Posts From Category: swiftUI

Programmatic routing in SwiftUI

Background

As I’m sure any iOS developer now knows, the future of iOS app development is SwiftUI. Apple’s new UI development language is now on its 2nd major release. While my own personal feeling is that the framework is not quite ready for prime time (much like when Swift first arrived. It’s missing some fairly key features) and we are perhaps a version or 2 away from it realistically being an option for being used to build a complete app. There is no denying that it is the future and when it works well, it makes building UI a lot easier.

If you are using an advanced iOS architecture VIPER, MVVM etc it is probably the case that you have abstracted your routing or creating of your view controllers away into a separate part of your architecture. When you need to navigate or deal with a deeplink for example, you will hopefully have something like a dependency injection framework or factory to create your view controller. This is than pushed onto the navigation stack or presented by the view controller depending on what you are trying to do.

This is something that is fairly straight forward in UIKit and makes a lot of sense. In this article we are going to discuss the workings of SwiftUI and how that approach is no longer possible.

Example

// 1
struct ContentView: View {
    var body: some View {
        NavigationView(content: {
            NavigationLink(destination: DetailView()) {
                Text("Navigate")
            }
        })
        
    } 
}

// 2
struct DetailView: View {
    var body: some View {
        Text("Detail View")
    }
}

This is a fairly simple SwiftUI example but let’s talk through it.

  1. First we have a ContentView, this contains a NavigationView which is kind of similar to a UINavigationController in UIKit, however it is a lot more limited. We have a navigation link that allows the user to tap the text view and will ‘push’ the detail view on to the stack.
  2. Second we have our detail view that simply displays some text.

If we run the code and tap on the links we should get something like this:
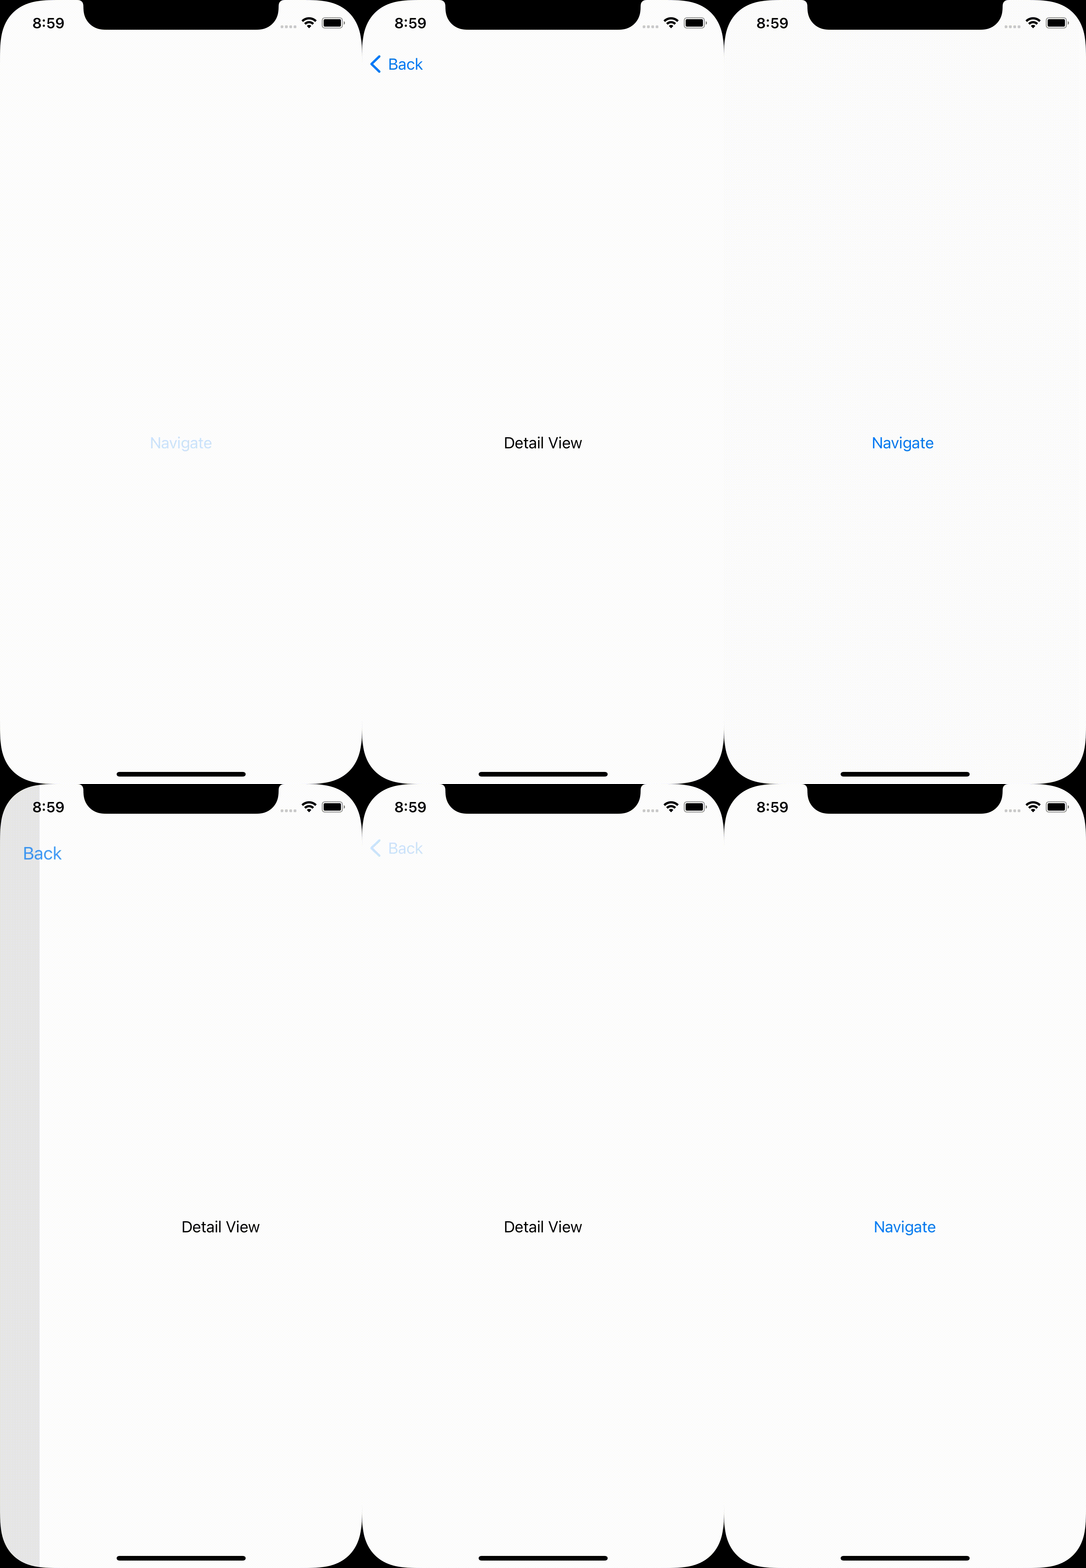
SwiftUI Navigation

Seems to work as intended right? What problems are there with this approach?

  1. There is a tight coupling between the ContentView and the DetailView, what if we want to change the navigation destination?
  2. What if we want to use the ContentView in a different app that doesn’t contain a DetailView but something else?
  3. What if the DetailView has dependencies we need to inject when it’s created? How does the ContentView know what to do in order to create the DetailView?
  4. What if we wish to perform an event such as fire an analytics event before moving to the next view?
  5. What if we wish to present the view in a modal rather than pushing it to the navigation stack?

Many of the more advanced architectures and frameworks have already solved these problems using a router / co-ordinator pattern. These are responsible for handling any navigation logic and often talk to a dependency injection module in order to create the destination view and pushing it onto the navigation stack or presenting it.

Decoupling the Views

The first thing we can try to do is abstract away the creation of the detail view. This will at least give us the opportunity to change the destination without the knowledge of the ContentView.

// 1
final class ContentPresenter: ObservableObject {
    func getDetailView() -> AnyView {
        return AnyView(DetailView())
    }
}

// 2
struct ContentView: View {
    @ObservedObject private var presenter: ContentPresenter
    
    init(presenter: ContentPresenter) {
        self.presenter = presenter
    }
    
    var body: some View {
        NavigationView(content: {
            NavigationLink(destination: presenter.getDetailView()) {
                Text("Navigate")
            }
        })
        
    }
}

struct DetailView: View {
    var body: some View {
        Text("Detail View")
    }
}

So let’s have a look at what we are doing here:

  1. First of all we have tried to separate out the creation of the destination view into another object. Ideally we could put this into a protocol but for the purpose of simplicity we have just used an object.
  2. We are injecting the presenter into the ContentView now, you will also notice in the NavigationLink we are now calling a method on the presenter to get the destination.

What does this give us that the previous example doesn’t?

  1. There is no longer tight coupling between the ContentView and the DetailView. The destination is no longer hardcoded. If we make the presenter using a protocol for example. We can inject different presenters and have different destinations.
  2. If the detailview has its own dependencies that need injecting then the presenter can take care of that as well without having to code them in here.

However it’s not all tea and biscuits! There are still a number of issues highlighted earlier that this solution doesn’t solve:

  1. We are still not able to trigger any analytics events or any other app behaviours off the back of the navigation trigger. Block the user from navigating until they have logged in for example.
  2. We can’t change or configure how the navigation happens, for example presenting a login vs actually performing navigation.
  3. We are also exposing navigation to the view, a presenter typically would not need to expose navigation functionality to the view. It would handle a tap event and then hand off that navigation logic to the router. Here we have to expose that functionality to the view itself.

Keep with UIKit for navigation, for now

My personal feeling is that navigation in SwiftUI could do with some more work. Views themselves should not know or care about where they are navigating to and how. They should be a visual representation of state. Of course, the navigation could be a presentation of state too, however a quick peak at the NavigationView docs shows no access to any form of state at all. The navigation view polices its own state, nothing outside of the object has a way to modify that state.

Further to that, many of the methods we have come to expect from UINavigationController are simply not available here. Whether it’s lack of maturity or a slightly confused approach I don’t know. My recommendation for now would be to make use of UINavigationControllers and the UIHostingController to perform navigation for the time being, at least until a better way to manage and manipulate the navigation state is added to SwiftUI.

Let’s have a quick look at how that changes things. First we need to create a hosting controller and inject our SwiftUI view:

let presenter = ContentPresenter()
let vc = UIHostingController(rootView: ContentView(presenter: presenter))
let navigationController = UINavigationController(rootViewController: vc)
presenter.navigationController = navigationController

So here we are creating our presenter and our view as before but adding them into a UIHostingViewController and a navigation controller. The UIHostingViewController allows us to put SwiftUI views into what is essentially a UIViewController and use it within a UIKit app.

We have also passed a reference to the navigation controller to the presenter. Let’s have a look at our updated SwiftUI code now that we have refactored it into a UIHostingController.

// 1
final class ContentPresenter: ObservableObject {
    weak var navigationController: UINavigationController?
    
    func buttonTapped() {
        // Do whatever we like
        // ...
        // Navigate
        let vc = UIHostingController(rootView: DetailView())
        navigationController?.pushViewController(vc, animated: true)
    }
}

// 2
struct ContentView: View {
    @ObservedObject private var presenter: ContentPresenter
    
    init(presenter: ContentPresenter) {
        self.presenter = presenter
    }
    
    var body: some View {
        Button(action: { presenter.buttonTapped() }) {
            Text("Navigate")
        }
    }
}

What’s changed here:

  1. First of all our presenter has replaced our getDetailView with a more generic button tapped function. This function can do any number of things we need it to do, before finally navigating. Here you can see we are using our reference to the navigation controller to push the new view controller.
  2. In our SwiftUI view you will see we no longer have a NavigationView or a NavigationLink. Our view has become far more generic and doesn’t contain and navigation specific logic. You will also see that we have a button which has a tap action assigned by the presenter. This allows us to make the button do anything, not just trigger navigation.

Hopefully you found this helpful when exploring navigation options in SwiftUI. You can find the SwiftUI Sample and the UIHostingController samples on github.

Read More

Using protocols, ObservableObject and @Published property wrappers in SwiftUI

Background

As I’m sure any iOS developer now knows, the future of iOS app development is SwiftUI. Apple’s new UI development language is now on it’s 2nd major release. While my own personal feeling is that the framework is not quite ready for prime time (much like when Swift first arrived. It’s missing some fairly key features) and we are perhaps a version or 2 away from it realistically being an option for being used to build a complete app. There is no denying that it is the future and when it works well, it makes building UI a lot easier.

As SwiftUI is the future, I’ve been investigating how teams might migrate their existing architectures across to the new technology. There a number of challenges presented by migrating to SwiftUI we will discuss below. As the title suggests we will be exploring how to use a presenter to control a SwiftUI view. It doesn’t matter which architecture you are using as such, whether it’s VIPER, MVVVM, VIP, MVP etc. As long as the logic and state of the view has been abstracted away from the view itself so it can be properly unit tested.

Example

List Item View

Let’s start by creating an example in SwiftUI. We will create a simple list view to display some news for example. Let’s create a simple list view first of all:

// 1
struct ListItemViewModel: Identifiable {
    let id: Int
    let title: String
    let subTitle: String?
    let image: String
}

// 2
struct ListItemView: View {
    let viewModel: ListItemViewModel
    
    var body: some View {
        HStack() {
            Image(viewModel.image)
            VStack(alignment: .leading) {
                Text(viewModel.title)
                    .font(.headline)
                viewModel.subTitle.map({
                    Text($0)
                        .font(.subheadline)
                })
            }
        }
    }
}

// 3
struct ListItemView_Previews: PreviewProvider {
    static var previews: some View {
        ListItemView(
            viewModel: ListItemViewModel(
                id: 1,
                title: "Test Title",
                subTitle: "Test Subtitle",
                image: "first"
            )
        )
    }
}

This is quite a straight forward view, but let’s step through it.

  1. First of all we define our model for the view. We have an id so that we can conform to Identifiable. This allows SwiftUI to uniquely identify each model in the view and helps with performing things like animation and reordering. We also have a title, optional subTitle and an image string. Hopefully nothing here is too scary.
  2. Now we define the view inself. Views in SwiftUI are simple structs that conform to the View protocol, rather than subclasses of UIView like they used to be in UIKit. Its a simple Hstack with an image view then 2 labels stacked on top of each other. See the screen grab below.
  3. Finally we have the preview code to inject an example model to use in the preview.

SwiftUI ListItemView

List View

Now that we have the items in our list, lets create a simple list view that displays those items.

// 1
struct ContentView: View {
    let listItems: [ListItemViewModel]
 
    var body: some View {
        List(listItems) { item in
            ListItemView(viewModel: item)
        }
    }
}

// 2
struct ContentView_Previews: PreviewProvider {
    static var previews: some View {
        let items = [ListItemViewModel(id: 1, title: "test", subTitle: "test sub", image: "first"),
                    ListItemViewModel(id: 2, title: "test2", subTitle: "test sub1", image: "first"),
                    ListItemViewModel(id: 3, title: "test3", subTitle: "test sub2", image: "first"),
                    ListItemViewModel(id: 4, title: "test4", subTitle: "test sub3", image: "first"),
                    ListItemViewModel(id: 5, title: "test5", subTitle: "test sub4", image: "first")]
        
        ContentView(listItems: items)
    }
}

Ok so what do we have here:

  1. A simple ContentView who has an array of list item view models and a body. The body lists out the content of our list using the ListItemView we created earlier. Simple
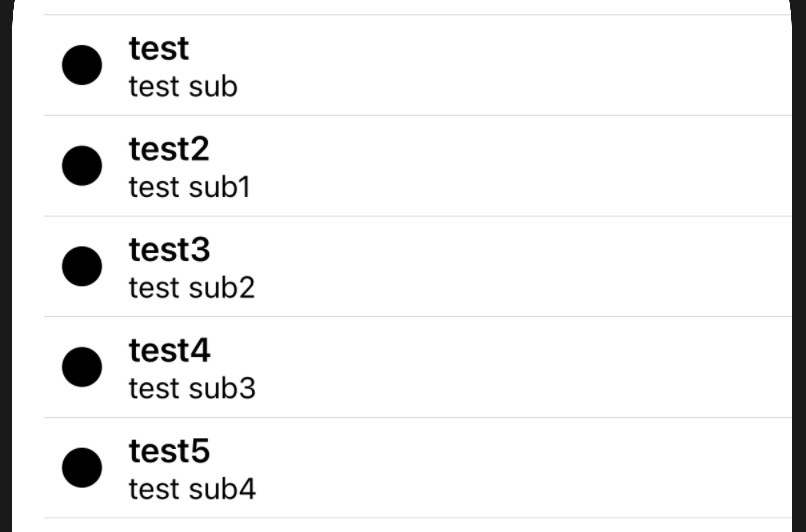
  2. Here we have some test data to show that our list is working. If we preview this view we will see something like this:

SwiftUI ListView

That’s wonderful, however it is not particularly dynamic. This is where a presenter or view model would come in. If we look at the description of MVP or MVVM we will see they have a similar role:

The presenter acts upon the model and the view. It retrieves data from repositories (the model), and formats it for display in the view.

There are further abstractions layers (such as interactors and use cases). However we are less concerned with them in this discussion and more on the relationship between the view and the presenter who is holding the state and logic of the view.

Abstracting the state

So at the moment we have a pretty stateless SwiftUI view that simply displays a hardcoded list. Now let’s attempt to abstract the list items away into another object that is injected into the view. This object would be responsible for fetching our items and loading them for the view.

This is where an ObservableObject comes in.

When your type conforms to ObservableObject, you are creating a new source of truth and teaching SwiftUI how to react to changes. In other words, you are defining the data that a view needs to render its UI and perform its logic. SwiftUI uses this dependency to automatically keep your view consistent and show the correct representation of your data. We like to think of ObservableObject as your data dependency surface. This is the part of your model that exposes data to your view, but it’s not necessarily the full model.

So lets update our example to move our list of items into a separate class that conforms to this protocol.

final class ListPresenter: ObservableObject {
    @Published var listItems: [ListItemViewModel] = []
}


struct ContentView: View {
    @ObservedObject private var presenter: ListPresenter
    
    init(presenter: ListPresenter) {
        self.presenter = presenter
    }
 
    var body: some View {
        List(presenter.listItems) { item in
            ListItemView(viewModel: item)
        }
    }
}

The @Published property wrapper here works with the ObservableObject to notify SwiftUI whenever the value changes in order to trigger an update.

We also see the @ObservedObject property wrapper. This causes this view to subscribe to the ObservableObject that’s assigned to it, and invalidates the view any time the object updates.

This is great and allows us to inject an object from outside of the view who can manage the fetching and supplying to the view, whenever the listItems var updates, the view will automatically update!

De-coupling dependencies

Now there is one problem here, can you see it? This view has a dependency between the view itself and the presenter class. Now if you are following the SOLID principles for example, and like to separate dependencies between your classes and layers we will need to remove the dependency between the view and presenter.

To do this lets change the ListPresenter class to be a protocol instead:

final class ListPresenterImp: ListPresenter {
    @Published var listItems: [ListItemViewModel] = []
}

protocol ListPresenter: ObservableObject {
    @Published var listItems: [ListItemViewModel] { get }
}

struct ContentView: View {
    @ObservedObject private var presenter: ListPresenter
    
    init(presenter: ListPresenter) {
        self.presenter = presenter
    }
 
    var body: some View {
        List(presenter.listItems) { item in
            ListItemView(viewModel: item)
        }
    }
}

This looks like it should be a straight forward change… Wrong! You will now start seeing errors galore. The primary cause coming from the decleration of our new protocol:

Property ‘listItems’ declared inside a protocol cannot have a wrapper

The problem here being exactly as the error states. We cannot use property wrappers inside protocols! That is going to cause a bit of a problem as we now can’t make use of the nice integration with SwiftUI via @Published properties, or so it seems…

Let’s take a step back for a moment, what exactly does the @Published property wrapper actually do? The @Published property wrapper essentially provides a publisher that the SwiftUI system can subscribe to in order to listen to updates to the value. This is in fact an implementation detail. One of the key points of protocol oriented programming is to abstract the implementation of functions are variables away from the dependency so that it is unaware of the inner workings. By trying to apply a property wrapper to the protocol we are trying to enforce how that variable should implemented under the hood. When infact should the implementing class of our protocol wish to, they could create their own custom implementation of the wrapper.

Fixing the errors

Ok so let’s start by removing the @Published property wrapper from our protocol:

final class ListPresenterImp: ListPresenter {
    @Published var listItems: [ListItemViewModel] = []
}

protocol ListPresenter: ObservableObject {
    var listItems: [ListItemViewModel] { get }
}

struct ContentView: View {
    @ObservedObject private var presenter: ListPresenter
    
    init(presenter: ListPresenter) {
        self.presenter = presenter
    }
 
    var body: some View {
        List(presenter.listItems) { item in
            ListItemView(viewModel: item)
        }
    }
}

Great! However there are now a bunch of different errors occuring… The key one that we need to pay attention to is this one:

Protocol ‘ListPresenter’ can only be used as a generic constraint because it has Self or associated type requirements

Right, so we have solved the riddle of @Published but this has now surfaced another problem. In order for our ListPresenter protocol to be compatible with the ObervedObject property wrapper in the view, it must extend ObservableObject. Now the problem here is that the ObservableObject uses an associatedtype. Which means if we wish to use it or hold a reference to it we must do type erasure (for more info read my previous post on type erasure) or use a generic constraint.

The simplest solution is for us to use a generic constraint on the view. View the code below:

final class ListPresenterImp: ListPresenter {
    @Published var listItems: [ListItemViewModel] = []
}

protocol ListPresenter: ObservableObject {
    var listItems: [ListItemViewModel] { get }
}

struct ContentView<T>: View where T: ListPresenter {
    @ObservedObject private var presenter: T
    
    init(presenter: T) {
        self.presenter = presenter
    }
 
    var body: some View {
        List(presenter.listItems) { item in
            ListItemView(viewModel: item)
        }
    }
}

So what has changed here. You will now notice that we have added a generic type T to our view. We have also added a generic constraint when implementing the View protocol which signals that the init and body implementations here are only when type T is a ListPresenter. Now in this instance that works fine as we only intend to use this view with our ListPresenter class. This removes the errors and the code now compiles. Let’s update the code and run a little test to make sure we are still getting all the reactive goodness of SwiftUI.

final class ListPresenterImp: ListPresenter {
    @Published var listItems: [ListItemViewModel] = []
    
    init() {
        Timer.scheduledTimer(withTimeInterval: 5.0, repeats: false) { (timer) in
            let items = [ListItemViewModel(id: 1, title: "test", subTitle: "test sub", image: "first"),
                        ListItemViewModel(id: 2, title: "test2", subTitle: "test sub1", image: "first")]
            
            self.listItems = items
        }
    }
}

protocol ListPresenter: ObservableObject {
    var listItems: [ListItemViewModel] { get }
}

struct ContentView<T>: View where T: ListPresenter {
    @ObservedObject private var presenter: T
    
    init(presenter: T) {
        self.presenter = presenter
    }
 
    var body: some View {
        List(presenter.listItems) { item in
            ListItemView(viewModel: item)
        }
    }
}

We have updated our list presenter implementation class to update our list items after 5 seconds. Nice and easy. If we initialise our view with a presenter with 5 items as below, then after 5 seconds our list should reduce to the 2 items as set in the timer.

let items = [ListItemViewModel(id: 1, title: "test", subTitle: "test sub", image: "first"),
                    ListItemViewModel(id: 2, title: "test2", subTitle: "test sub1", image: "first"),
                    ListItemViewModel(id: 3, title: "test3", subTitle: "test sub2", image: "first"),
                    ListItemViewModel(id: 4, title: "test4", subTitle: "test sub3", image: "first"),
                    ListItemViewModel(id: 5, title: "test5", subTitle: "test sub4", image: "first")]
        
let presenter = ListPresenterImp()
presenter.listItems = items
let contentView = ContentView(presenter: presenter)

Now let’s run this as part of an app and see what happens:

Presenter Demo

So as you can see, after 5 seconds the list of items is reduced after 5 seconds to 2 items, proving that our implementation works and we are still able to hook into the nice secret sauce that combine and swiftUI expose to us to allow us to update our views. I’ve seen some rather crazy implementations and workarounds on Stack Overflow. Hopefully this implementation is a little nicer!

Download the sample project to run it for yourself (Xcode 12.4)

Read More