Posts Tagged - swift

SOLID Principles in Swift - Dependency Inversion Principle

Background

In this series of posts we are going to be covering the SOLID principles of software development. These are a set of principles / guidelines, that when followed when developing a software system, make it more likely that the system will be easier to extend and maintain over time. Let’s take a look at the problems that they seek to solve:

  • Fragility: A change may break unexpected parts, it is very difficult to detect if you don’t have a good test coverage
  • Immobility: A component is difficult to reuse in another project or in multiple places of the same project because it has too many coupled dependencies
  • Rigidity: A change requires a lot of effort because it affects several parts of the project

So what are the SOLID principles?

  • Single Responsibility Principle - A class should have only a single responsibility / have only one reason to change
  • Open-Closed Principle - Software should be open for extension but closed for modification
  • Liskov Substitution Principle - Objects in a program should be replaceable with instances of their sub types without altering the correctness of the program
  • Interface Segregation Principle - Many client-specific interfaces are better than one general-purpose interface
  • Dependency Inversion Principle - High level modules should not depend on low level modules. Both should depend on abstractions

In this article we will focus on the Dependency Inversion Principle.

What does it mean?

This principle has 2 main components described below:

High-level modules should not import anything from low-level modules. Both should depend on abstractions (e.g., interfaces) Abstractions should not depend on details. Details (concrete implementations) should depend on abstractions

I’ve interviewed many iOS developers over the years and I struggle to recall a single person who has actually got this part of the SOLID principles 100% right. I think a large part of this comes from the fact many use simple architectures such as MVVM that don’t break applications down into smaller layers and components/modules. This isn’t a criticism, not every app needs a VIPER/Clean architecture approach with multiple layers.

Most iOS developers I speak to come to the conclusion that this principle just means using protocols instead of concrete classes and injecting dependencies to help with testing/mocking. While this principle does rely on this to work it is not the primary purpose of the principle and exposes an issue once you start to depend on abstractions used across multiple layers / modules.

Setup

Lets setup a simple example in Xcode where we have two separate modules that depend on each other in order to provide some functionality.

If we create a simple Swift UI project using Xcode, then using File -> New -> Package create 2 new swift packages and add them to the project. One called LibraryA and one called LibraryB. Be sure to select your project in the ‘Add to’ drop down when naming your libraries. You should have something that looks like below Xcode.
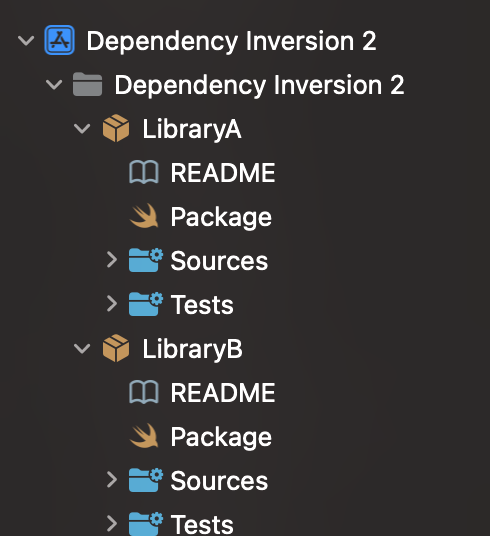
Swift Packages Setup

Let’s start by adding a protocol and some custom data structure that we are going to be using across the 2 libraries we are working. Add a file called Protocol.swift in LibraryA and add the following code below:

import Foundation

public protocol MyProtocol {
    func doSomething(data: MyData)
}

public struct MyData {
    public let title: String
    public let subTitle: String
}

We have a simple one function protocol and a small struct, this is what we will be using to separate dependencies between our 2 libraries.

Next, lets create an implementation in LibraryA that has these protocols as a dependency. Create a file in LibraryA with the name ImplementationA:

import Foundation

public class ImplementationA {
    private let something: MyProtocol
    
    public init(something: MyProtocol) {
        self.something = something
    }
}

This is just a simple class that has the MyProtocol protocol has a dependency. Simple enough so far!

Now let’s create a class in LibraryB that implements the protocol that is being used in our class in LibraryA. Create a class in LibraryB called ImplementationB:

import Foundation
import LibraryA

public class ImplementationB: MyProtocol {
    public init() {}
    
    public func doSomething(data: LibraryA.MyData) {
        print("Do something")
    }
}

We have our class in LibraryB that is implementing the protocol we previously created in LibraryA. For this reason you will notice that we have to import LibraryA in this class as well. There is one additional step we need to do before this will compile correctly, we need to define our dependency in our package file. Let’s open the LibraryB package file and edit it to add the dependency between the 2 packages:

import PackageDescription

let package = Package(
    name: "LibraryB",
    products: [
        .library(
            name: "LibraryB",
            targets: ["LibraryB"]),
    ],
    // Assign LibraryA as dependency
    dependencies: [
        .package(path: "../LibraryA")
    ],
    targets: [
        .target(
            name: "LibraryB",
            // Add dependency to target
            dependencies: ["LibraryA"]),
        .testTarget(
            name: "LibraryBTests",
            dependencies: ["LibraryB"]),
    ]
)

We won’t go into all the options you need in the swift package file but hopefully by reading this you can see we have defined a dependency and added it to our LibraryB target. If you attempt to build the project it should compile successfully.

Now let’s look at the structure of these 2 libraries and their relationship to each other.
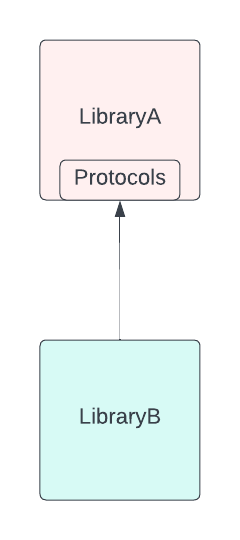
LibraryB to LibraryA Dependency

As you can see, we have LibraryA, this contains the protocols and LibraryB that implements the protocols. In order for LibraryB to implement the protocols it needs a dependency to LibraryA in order to work.

Problem 1

Now what happens if we want to use the protocols in another Library? Let’s call this LibraryC? At moment the protocols are contained in LibraryA where they are being used and implemented by Library B.

  • We can’t use the protocols in another library without adding LibraryA which may contain code and other assets we don’t want.
  • We could copy the protocols to LibraryC, however if you needed LibraryA and LibraryC in the same project you would get class clashes.
  • We would need to edit LibraryB to add another dependency in this case. What happens if we are not the owners of LibraryB? How would we even do this?

One solution we can try is moving the protocols from LibraryA to LibraryB. This reverses the dependencies and helps to solve the problems highlighted above. Let’s go ahead and do this now.

  • Copy the Protocols.swift file we created from LibraryA to LibraryB
  • Remove the import of LibraryA from the implementationB.swift
import Foundation

public class ImplementationB: MyProtocol {
    public init() {}
    
    public func doSomething(data: MyData) {
        print("Do something")
    }
}
  • Add an import of LibraryB to the top of implementationA.swift
import Foundation
import LibraryB

public class ImplementationA {
    private let something: MyProtocol
    
    public init(something: MyProtocol) {
        self.something = something
    }
}
  • Update the LibraryB package file to remove the LibraryA dependency
import PackageDescription

let package = Package(
    name: "LibraryB",
    products: [
        .library(
            name: "LibraryB",
            targets: ["LibraryB"]),
    ],
    // Assign LibraryA as dependency
    dependencies: [],
    targets: [
        .target(
            name: "LibraryB",
            // Add dependency to target
            dependencies: []),
        .testTarget(
            name: "LibraryBTests",
            dependencies: ["LibraryB"]),
    ]
)
  • Update the LibraryA package file to add the LibraryB dependency
import PackageDescription

let package = Package(
    name: "LibraryA",
    products: [
        // Products define the executables and libraries a package produces, and make them visible to other packages.
        .library(
            name: "LibraryA",
            targets: ["LibraryA"]),
    ],
    dependencies: [
        // Dependencies declare other packages that this package depends on.
        .package(path: "../LibraryB")
    ],
    targets: [
        // Targets are the basic building blocks of a package. A target can define a module or a test suite.
        // Targets can depend on other targets in this package, and on products in packages this package depends on.
        .target(
            name: "LibraryA",
            dependencies: ["LibraryB"]),
        .testTarget(
            name: "LibraryATests",
            dependencies: ["LibraryA"]),
    ]
)

Now let’s see a diagram of what we have done. Now if we look at our 2 libraries at a high level the dependencies look like this.
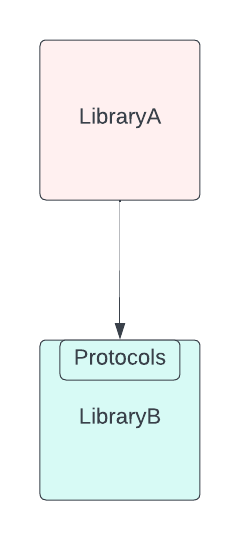
LibraryA to LibraryB Dependency

So now, our LibraryA has a dependency on LibraryB. LibraryA is using the protocols that are defined AND implemented in LibraryB! Problem solved… right… Not entirely.

If we review the problems we discussed earlier, if LibraryC wanted to make use of the protocols and implementation in LibraryB that is now possible as LibraryB has no knowledge of LibraryA or LibraryC. However this creates a new problem…

Problem 2

What if LibraryA and LibraryC want to use different implementations of the protocols from each other? What if we introduced LibraryD that wanted to implement the protocols and be used by another library such as LibraryC? In order to facilitate this we would need to create a dependency between LibraryD and LibraryB. What problems does this create?

We are introducing a dependency to a library we don’t need, in order to implement the protocols within it. In our example there isn’t much in LibraryB but imagine LibraryB had lots of other code and its own dependencies? Now we are including all of those in our project in order to have access to the protocols.
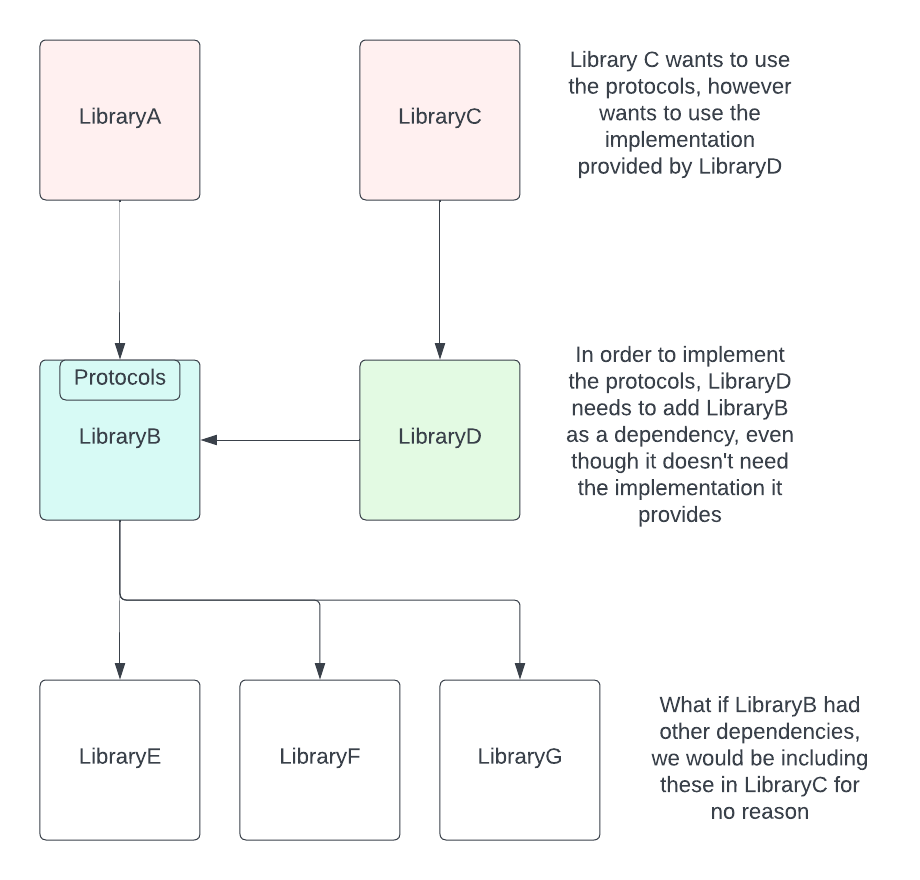
LibraryA to LibraryB Dependency Problems

Solution

This is where Dependency Inversion comes in. What we need to do is create a separate library for the protocols and any data that passes through them. Then, we make the dependencies between our different libraries to that one, thus removing the dependencies between our different layers. Let’s do that now.

  • Create a new package and add it to your project, naming it Protocols. Now move the Protocols.swift file that we created earlier into the Protocols package. Your Xcode project file explorer should look like below:
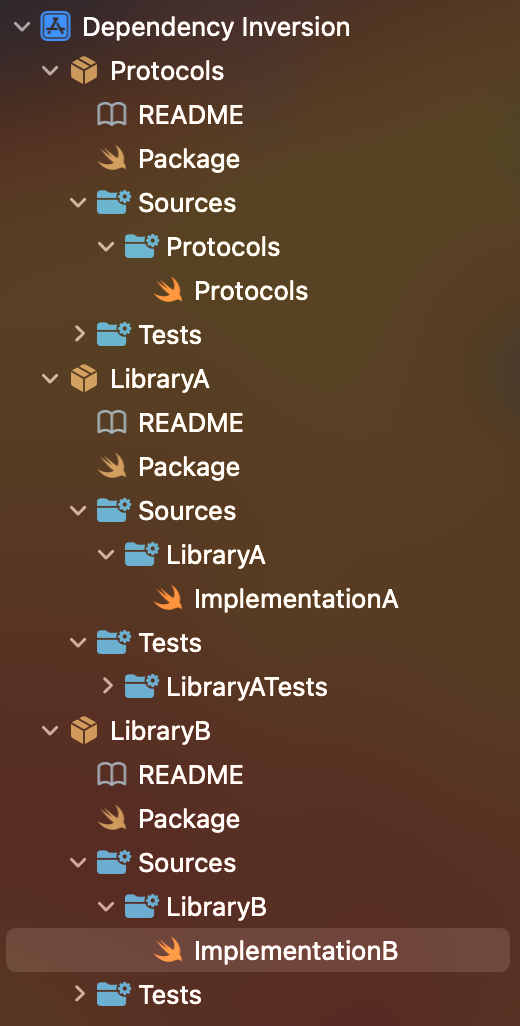
Protocols in own package

  • Now lets edit the dependencies of our packages so that both LibraryA and LibraryB depend on protocols. Your package files for LibraryA and B should now look like the below:
import PackageDescription

let package = Package(
    name: "LibraryA",
    products: [
        // Products define the executables and libraries a package produces, and make them visible to other packages.
        .library(
            name: "LibraryA",
            targets: ["LibraryA"]),
    ],
    dependencies: [
        // Dependencies declare other packages that this package depends on.
        .package(path: "../Protocols")
    ],
    targets: [
        // Targets are the basic building blocks of a package. A target can define a module or a test suite.
        // Targets can depend on other targets in this package, and on products in packages this package depends on.
        .target(
            name: "LibraryA",
            dependencies: ["Protocols"]),
        .testTarget(
            name: "LibraryATests",
            dependencies: ["LibraryA"]),
    ]
)
import PackageDescription

let package = Package(
    name: "LibraryB",
    products: [
        // Products define the executables and libraries a package produces, and make them visible to other packages.
        .library(
            name: "LibraryB",
            targets: ["LibraryB"]),
    ],
    dependencies: [
        // Dependencies declare other packages that this package depends on.
        .package(path: "../Protocols")
    ],
    targets: [
        // Targets are the basic building blocks of a package. A target can define a module or a test suite.
        // Targets can depend on other targets in this package, and on products in packages this package depends on.
        .target(
            name: "LibraryB",
            dependencies: ["Protocols"]),
        .testTarget(
            name: "LibraryBTests",
            dependencies: ["LibraryB"]),
    ]
)
  • Now update the imports of your implementation files so that they import Protocols instead. Your implementation files should look like the below:
import Foundation
import Protocols

public class ImplementationA {
    private let something: MyProtocol
    
    public init(something: MyProtocol) {
        self.something = something
    }
}
import Foundation
import Protocols

public class ImplementationB: MyProtocol {
    public init() {}
    
    public func doSomething(data: MyData) {
        print("Do something")
    }
}

Let’s have a look at what we have done here. We have moved the dependencies between the layers into a separate package and are now pointing both sides at that rather than one way or the other. Let’s update our diagram to show how this helps us.
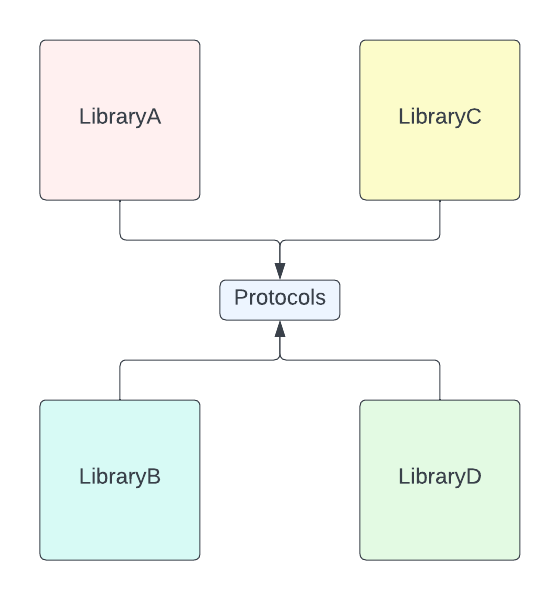
Dependency Inversion

Now if we want to use LibraryA, B, C, or D it does not matter in our dependency graph. They all point to the protocols and data and can be used interchangeably without the need to modify the libraries, so they depend on each other. We also avoid importing any unnecessary classes that we don’t need in order to satisfy the dependencies.

This is what dependency inversion is. It’s separating protocols and data dependencies from the dependencies themselves and putting them into their own package. This way you completely separate the layers from each other, and they can be used together without any knowledge of each other. Awesome!

Read More

SOLID Principles in Swift - Interface Segragation Principle

Background

In this series of posts we are going to be covering the SOLID principles of software development. These are a set of principles / guidelines, that when followed when developing a software system, make it more likely that the system will be easier to extend and maintain over time. Let’s take a look at the problems that they seek to solve:

  • Fragility: A change may break unexpected parts, it is very difficult to detect if you don’t have a good test coverage
  • Immobility: A component is difficult to reuse in another project or in multiple places of the same project because it has too many coupled dependencies
  • Rigidity: A change requires a lot of effort because it affects several parts of the project

So what are the SOLID principles?

  • Single Responsibility Principle - A class should have only a single responsibility / have only one reason to change
  • Open-Closed Principle - Software should be open for extension but closed for modification
  • Liskov Substitution Principle - Objects in a program should be replaceable with instances of their sub types without altering the correctness of the program
  • Interface Segregation Principle - Many client-specific interfaces are better than one general-purpose interface
  • Dependency Inversion Principle - High level modules should not depend on low level modules. Both should depend on abstractions

In this article we will focus on the Interface Segregation Principle.

What does it mean?

The summary of the principle is as follows:

Many client-specific interfaces are better than one general-purpose interface

In Swift, we use Protocols rather than interfaces in languages such as Java so from here on out we will refer to interfaces as Protocols.

Now the purpose of this rule is quite straight forward in comparison to some of the other rules in the SOLID principles. What it means is its better to create smaller Protocols than to create one large one with lots of methods defined.

What’s the problem

So why does having one large protocol cause a problem? Let’s examine one of the classic Cocoa Touch protocols to see why this is an issue.

public protocol UITableViewDataSource : NSObjectProtocol {

    // 1
    func tableView(_ tableView: UITableView, numberOfRowsInSection section: Int) -> Int
    func tableView(_ tableView: UITableView, cellForRowAt indexPath: IndexPath) -> UITableViewCell

    // 2
    optional func numberOfSections(in tableView: UITableView) -> Int
    optional func tableView(_ tableView: UITableView, titleForHeaderInSection section: Int) -> String? 
    optional func tableView(_ tableView: UITableView, titleForFooterInSection section: Int) -> String?
    optional func tableView(_ tableView: UITableView, canEditRowAt indexPath: IndexPath) -> Bool
    optional func tableView(_ tableView: UITableView, canMoveRowAt indexPath: IndexPath) -> Bool
    optional func sectionIndexTitles(for tableView: UITableView) -> [String]?
    optional func tableView(_ tableView: UITableView, sectionForSectionIndexTitle title: String, at index: Int) -> Int
    optional func tableView(_ tableView: UITableView, commit editingStyle: UITableViewCell.EditingStyle, forRowAt indexPath: IndexPath)
    optional func tableView(_ tableView: UITableView, moveRowAt sourceIndexPath: IndexPath, to destinationIndexPath: IndexPath)
}

I am sure many of you have implemented this protocol at some point in your past ;) I have modified the source slightly to make it easier to read and get the point across So why are we looking at this?

  1. Only 2 methods you have to implement on the first 2.
  2. The rest of the methods are optional and you can implement whichever ones you feel you want to use.

Now this protocol has its roots in Objective C helps it masks the problem somewhat. In Objective C as you can see in the code above its possible to mark certain functions as optional. This means you can implement them if you want to but don’t have to, this allows this protocol declaration to contain too many methods without causing problems for the implementing class.

In Swift, it is not possible to mark functions as optional, all functions need to be implemented. Let’s update the above protocol to be more Swifty and see what problems that might cause us.

protocol MyUITableViewDataSource {

    func tableView(_ tableView: UITableView, numberOfRowsInSection section: Int) -> Int
    func tableView(_ tableView: UITableView, cellForRowAt indexPath: IndexPath) -> UITableViewCell

    func numberOfSections(in tableView: UITableView) -> Int
    func tableView(_ tableView: UITableView, titleForHeaderInSection section: Int) -> String? 
    func tableView(_ tableView: UITableView, titleForFooterInSection section: Int) -> String?
    func tableView(_ tableView: UITableView, canEditRowAt indexPath: IndexPath) -> Bool
    func tableView(_ tableView: UITableView, canMoveRowAt indexPath: IndexPath) -> Bool
    func sectionIndexTitles(for tableView: UITableView) -> [String]?
    func tableView(_ tableView: UITableView, sectionForSectionIndexTitle title: String, at index: Int) -> Int
    func tableView(_ tableView: UITableView, commit editingStyle: UITableViewCell.EditingStyle, forRowAt indexPath: IndexPath)
    func tableView(_ tableView: UITableView, moveRowAt sourceIndexPath: IndexPath, to destinationIndexPath: IndexPath)
}

Now that we have converted our protocol to be more swifty, what problem will this cause when we attempt to make a class conform to this protocol? Let’s have a look at an example.

class MyTableViewDatasource: MyUITableViewDataSource {
    func tableView(_ tableView: UITableView, numberOfRowsInSection section: Int) -> Int {}
    func tableView(_ tableView: UITableView, cellForRowAt indexPath: IndexPath) -> UITableViewCell {}
    func numberOfSections(in tableView: UITableView) -> Int {}
    func tableView(_ tableView: UITableView, titleForHeaderInSection section: Int) -> String? {}
    func tableView(_ tableView: UITableView, titleForFooterInSection section: Int) -> String? {}
    func tableView(_ tableView: UITableView, canEditRowAt indexPath: IndexPath) -> Bool {}
    func tableView(_ tableView: UITableView, canMoveRowAt indexPath: IndexPath) -> Bool {}
    func sectionIndexTitles(for tableView: UITableView) -> [String]? {}
    func tableView(_ tableView: UITableView, sectionForSectionIndexTitle title: String, at index: Int) -> Int {}
    func tableView(_ tableView: UITableView, commit editingStyle: UITableViewCell.EditingStyle, forRowAt indexPath: IndexPath) {}
    func tableView(_ tableView: UITableView, moveRowAt sourceIndexPath: IndexPath, to destinationIndexPath: IndexPath) {}
}

Our class above now has to implement every single protocol method. Even if we don’t intend to use it. In the objective c implementation of the protocol we have the option of implementing only the ones we need whereas now we must implement every single method. Imagine all the view controllers in the world that would be full of empty methods in order to conform to this protocol!

This protocol breaks the interface segregation principle.

A better solution

To improve the solution we could break the one big interface down into smaller protocols. That way we could conform to only the protocols we were interested in implementing for our functionality. This may looks something like:

  1. UITableViewDataSource - For the 2 compulsory methods we are familier with
  2. UITableViewSectionsDatasource - For methods relating to multi section methods
  3. UITableViewSectionTitles - For methods relating to headers and footers in sections
  4. UITableViewEditable - For methods relating to editing and moving cells

This way we could conform to select methods we want, rather than one big interface where we may only want a small subset of the methods.

A good example

A good example of interface segregation in the iOS SDK is Codable. The definition of Codable is as below:

typealias Codable = Decodable & Encodable

Basically Codable is just the combination of 2 other protocols: Decodable and Encodable. This is a great example of how to do the interface segregation. If you are building say a JSON parse struct, you may wish to only conform to Decodable so you can decode the JSON. If in the future you wanted to serialize the struct for something like say data storage you can conform to Encoding later if needed.

Summary

The interface segregation principle is the easiest of the principles to understand in my opinion. In basic terms it means don’t create a big protocol with lots of methods that aren’t always required to be implemented depending on the implementation requirements.

Instead, separate the protocol into smaller protocols with only the methods required for a single piece of functionality to work. Not only does this avoids having lots of redundant methods it also helps to facilitate the single responsibility principle by allowing functionality to be broken down into different classes. For example, you could have different classes to handle different activities rather than one big class with all functionality in.

Read More

SOLID Principles in Swift - Liskov Substitution Principle

Background

In this series of posts we are going to be covering the SOLID principles of software development. These are a set of principles / guidelines, that when followed when developing a software system, make it more likely that the system will be easier to extend and maintain over time. Let’s take a look at the problems that they seek to solve:

  • Fragility: A change may break unexpected parts, it is very difficult to detect if you don’t have a good test coverage
  • Immobility: A component is difficult to reuse in another project or in multiple places of the same project because it has too many coupled dependencies
  • Rigidity: A change requires a lot of effort because it affects several parts of the project

So what are the SOLID principles?

  • Single Responsibility Principle - A class should have only a single responsibility / have only one reason to change
  • Open-Closed Principle - Software should be open for extension but closed for modification
  • Liskov Substitution Principle - Objects in a program should be replaceable with instances of their sub types without altering the correctness of the program
  • Interface Segregation Principle - Many client-specific interfaces are better than one general-purpose interface
  • Dependency Inversion Principle - High level modules should not depend on low level modules. Both should depend on abstractions

In this article we will focus on the Liskov Substitution Principle.

What does it mean?

So the Liskov Substitution Principle states:

Derived classes must be substitutable for their base classes

What exactly does this mean? In a basic sense it for example if you have a function that accepts a type of class which is a parent of other classes, any class that subclasses the parent class should be able to be passed in without it breaking the program.

See a summary of the main points of the principle below:

  1. Contra variance of method parameter types in the sub type.
  2. Covariance of method return types in the sub type.
  3. New exceptions cannot be thrown by the methods in the sub type, except if they are sub types of exceptions thrown by the methods of the super type.
  4. Don’t implement stricter validation rules on input parameters than those implemented by the parent class.
  5. Apply at the least the same rules to all output parameters as applied by the parent class.

Let’s take a look at what these different rules mean for subclasses.

The Parent Class

First of all, let’s define our parent class or base class that contains some functionality. Let’s use a vehicle class as an example, this vehicle has a throttle which can be set at any value between 0 and 100.

// 1
enum VehicleError: Error {
    case outOfBounds
}

// 2
class Vehicle {
    private var throttle: Int = 0
    
    // 3
    func setThrottle(throttle: Int) throws {
        guard (0...100).contains(throttle) else {
            throw VehicleError.outOfBounds
        }
        self.throttle = throttle
    }
}

Let’s step through it:

  1. First of all we define a custom error to throw if the throttle is not within bounds
  2. Here we define our vehicle class that has a throttle variable to store the value being set
  3. We have a function to set the throttle value, there is a guard statement to check whether the value being set is in the appropriate range. If it is not, we throw an error, if it is we set the value

Validation rules on input parameters

Now let’s create a subclass that breaks the principle. We will make a lorry class that inherits from the super class but adds its own restrictions to the throttle function, only allowing the throttle to be set between 0 and 60 for example.

class Lorry: Vehicle {
    override func setThrottle(throttle: Int) throws {
        guard (0...60).contains(throttle) else {
            throw VehicleError.outOfBounds
        }
        
        try super.setThrottle(throttle: throttle)
    }
}

So what is happening here? We have subclassed the Vehicle class and overriden the setThrottle method. Now what we have done here is we have added a guard statement to check if the throttle is between 0 and 60. We throw an error saying out of bounds if outside of that, if it is within bounds we call the super class method.

Why is this a problem? Well imagine we are building a system / class that interacts with the Vehicle class. Now based on the Vehicle class you would expect to be able to set the throttle to anything between 0 and a 100. However now, if someone chooses to pass a Lorry subclass to your system / class, you will not be able to set the throttle above 60. Depending on how this other class or system is built this may have unintended side effects as you can’t set the values that you are expecting without getting an error.

This example breaks the rule:

Don’t implement stricter validation rules on input parameters than those implemented by the parent class.

Errors in the liskov principle

Let’s modify our example to see how we could break the principle by throwing different errors. Let’s modify the Lorry subclass:

enum LorryError: Error {
	case outOfBounds
}

class Lorry: Vehicle {
    override func setThrottle(throttle: Int) throws {
        guard (0...60).contains(throttle) else {
            throw LorryError.outOfBounds
        }
        
        try super.setThrottle(throttle: throttle)
    }
}

So what is happening here:

  • We have added a new Error type called LorryError
  • When we have our bounds exception we are throwing this new error type instead of the one provided by the super class

Why does that cause a problem? To find out let’s take a look at the error handling code:

// 1
let vehicle: Vehicle = Vehicle()

do {
	// 2
    try vehicle.setThrottle(throttle: 110)
} catch VehicleError.outOfBounds {
	// 3
    print("System shutdown")
} catch {
	// 4
    print("Show generic error")
}

Let’s step through this code:

  1. We are creating a Vehicle super class object.
  2. We are calling our function with a value considered out of bounds
  3. We catch the outOfBounds exception and print a system shutdown message
  4. We have a generic catch for other errors where we show a generic error message

Now if we run this code we see the below message in the console as expected:

System shutdown

So what happens if we replace our Lorry subclass with its new error and put it in place of the Vehicle super class? If we change line one to read:

let vehicle: Vehicle = Lorry()

If we run the code above we will now see a different error:

Show generic error

The error handling code is not aware of subclass specific errors so is no longer able to handle them accordingly. Imagine a mission critical system that needs to shut down if an out of bounds happens, in this case the error would be missed as it would require the error handling class to have knowledge of all possible sub types in order to handle all the errors appropriate. Defeating the point of using the super class and thus breaking the principle:

New exceptions cannot be thrown by the methods in the sub type, except if they are sub types of exceptions thrown by the methods of the super type.

Contra variance and Covariance of parameters and return types

In the list of rules you may recall seeing two items talking about contra variance and covariance of parameters and return types. What does that mean exactly?

  1. Contra variance of method parameter types in the sub type.
  2. Covariance of method return types in the sub type.

Contra variance of method parameter types in the sub type

Contra variance means that we can use change the type of method parameter to a super class of the type but not a subclass. This rules works basically in combination with the rule below:

Don’t implement stricter validation rules on input parameters than those implemented by the parent class.

What it means is, we can use a super class of a parameter, thus ‘weakening’ the restrictions of the method, but not a subclass of that type which would tighten the restrictions of the method.

Covariance of method return types in the sub type

Covariance means that the type being used can be a sub type of the class provided by the super class function return type. Similarly, this works in the same way as the 5th rule:

Apply at the least the same rules to all output parameters as applied by the parent class.

Now both of these rules aren’t possible to be broken as part of Swift. It’s not possible to overload functions providing alternative type specifications, at least while still referring to the super class type. We can override methods and provide different parameter types and return types but this requires the calling class to know the type of the subclass. When referring to the super class, the super class implementation is always called regardless of subclass functions with different params.

Read More

SOLID Principles in Swift - Open / Closed Principle

Background

In this series of posts we are going to be covering the SOLID principles of software development. These are a set of principles / guidelines, that when followed when developing a software system, make it more likely that the system will be easier to extend and maintain over time. Let’s take a look at the problems that they seek to solve:

  • Fragility: A change may break unexpected parts, it is very difficult to detect if you don’t have a good test coverage
  • Immobility: A component is difficult to reuse in another project or in multiple places of the same project because it has too many coupled dependencies
  • Rigidity: A change requires a lot of effort because it affects several parts of the project

So what are the SOLID principles?

  • Single Responsibility Principle - A class should have only a single responsibility / have only one reason to change
  • Open-Closed Principle - Software should be open for extension but closed for modification
  • Liskov Substitution Principle - Objects in a program should be replaceable with instances of their sub types without altering the correctness of the program
  • Interface Segregation Principle - Many client-specific interfaces are better than one general-purpose interface
  • Dependency Inversion Principle - High level modules should not depend on low level modules. Both should depend on abstractions

In this article we will focus on the Open-Closed Principle.

What does it mean?

So the open-closed principle states:

Software should be open for extension but closed for modification

What exactly does this mean? I think out of all the principles this is the hardest to understand. Mostly due to the fact the explanation leaves far too much open to interpretation. A simple Google search will offer up several examples of how this principle works. In this article I will present my take on the principle and how to build software that will comply with it.

Let’s focus on a type that by design, violates the open closed principle.

Enums

Enums are a very powerful tool in Swift. They are first class types and such can have associated values and conform to protocols for example. However when used at the boundary of a particular system or module they can present a particular problem.

Let’s imagine an analytics system where we can log events. This is a design pattern I’ve seen in many places:

// 1
enum AnalyticsEvent {
    case newsList
    case newsDetail(id: Int)
}

// 2
class AnalyticsController {
    func sendEvent(_ event: AnalyticsEvent) {
        let title = event.title
        let params = event.params
        
        // Send data to analytics network
    }
}

// 3
extension AnalyticsEvent {
    var title: String {
        switch self {
        case .newsList:
            return "News List"
        case .newsDetail:
            return "News detail"
        }
    }
    
    var params: [String : String] {
        switch self {
        case .newsList:
            return [:]
        case .newsDetail(let id):
            return ["id": "\(id)"]
        }
    }
}

Let’s look at what we have here.

  1. The first thing that is defined is an enum that houses all the different analytics events that are available. Some with associated values.
  2. Next we have our analytics controller, this takes an event as a parameter, takes information from the event and would then send that on to our analytics system.
  3. Here we have extended the AnalyticsEvent enum to add 2 variables, one for title and one for params that contain a switch for each of our events.

On the surface or at first look this might appear an ok solution. We have hidden our implementation of the analytics network inside our AnalyticsController and setup a defined set of events that we can support.

The Problem

Now lets look at the problems that this approach causes.

  • What happens if we need to add new events to our analytics system?
  • What if our analytics system was part of a separate package or module?
  • What happens when we have a lot of events?

So first of all, every time we need to add / update or remove any of the events in our analytics system we need to modify the enum. We can’t just implement new events and have them be compatible with the system. Also if the number of events becomes very large then the code will grow large in size. Making it hard to read, maintain and a bit of a mess. Also the enum now has multiple responsibilities, as it covers many events breaking the single responsibility principle.

The second issue which is probably the more important one, is let’s say we are breaking our app down in to separate packages. This Analytics Controller and Event would be in a separate package, what if we wanted to re-use it across different projects? Both of these scenarios become very difficult because we are using an enum that would need to be updated to accommodate events for different apps. The package would need constantly updating as new events were added.

The Solution

So we have identified some issues with the above implementation, how can we change it to make solve these issues we have identified? Look at the new example:

// 1
struct NewsListEvent: AnalyticsEvent {
    var title: String {
        return "News List"
    }
    
    var params: [String : String] {
        return [:]
    }
}

struct NewsDetailEvent: AnalyticsEvent {
    let id: Int
    
    var title: String {
        return "News detail"
    }
    
    var params: [String : String] {
        return ["id": "\(id)"]
    }
}

// 2
protocol AnalyticsEvent {
    var title: String { get }
    var params: [String: String] { get }
}

class AnalyticsController {
    func sendEvent(_ event: AnalyticsEvent) {
        let title = event.title
        let params = event.params
        
        // Send data to analytics network
    }
}

Let’s look at how we have changed the example:

  1. First of all we have now removed the enum. Using an enum as a huge list of possible options is considered a code smell. Especially when it involves something that may change often. If you have a finite number of states that is unlikely to change, that is more suited to an enum than a list of analytics events. We have refactored those enum cases into 2 separate classes now.

  2. We have switched the enum for a protocol that exposes the necessary items required by our analytics controller (we could have potentially done this in the previous example however we would still have the enum).

So what advantages does this have over the previous implementation?

  • With the events now being in separate classes we are now following the single responsibility principle, each event has its own class that can be updated whenever they need to be.
  • Now that we are using a protocol and not an enum, we are now able to add new events to our app without ever having to touch the analytics system. Simply create a new class and make it conform to AnalyticsEvent, and we can use it with the analytics controller.
  • Further to that we could have our analytics system in a separate reusable package, then our client apps could define their own set of events to use with the system.

Our analytics code is now open for extension, but does not need to be modified to support new events. Unlike our enum example.

Read More

SOLID Principles in Swift - Single Responsibility Principle

Background

In this series of posts we are going to be covering the SOLID principles of software development. These are a set of principles / guidelines, that when followed when developing a software system, make it more likely that the system will be easier to extend and maintain over time. Let’s take a look at the problems that they seek to solve:

  • Fragility: A change may break unexpected parts, it is very difficult to detect if you don’t have a good test coverage
  • Immobility: A component is difficult to reuse in another project or in multiple places of the same project because it has too many coupled dependencies
  • Rigidity: A change requires a lot of effort because it affects several parts of the project

So what are the SOLID principles?

  • Single Responsibility Principle - A class should have only a single responsibility / have only one reason to change
  • Open-Closed Principle - Software should be open for extension but closed for modification
  • Liskov Substitution Principle - Objects in a program should be replaceable with instances of their sub types without altering the correctness of the program
  • Interface Segregation Principle - Many client-specific interfaces are better than one general-purpose interface
  • Dependency Inversion Principle - High level modules should not depend on low level modules. Both should depend on abstractions

In this article we will focus on the Single Responsibility Principle.

Problem

The first principle in the list is the Single Responsibility Principle. This principle is defined as follows:

A class should have only one reason to change

This means a class should be responsible for only one task, not multiple. Let’s take a look at an example and how we can refactor it using the principle.

struct SomeNews: Codable {
    let id: Int
    let title: String
}

class NewsDatasource {
    func getNews(completion: @escaping ([SomeNews]) -> Void) {
        // 1. Create request
        let url = URL(string: "SomeNews/URL")!
        let request = URLRequest(url: url)
        
        // 2. Fetching data
        let dataTask = URLSession.shared.dataTask(with: request) { (data, response, error) in
            
            // 3. Parsing data
            guard let data = data,
                  let news = try? JSONDecoder().decode([SomeNews].self, from: data) else {
                completion([])
                return
            }
            
            completion(news)
        }
        
        dataTask.resume()
    }
}

This looks like a fairly simple news datasource / service that is fetching some news items from the web. However if we take a closer look we will see it’s responsible for more than one task.

  1. Creating the URLRequest that is used to fetch the news articles
  2. Fetching the data using a URLSession
  3. Parsing the data

Already that is 3 different responsibilities this class has. They may seem fairly straight forward in this example but imagine how this could get out of hand quickly in a larger codebase. Let’s cover some of the scenarios.

  • Is this example the news request is simple. However what if the request was more complex, what if we needed to add headers etc to that request? All that code would be in this class.
  • What if we wanted to change the request used to fetch the news? We would have to make a code change here. Or what if we could fetch news from more than one API? How would we do that in the current structure?
  • Once the request has been made we are using a JSONDecoder to decode the response. What if the response comes back in a different format? What if we wanted to use a different decodable for the response?
  • What if the news request can be used in multiple places?

As we can see from the above list, there are several scenarios that would require a code change of this class. If we recall what the single responsibility stands for:

A class should have only one reason to change

There is also a side effect of this which isn’t as obvious, that is testability. Let’s look at some examples:

  • How would we test changes the URLRequest? If did indeed change the URLRequest or it was being generated differently, how would we test that?
  • How do we test how our class handles responses from the server? What happens if we get an error for example?
  • How do we test our decoding code? How can we be sure that it is going to handle incorrect data correctly? How does our news datasource handle decoding errors?

If we look at the code in the example we can see that in would be impossible to write unit tests covering any of the above scenarios. Let’s have a look at how we can break this class down into single components, allowing us to make changes only in one place and at the same time improving testability.

Breaking it down

URL Builder

Let’s start by breaking this class down into separate classes, each with one responsibility. First of all let’s take out the building of the URLRequest and put it in another class.

class NewsURLBuilder {
    private let hostName: String
    
    init(hostName: String) {
        self.hostName = hostName
    }
    
    func getNews() -> URLRequest {
        let url = URL(string: "\(hostName)SomeNews/URL")!
        let request = URLRequest(url: url)

        return request
    }
}

Great, now we have a class that’s only responsibility is to build and return a URLRequest. In a more complex system this class might need ids, user tokens etc in order to configure the request. In the scenario where we need to change how news is retrieved we only need to modify this one class in order to make that change. We can also change the hostname based on the environment such as dev, test and prod.

The other benefit of doing this is we can now write unit tests to make sure that the URLRequest is being built correctly. Let’s do a small example now:

class URLBuilderTests: XCTestCase {

    func testURLBuilder() throws {
        let builder = NewsURLBuilder(hostName: "http://mytest.com/")
        let request = builder.getNews()
        
        XCTAssertEqual(request.url?.absoluteString, "http://mytest.com/SomeNews/URL", "Request URL string is incorrect")
    }

}

Our URL builder isn’t particularly complex so doesn’t need many tests. But at least here with it being in a separate component we can test the construction and make sure it’s being created correctly. We could expand this test to test other elements of the request if needed, or if we needed different parameters to build the request.

Parser

Next lets take the parser and put that into it’s own class.

class NewsParser {
    private let decoder: JSONDecoder
    
    init(decoder: JSONDecoder) {
        self.decoder = decoder
    }
    
    func parse(data: Data) -> [SomeNews] {
        return (try? decoder.decode([SomeNews].self, from: data)) ?? []
    }
}

Here we can see we have taken our decoding code and put it into a separate class. This class has one reason to change, it only needs to be changed if the parsing needs to be changed! Also like our URL builder class we can now test the decoding to make sure we get the results we are expecting:

class NewsParserTests: XCTestCase {

    func testCorrectData() throws {
        let correctJSON = """
        [
          {
            "id": 1,
            "title": "Test Article 1"
          },
          {
            "id": 2,
            "title": "Test Article 2"
          }
        ]
        """
        
        let data = correctJSON.data(using: .utf8)!
        
        let parser = NewsParser(decoder: JSONDecoder())
        let news = parser.parse(data: data)
        XCTAssertFalse(news.isEmpty)
        XCTAssertEqual(news[0].id, 1)
        XCTAssertEqual(news[0].title, "Test Article 1")
    }

    
    func testInCorrectData() throws {
        let incorrectJSON = """
        [
          {
            "id": 1,
            "title": "Test Article 1"
          },
          {
            "id": 2,
        ]
        """
        
        let data = incorrectJSON.data(using: .utf8)!
        
        let parser = NewsParser(decoder: JSONDecoder())
        let news = parser.parse(data: data)
        XCTAssertTrue(news.isEmpty)
    }
}

So what have we done here. We have created a couple of unit tests for our parser.

  • The first one supplies the parser with some correct JSON data and checks that the news objects we receive are correct and have the right data.
  • The second test sends some incorrect data to the parser and tests that we receive an empty array as expected

I’m aware that we aren’t handling errors in this example, this has been done to try and keep things as simple as possible

Putting it all together

Now that we have separated out these components into separate pieces, lets see how our datasource looks now.

class NewsDatasource {
    private let requestBuilder: NewsURLBuilder
    private let parser: NewsParser
    
    init(requestBuilder: NewsURLBuilder, parser: NewsParser) {
        self.requestBuilder = requestBuilder
        self.parser = parser
    }
    
    func getNews(completion: @escaping ([SomeNews]) -> Void) {
        // 1. Create request
        let request = requestBuilder.getNews()
        
        // 2. Fetching data
        let dataTask = URLSession.shared.dataTask(with: request) { [weak self] (data, response, error) in
            
            // 3. Parsing data
            guard let self = self,
                let data = data else {
                completion([])
                return
            }
            
            completion(self.parser.parse(data: data))
        }
        
        dataTask.resume()
    }
}

Now if we look here we can see that we have swapped out the code for building the request and parsing the data for our separate classes. Now our example is following the single responsibility principle. We have 3 components now:

  1. A component to build our request
  2. A component to execute the request
  3. A component to parse the data we get back from the request

So what have we gained:

  • We now have test coverage of our components (we could update the NewsDatasource to have tests too but that is a bit more advanced and out of scope of this article)
  • We have the ability to re-use these components in other parts of the app or in other apps if we need to
  • If we need to make changes, each component is only responsibility for one thing, so we can update and test each change in turn. Rather than making multiple changes in one place and not be able to test them!

Feel free to download the sample and play around with the tests yourself!

Read More

Programmatic routing in SwiftUI

Background

As I’m sure any iOS developer now knows, the future of iOS app development is SwiftUI. Apple’s new UI development language is now on its 2nd major release. While my own personal feeling is that the framework is not quite ready for prime time (much like when Swift first arrived. It’s missing some fairly key features) and we are perhaps a version or 2 away from it realistically being an option for being used to build a complete app. There is no denying that it is the future and when it works well, it makes building UI a lot easier.

If you are using an advanced iOS architecture VIPER, MVVM etc it is probably the case that you have abstracted your routing or creating of your view controllers away into a separate part of your architecture. When you need to navigate or deal with a deeplink for example, you will hopefully have something like a dependency injection framework or factory to create your view controller. This is than pushed onto the navigation stack or presented by the view controller depending on what you are trying to do.

This is something that is fairly straight forward in UIKit and makes a lot of sense. In this article we are going to discuss the workings of SwiftUI and how that approach is no longer possible.

Example

// 1
struct ContentView: View {
    var body: some View {
        NavigationView(content: {
            NavigationLink(destination: DetailView()) {
                Text("Navigate")
            }
        })
        
    } 
}

// 2
struct DetailView: View {
    var body: some View {
        Text("Detail View")
    }
}

This is a fairly simple SwiftUI example but let’s talk through it.

  1. First we have a ContentView, this contains a NavigationView which is kind of similar to a UINavigationController in UIKit, however it is a lot more limited. We have a navigation link that allows the user to tap the text view and will ‘push’ the detail view on to the stack.
  2. Second we have our detail view that simply displays some text.

If we run the code and tap on the links we should get something like this:

SwiftUI Navigation

Seems to work as intended right? What problems are there with this approach?

  1. There is a tight coupling between the ContentView and the DetailView, what if we want to change the navigation destination?
  2. What if we want to use the ContentView in a different app that doesn’t contain a DetailView but something else?
  3. What if the DetailView has dependencies we need to inject when it’s created? How does the ContentView know what to do in order to create the DetailView?
  4. What if we wish to perform an event such as fire an analytics event before moving to the next view?
  5. What if we wish to present the view in a modal rather than pushing it to the navigation stack?

Many of the more advanced architectures and frameworks have already solved these problems using a router / co-ordinator pattern. These are responsible for handling any navigation logic and often talk to a dependency injection module in order to create the destination view and pushing it onto the navigation stack or presenting it.

Decoupling the Views

The first thing we can try to do is abstract away the creation of the detail view. This will at least give us the opportunity to change the destination without the knowledge of the ContentView.

// 1
final class ContentPresenter: ObservableObject {
    func getDetailView() -> AnyView {
        return AnyView(DetailView())
    }
}

// 2
struct ContentView: View {
    @ObservedObject private var presenter: ContentPresenter
    
    init(presenter: ContentPresenter) {
        self.presenter = presenter
    }
    
    var body: some View {
        NavigationView(content: {
            NavigationLink(destination: presenter.getDetailView()) {
                Text("Navigate")
            }
        })
        
    }
}

struct DetailView: View {
    var body: some View {
        Text("Detail View")
    }
}

So let’s have a look at what we are doing here:

  1. First of all we have tried to separate out the creation of the destination view into another object. Ideally we could put this into a protocol but for the purpose of simplicity we have just used an object.
  2. We are injecting the presenter into the ContentView now, you will also notice in the NavigationLink we are now calling a method on the presenter to get the destination.

What does this give us that the previous example doesn’t?

  1. There is no longer tight coupling between the ContentView and the DetailView. The destination is no longer hardcoded. If we make the presenter using a protocol for example. We can inject different presenters and have different destinations.
  2. If the detailview has its own dependencies that need injecting then the presenter can take care of that as well without having to code them in here.

However it’s not all tea and biscuits! There are still a number of issues highlighted earlier that this solution doesn’t solve:

  1. We are still not able to trigger any analytics events or any other app behaviours off the back of the navigation trigger. Block the user from navigating until they have logged in for example.
  2. We can’t change or configure how the navigation happens, for example presenting a login vs actually performing navigation.
  3. We are also exposing navigation to the view, a presenter typically would not need to expose navigation functionality to the view. It would handle a tap event and then hand off that navigation logic to the router. Here we have to expose that functionality to the view itself.

Keep with UIKit for navigation, for now

My personal feeling is that navigation in SwiftUI could do with some more work. Views themselves should not know or care about where they are navigating to and how. They should be a visual representation of state. Of course, the navigation could be a presentation of state too, however a quick peak at the NavigationView docs shows no access to any form of state at all. The navigation view polices its own state, nothing outside of the object has a way to modify that state.

Further to that, many of the methods we have come to expect from UINavigationController are simply not available here. Whether it’s lack of maturity or a slightly confused approach I don’t know. My recommendation for now would be to make use of UINavigationControllers and the UIHostingController to perform navigation for the time being, at least until a better way to manage and manipulate the navigation state is added to SwiftUI.

Let’s have a quick look at how that changes things. First we need to create a hosting controller and inject our SwiftUI view:

let presenter = ContentPresenter()
let vc = UIHostingController(rootView: ContentView(presenter: presenter))
let navigationController = UINavigationController(rootViewController: vc)
presenter.navigationController = navigationController

So here we are creating our presenter and our view as before but adding them into a UIHostingViewController and a navigation controller. The UIHostingViewController allows us to put SwiftUI views into what is essentially a UIViewController and use it within a UIKit app.

We have also passed a reference to the navigation controller to the presenter. Let’s have a look at our updated SwiftUI code now that we have refactored it into a UIHostingController.

// 1
final class ContentPresenter: ObservableObject {
    weak var navigationController: UINavigationController?
    
    func buttonTapped() {
        // Do whatever we like
        // ...
        // Navigate
        let vc = UIHostingController(rootView: DetailView())
        navigationController?.pushViewController(vc, animated: true)
    }
}

// 2
struct ContentView: View {
    @ObservedObject private var presenter: ContentPresenter
    
    init(presenter: ContentPresenter) {
        self.presenter = presenter
    }
    
    var body: some View {
        Button(action: { presenter.buttonTapped() }) {
            Text("Navigate")
        }
    }
}

What’s changed here:

  1. First of all our presenter has replaced our getDetailView with a more generic button tapped function. This function can do any number of things we need it to do, before finally navigating. Here you can see we are using our reference to the navigation controller to push the new view controller.
  2. In our SwiftUI view you will see we no longer have a NavigationView or a NavigationLink. Our view has become far more generic and doesn’t contain and navigation specific logic. You will also see that we have a button which has a tap action assigned by the presenter. This allows us to make the button do anything, not just trigger navigation.

Hopefully you found this helpful when exploring navigation options in SwiftUI. You can find the SwiftUI Sample and the UIHostingController samples on github.

Read More

Using protocols, ObservableObject and @Published property wrappers in SwiftUI

Background

As I’m sure any iOS developer now knows, the future of iOS app development is SwiftUI. Apple’s new UI development language is now on it’s 2nd major release. While my own personal feeling is that the framework is not quite ready for prime time (much like when Swift first arrived. It’s missing some fairly key features) and we are perhaps a version or 2 away from it realistically being an option for being used to build a complete app. There is no denying that it is the future and when it works well, it makes building UI a lot easier.

As SwiftUI is the future, I’ve been investigating how teams might migrate their existing architectures across to the new technology. There a number of challenges presented by migrating to SwiftUI we will discuss below. As the title suggests we will be exploring how to use a presenter to control a SwiftUI view. It doesn’t matter which architecture you are using as such, whether it’s VIPER, MVVVM, VIP, MVP etc. As long as the logic and state of the view has been abstracted away from the view itself so it can be properly unit tested.

Example

List Item View

Let’s start by creating an example in SwiftUI. We will create a simple list view to display some news for example. Let’s create a simple list view first of all:

// 1
struct ListItemViewModel: Identifiable {
    let id: Int
    let title: String
    let subTitle: String?
    let image: String
}

// 2
struct ListItemView: View {
    let viewModel: ListItemViewModel
    
    var body: some View {
        HStack() {
            Image(viewModel.image)
            VStack(alignment: .leading) {
                Text(viewModel.title)
                    .font(.headline)
                viewModel.subTitle.map({
                    Text($0)
                        .font(.subheadline)
                })
            }
        }
    }
}

// 3
struct ListItemView_Previews: PreviewProvider {
    static var previews: some View {
        ListItemView(
            viewModel: ListItemViewModel(
                id: 1,
                title: "Test Title",
                subTitle: "Test Subtitle",
                image: "first"
            )
        )
    }
}

This is quite a straight forward view, but let’s step through it.

  1. First of all we define our model for the view. We have an id so that we can conform to Identifiable. This allows SwiftUI to uniquely identify each model in the view and helps with performing things like animation and reordering. We also have a title, optional subTitle and an image string. Hopefully nothing here is too scary.
  2. Now we define the view inself. Views in SwiftUI are simple structs that conform to the View protocol, rather than subclasses of UIView like they used to be in UIKit. Its a simple Hstack with an image view then 2 labels stacked on top of each other. See the screen grab below.
  3. Finally we have the preview code to inject an example model to use in the preview.

SwiftUI ListItemView

List View

Now that we have the items in our list, lets create a simple list view that displays those items.

// 1
struct ContentView: View {
    let listItems: [ListItemViewModel]
 
    var body: some View {
        List(listItems) { item in
            ListItemView(viewModel: item)
        }
    }
}

// 2
struct ContentView_Previews: PreviewProvider {
    static var previews: some View {
        let items = [ListItemViewModel(id: 1, title: "test", subTitle: "test sub", image: "first"),
                    ListItemViewModel(id: 2, title: "test2", subTitle: "test sub1", image: "first"),
                    ListItemViewModel(id: 3, title: "test3", subTitle: "test sub2", image: "first"),
                    ListItemViewModel(id: 4, title: "test4", subTitle: "test sub3", image: "first"),
                    ListItemViewModel(id: 5, title: "test5", subTitle: "test sub4", image: "first")]
        
        ContentView(listItems: items)
    }
}

Ok so what do we have here:

  1. A simple ContentView who has an array of list item view models and a body. The body lists out the content of our list using the ListItemView we created earlier. Simple
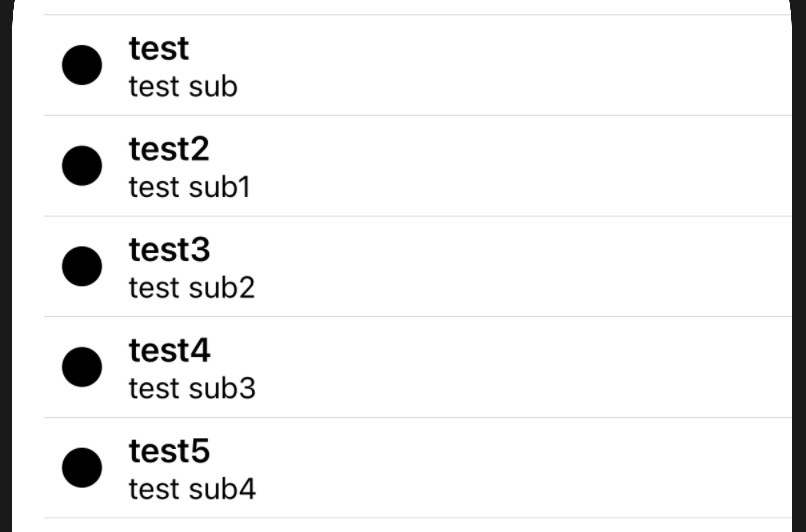
  2. Here we have some test data to show that our list is working. If we preview this view we will see something like this:

SwiftUI ListView

That’s wonderful, however it is not particularly dynamic. This is where a presenter or view model would come in. If we look at the description of MVP or MVVM we will see they have a similar role:

The presenter acts upon the model and the view. It retrieves data from repositories (the model), and formats it for display in the view.

There are further abstractions layers (such as interactors and use cases). However we are less concerned with them in this discussion and more on the relationship between the view and the presenter who is holding the state and logic of the view.

Abstracting the state

So at the moment we have a pretty stateless SwiftUI view that simply displays a hardcoded list. Now let’s attempt to abstract the list items away into another object that is injected into the view. This object would be responsible for fetching our items and loading them for the view.

This is where an ObservableObject comes in.

When your type conforms to ObservableObject, you are creating a new source of truth and teaching SwiftUI how to react to changes. In other words, you are defining the data that a view needs to render its UI and perform its logic. SwiftUI uses this dependency to automatically keep your view consistent and show the correct representation of your data. We like to think of ObservableObject as your data dependency surface. This is the part of your model that exposes data to your view, but it’s not necessarily the full model.

So lets update our example to move our list of items into a separate class that conforms to this protocol.

final class ListPresenter: ObservableObject {
    @Published var listItems: [ListItemViewModel] = []
}


struct ContentView: View {
    @ObservedObject private var presenter: ListPresenter
    
    init(presenter: ListPresenter) {
        self.presenter = presenter
    }
 
    var body: some View {
        List(presenter.listItems) { item in
            ListItemView(viewModel: item)
        }
    }
}

The @Published property wrapper here works with the ObservableObject to notify SwiftUI whenever the value changes in order to trigger an update.

We also see the @ObservedObject property wrapper. This causes this view to subscribe to the ObservableObject that’s assigned to it, and invalidates the view any time the object updates.

This is great and allows us to inject an object from outside of the view who can manage the fetching and supplying to the view, whenever the listItems var updates, the view will automatically update!

De-coupling dependencies

Now there is one problem here, can you see it? This view has a dependency between the view itself and the presenter class. Now if you are following the SOLID principles for example, and like to separate dependencies between your classes and layers we will need to remove the dependency between the view and presenter.

To do this lets change the ListPresenter class to be a protocol instead:

final class ListPresenterImp: ListPresenter {
    @Published var listItems: [ListItemViewModel] = []
}

protocol ListPresenter: ObservableObject {
    @Published var listItems: [ListItemViewModel] { get }
}

struct ContentView: View {
    @ObservedObject private var presenter: ListPresenter
    
    init(presenter: ListPresenter) {
        self.presenter = presenter
    }
 
    var body: some View {
        List(presenter.listItems) { item in
            ListItemView(viewModel: item)
        }
    }
}

This looks like it should be a straight forward change… Wrong! You will now start seeing errors galore. The primary cause coming from the decleration of our new protocol:

Property ‘listItems’ declared inside a protocol cannot have a wrapper

The problem here being exactly as the error states. We cannot use property wrappers inside protocols! That is going to cause a bit of a problem as we now can’t make use of the nice integration with SwiftUI via @Published properties, or so it seems…

Let’s take a step back for a moment, what exactly does the @Published property wrapper actually do? The @Published property wrapper essentially provides a publisher that the SwiftUI system can subscribe to in order to listen to updates to the value. This is in fact an implementation detail. One of the key points of protocol oriented programming is to abstract the implementation of functions are variables away from the dependency so that it is unaware of the inner workings. By trying to apply a property wrapper to the protocol we are trying to enforce how that variable should implemented under the hood. When infact should the implementing class of our protocol wish to, they could create their own custom implementation of the wrapper.

Fixing the errors

Ok so let’s start by removing the @Published property wrapper from our protocol:

final class ListPresenterImp: ListPresenter {
    @Published var listItems: [ListItemViewModel] = []
}

protocol ListPresenter: ObservableObject {
    var listItems: [ListItemViewModel] { get }
}

struct ContentView: View {
    @ObservedObject private var presenter: ListPresenter
    
    init(presenter: ListPresenter) {
        self.presenter = presenter
    }
 
    var body: some View {
        List(presenter.listItems) { item in
            ListItemView(viewModel: item)
        }
    }
}

Great! However there are now a bunch of different errors occuring… The key one that we need to pay attention to is this one:

Protocol ‘ListPresenter’ can only be used as a generic constraint because it has Self or associated type requirements

Right, so we have solved the riddle of @Published but this has now surfaced another problem. In order for our ListPresenter protocol to be compatible with the ObervedObject property wrapper in the view, it must extend ObservableObject. Now the problem here is that the ObservableObject uses an associatedtype. Which means if we wish to use it or hold a reference to it we must do type erasure (for more info read my previous post on type erasure) or use a generic constraint.

The simplest solution is for us to use a generic constraint on the view. View the code below:

final class ListPresenterImp: ListPresenter {
    @Published var listItems: [ListItemViewModel] = []
}

protocol ListPresenter: ObservableObject {
    var listItems: [ListItemViewModel] { get }
}

struct ContentView<T>: View where T: ListPresenter {
    @ObservedObject private var presenter: T
    
    init(presenter: T) {
        self.presenter = presenter
    }
 
    var body: some View {
        List(presenter.listItems) { item in
            ListItemView(viewModel: item)
        }
    }
}

So what has changed here. You will now notice that we have added a generic type T to our view. We have also added a generic constraint when implementing the View protocol which signals that the init and body implementations here are only when type T is a ListPresenter. Now in this instance that works fine as we only intend to use this view with our ListPresenter class. This removes the errors and the code now compiles. Let’s update the code and run a little test to make sure we are still getting all the reactive goodness of SwiftUI.

final class ListPresenterImp: ListPresenter {
    @Published var listItems: [ListItemViewModel] = []
    
    init() {
        Timer.scheduledTimer(withTimeInterval: 5.0, repeats: false) { (timer) in
            let items = [ListItemViewModel(id: 1, title: "test", subTitle: "test sub", image: "first"),
                        ListItemViewModel(id: 2, title: "test2", subTitle: "test sub1", image: "first")]
            
            self.listItems = items
        }
    }
}

protocol ListPresenter: ObservableObject {
    var listItems: [ListItemViewModel] { get }
}

struct ContentView<T>: View where T: ListPresenter {
    @ObservedObject private var presenter: T
    
    init(presenter: T) {
        self.presenter = presenter
    }
 
    var body: some View {
        List(presenter.listItems) { item in
            ListItemView(viewModel: item)
        }
    }
}

We have updated our list presenter implementation class to update our list items after 5 seconds. Nice and easy. If we initialise our view with a presenter with 5 items as below, then after 5 seconds our list should reduce to the 2 items as set in the timer.

let items = [ListItemViewModel(id: 1, title: "test", subTitle: "test sub", image: "first"),
                    ListItemViewModel(id: 2, title: "test2", subTitle: "test sub1", image: "first"),
                    ListItemViewModel(id: 3, title: "test3", subTitle: "test sub2", image: "first"),
                    ListItemViewModel(id: 4, title: "test4", subTitle: "test sub3", image: "first"),
                    ListItemViewModel(id: 5, title: "test5", subTitle: "test sub4", image: "first")]
        
let presenter = ListPresenterImp()
presenter.listItems = items
let contentView = ContentView(presenter: presenter)

Now let’s run this as part of an app and see what happens:

Presenter Demo

So as you can see, after 5 seconds the list of items is reduced after 5 seconds to 2 items, proving that our implementation works and we are still able to hook into the nice secret sauce that combine and swiftUI expose to us to allow us to update our views. I’ve seen some rather crazy implementations and workarounds on Stack Overflow. Hopefully this implementation is a little nicer!

Download the sample project to run it for yourself (Xcode 12.4)

Read More

Repository Pattern in Swift

Background

All apps developed require data of some description. This data is stored somewhere, could be on the device itself, in a remote database/service or a combination. Let’s take a look at the most common sources of data:

Each of these methods saves data in a different format. Now I’m sure you will have used at least one of these methods in your apps at some point to retrieve / save data.

When not using the repository pattern it is quite common to access and use these elements directly, either in your ViewController or in some other part of your app depending how it is structured.

The problem

What’s the problem with this approach? Your app becomes difficult to maintain. Now if you only have a small app with a few screens then this isn’t much of a problem as there are only a few elements to change.

However, what if you are working on a large app with several developers and lots of code? You could have NSManagedObjects or Codable objects littered throughout the codebase for example. What happens if you wish to remove Core Data? Perhaps move to realm? You would need to modify all of the classes in your codebase where you had used your Core Data objects.

Similarly, if you are using Codable objects directly from your JSON response. What happens when your backend team changes the API or you switch to a different API provider? The structure of the data may change which means your Codable objects might change. Again you will need to modify a large number of classes if you are working on a large app.

We can also apply this to the other options such as accessing data from 3rd party frameworks. If we use the objects returned from the framework directly, they will all need changing if we change provider or the SDK changes.

There is also the question of query language. Web services use headers and URLQueryItem, Core Data uses Predicates and so on. Every entry point to query the data must know and understand the underlying query language in order to get the information it once. Again, if this changes we need change every query point to the new format.

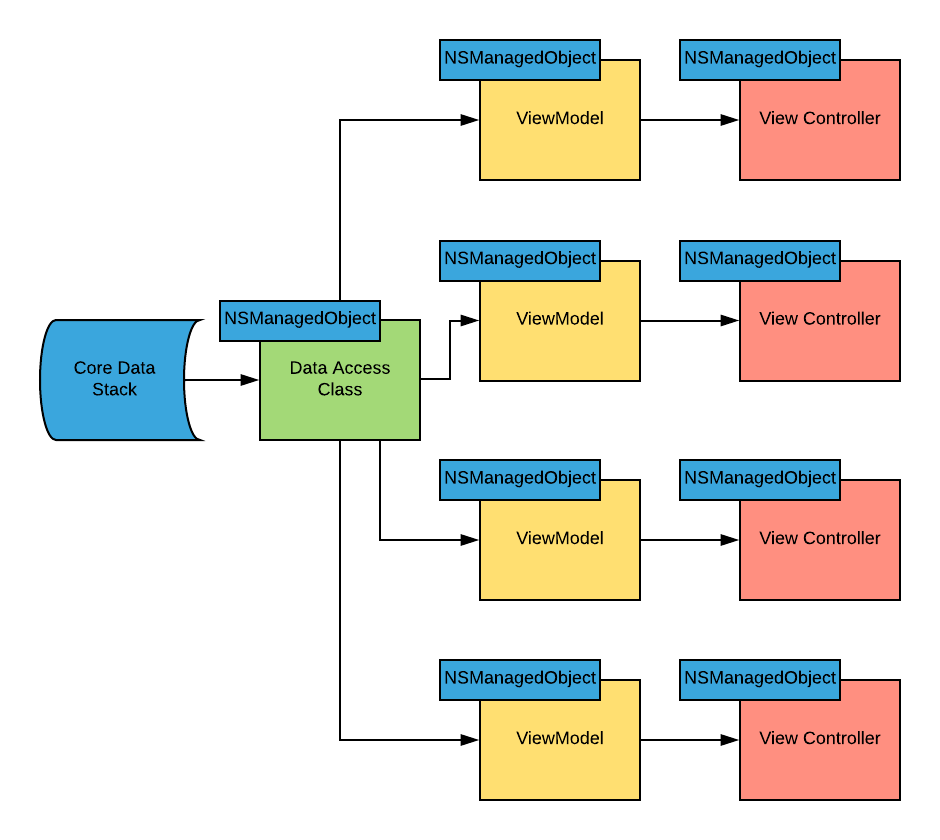
Let’s have a look at the diagram below:

Core Data Example

Here we have an app structure that is making use of Core Data. There is an object that is being used to access the stack that returns some data. Let’s say for this example that it is news articles. These new articles must inherit from NSManagedObject to be used in Core Data. Now if our data layer is returning NSManagedObjects to the rest of our app structure we now have a dependency between Core Data and the rest of the files in our app. If we wish to move to Realm for example, or switch to using some other form of data store we would need to modify all the of files in the app. The app in this example is only small, imagine having to do that for a much bigger app!

Domain Objects and the Repository

This is where Domain Objects come in. Domain Objects are value objects that are defined by your application. Rather than using objects and structures defined outside of the app, we define what we want the objects to look like. It’s then up to the repository to map between the data storage object / structure to these value objects.

When we do this, it means any changes to the data access layer, as we discussed earlier such as data structure changes or changes in provider don’t impact the rest of the app. The only part of the app that needs to be updated is the repository and it’s mapping to the domain objects.

The below quote summarises the idea of the pattern:

Repositories are classes or components that encapsulate the logic required to access data sources. They centralize common data access functionality, providing better maintainability and decoupling the infrastructure or technology used to access databases from the domain model layer.

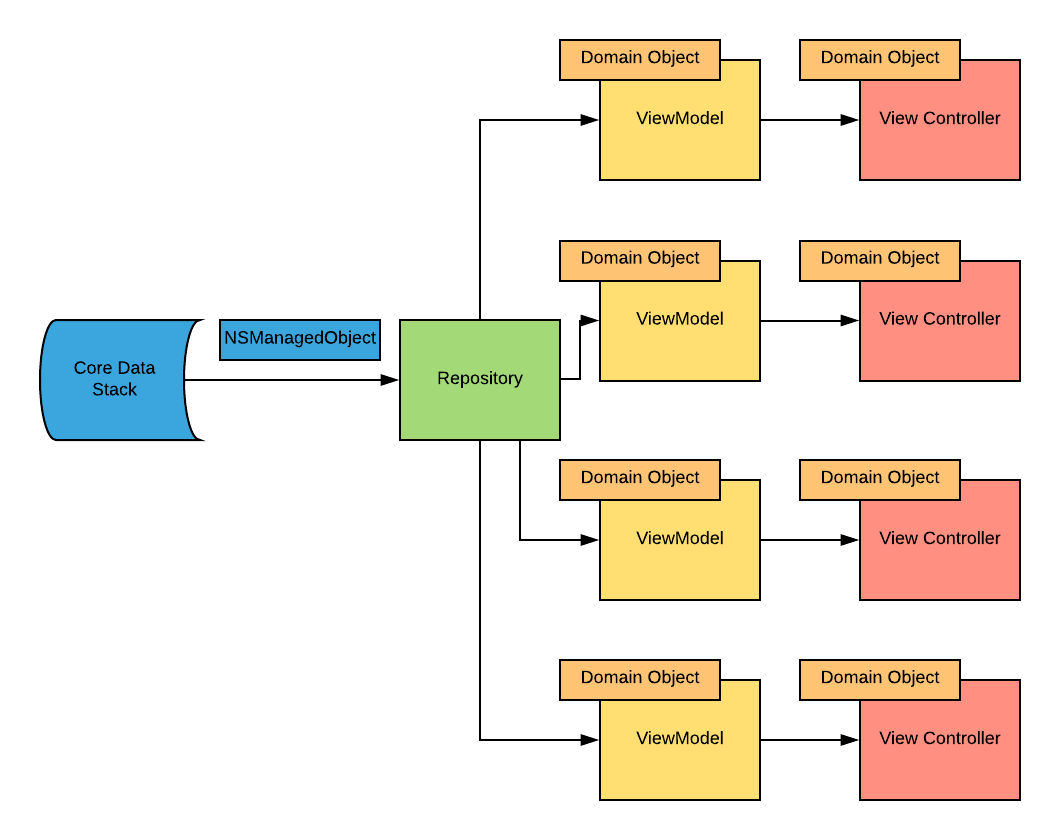
Let’s have a look at our previous example but modified to use the a repository and domain objects:

Core Data Example 2

So what is the difference here? As you can see the Core Data stack is still returning NSManagedObjects, however the repository is converting that to a domain object. This object doesn’t inherit from NSManagedObject, also it’s structure and attributes are defined by the app rather than what is in the data store.

Now if we wanted to move away from Core Data to something else the only classes that need to be changed are the Core Data stack and the repository. The rest of the app does not need to be changed as we can map the new data stores type to our domain objects using the repository.

Example

To show a small working example we are going to use a couple of Free Public APIs (highly recommend this resource if you are looking to build a demo app or experiment). We will use 2 APIs that returns users. However they return them in a different format.

https://jsonplaceholder.typicode.com/users/1

https://randomuser.me/api/

As we have done in previous blog posts we are going to use QuickType to generate our Codable objects from our JSON response. We will start with our first request.

// MARK: - User
struct User: Codable {
    let id: Int
    let name, username, email: String
    let address: Address
    let phone, website: String
    let company: Company
}

// MARK: - Address
struct Address: Codable {
    let street, suite, city, zipcode: String
    let geo: Geo
}

// MARK: - Geo
struct Geo: Codable {
    let lat, lng: String
}

// MARK: - Company
struct Company: Codable {
    let name, catchPhrase, bs: String
}

This structure will allow us to decode the response from the first request. Let’s make a simple example that takes the response and outputs some data. We will be using code from our Simple JSON Decoder to process the output so feel free to read up if the code you see doesn’t make sense.

let url = URL(string: "https://jsonplaceholder.typicode.com/users/1")!
// 1
let task = URLSession.shared.dataTask(with: url, completionHandler: { (user: User?, response, error) in
	// 2
    if let error = error {
        print(error.localizedDescription)
        return
    }

    // 3
    if let user = user {
        print(user.name)
        print(user.address.street)
        print(user.address.city)
        print(user.address.zipcode)
        print(user.address.geo.lat)
        print(user.address.geo.lng)
    }
})
task.resume()

So let’s step through what’s happening here:

  1. First of all we are making the request using our Simple JSON Decoder to return our new User type.
  2. Output any errors
  3. So here we are outputting the name, address and location of the user we get back. Super simple right now.

Managing change

Now let’s say we change provider. Maybe our backend team changes the API, or we switch data provider or from 2 different data provider SDKs. In our example we will switch from the first url (https://jsonplaceholder.typicode.com/users/1) to the second (https://randomuser.me/api/).

The first thing we will need to do is change all of our codable objects as the structure of the response is different. Let’s use QuickType again to give us the new structure:

// MARK: - Users
struct Users: Codable {
    let results: [Result]
    let info: Info
}

// MARK: - Info
struct Info: Codable {
    let seed: String
    let results, page: Int
    let version: String
}

// MARK: - Result
struct Result: Codable {
    let gender: String
    let name: Name
    let location: Location
    let email: String
    let login: Login
    let dob, registered: Dob
    let phone, cell: String
    let id: ID
    let picture: Picture
    let nat: String
}

// MARK: - Dob
struct Dob: Codable {
    let date: String
    let age: Int
}

// MARK: - ID
struct ID: Codable {
    let name: String
    let value: String?
}

// MARK: - Location
struct Location: Codable {
    let street: Street
    let city, state, country: String
    let postcode: Int
    let coordinates: Coordinates
    let timezone: Timezone
}

// MARK: - Coordinates
struct Coordinates: Codable {
    let latitude, longitude: String
}

// MARK: - Street
struct Street: Codable {
    let number: Int
    let name: String
}

// MARK: - Timezone
struct Timezone: Codable {
    let offset, timezoneDescription: String

    enum CodingKeys: String, CodingKey {
        case offset
        case timezoneDescription = "description"
    }
}

// MARK: - Login
struct Login: Codable {
    let uuid, username, password, salt: String
    let md5, sha1, sha256: String
}

// MARK: - Name
struct Name: Codable {
    let title, first, last: String
}

// MARK: - Picture
struct Picture: Codable {
    let large, medium, thumbnail: String
}

Now this is more complicated that it needs to be for our example but I’m leaving it here as an extreme example of how different things can be. As you can probably tell the structure and types have change dramatically from our first example. So let’s try and output the same data from this example in our previous example. We can ignore the request part and just focus on the data output so we can see the differences:

// Request 1 output
if let user = user {
    print(user.name)
    print(user.address.street)
    print(user.address.city)
    print(user.address.zipcode)
    print(user.address.geo.lat)
    print(user.address.geo.lng)
}


// Request 2 output
if let user = users?.results.first {
    print("\(user.name.first) \(user.name.last)")
    print(user.location.street.name)
    print(user.location.city)
    print(user.location.postcode)
    print(user.location.coordinates.latitude)
    print(user.location.coordinates.longitude)
}

As you can see from even this simple example. We would have to change 7 lines of code, just to produce the same output. Now imagine this change happening on a much bigger project! There could possibly be 100s of lines of code that would need updating, all because the API response has changed.

Repository Pattern

Here is where the repository pattern comes in. We can create a user repository that fetches the user and converts it to our domain object. That way we don’t need to update the output.

First thing to do is design our domain object that will represent a User in our system. Now all we are doing in this simple example is outputting a few attributes so let’s design our object with just those attributes as we don’t need the rest.

struct DomainUser {
    let name: String
    let street: String
    let city: String
    let postcode: String
    let latitude: String
    let longitude: String
}

Here we have a nice simple representation of our User object. There is no need to consider any of the other possible attributes returned from the API. We aren’t using them in our application and they will just sit around taking up valuable memory. You will also notice that this object doesn’t conform to Codable or subclass NSManagedObject. This is because DomainObject should not contain any knowledge about how they are stored. That is the responsibility of the repository.

To design our repository we can make use of Generics and Protocols to design a repository we can use for anything, not just our DomainUser. Let take a look:

protocol Repository {
    associatedtype T
    
    func get(id: Int, completionHandler: (T?, Error?) -> Void)
    func list(completionHandler: ([T]?, Error?) -> Void)
    func add(_ item: T, completionHandler: (Error?) -> Void)
    func delete(_ item: T, completionHandler: (Error?) -> Void)
    func edit(_ item: T, completionHandler: (Error?) -> Void)
}

protocol CombineRepository {
    associatedtype T
    
    func get(id: Int) -> AnyPublisher<T, Error>
    func list() -> AnyPublisher<[T], Error>
    func add(_ item: T) -> AnyPublisher<Void, Error>
    func delete(_ item: T) -> AnyPublisher<Void, Error>
    func edit(_ item: T) -> AnyPublisher<Void, Error>
}

Here we have different functions for all of the operations we can do. What you will notice is that none of these functions specify where or how the data is stored. Remember when we talked about different storage options at the beginning? We could implement a repo that talks to an API (like in our example), one that stores things in Core Data or one that writes to UserDefaults. It’s up to the repository that implements the protocol to decide these details, all we care about is that we can load and save the data from somewhere.

See it action

Now we have defined what the repository pattern is, let’s create 2 implementations. One for our first request and one for the second. Both should return domain objects, rather than the type returned from the request.

// 1
enum RepositoryError: Error {
    case notFound
}

struct FirstRequestImp: Repository {
    typealias T = DomainUser
    
    // 2
    func get(id: Int, completionHandler: @escaping (DomainUser?, Error?) -> Void) {
        let url = URL(string: "https://jsonplaceholder.typicode.com/users/1")!
        let task = URLSession.shared.dataTask(with: url, completionHandler: { (user: User?, response, error) in
            if let error = error {
                completionHandler(nil, error)
                return
            }

            guard let user = user else {
                completionHandler(nil, RepositoryError.notFound)
                return
            }
            
            // 3
            let domainUser = DomainUser(
                name: user.name,
                street: user.address.street,
                city: user.address.city,
                postcode: user.address.zipcode,
                latitude: user.address.geo.lat,
                longitude: user.address.geo.lng
            )
            
            completionHandler(domainUser, nil)
        })
        task.resume()
    }
    
     // 4
    func list(completionHandler: @escaping ([DomainUser]?, Error?) -> Void) {}
    func add(_ item: DomainUser, completionHandler: @escaping (Error?) -> Void) {}
    func delete(_ item: DomainUser, completionHandler: @escaping (Error?) -> Void) {}
    func edit(_ item: DomainUser, completionHandler: @escaping (Error?) -> Void) {}
}

struct SecondRequestImp: Repository {
    typealias T = DomainUser
    
    func get(id: Int, completionHandler: @escaping (DomainUser?, Error?) -> Void) {
        let url = URL(string: "https://randomuser.me/api/")!
        let task = URLSession.shared.dataTask(with: url, completionHandler: { (users: Users?, response, error) in
            if let error = error {
                completionHandler(nil, error)
                return
            }

            guard let user = users?.results.first else {
                completionHandler(nil, RepositoryError.notFound)
                return
            }
            
            // 5
            let domainUser = DomainUser(
                name: "\(user.name.first) \(user.name.last)",
                street: user.location.street.name,
                city: user.location.city,
                postcode: "\(user.location.postcode)",
                latitude: user.location.coordinates.latitude,
                longitude: user.location.coordinates.longitude
            )
            
            completionHandler(domainUser, nil)
        })
        task.resume()
    }
    
    func list(completionHandler: @escaping ([DomainUser]?, Error?) -> Void) {}
    func add(_ item: DomainUser, completionHandler: @escaping (Error?) -> Void) {}
    func delete(_ item: DomainUser, completionHandler: @escaping (Error?) -> Void) {}
    func edit(_ item: DomainUser, completionHandler: @escaping (Error?) -> Void) {}
}

There’s quite a bit of code here so let’s step through it.

  1. First of all we have defined a new error to send back if we don’t receive any user info from the API.
  2. This is the same call we made in our example before.
  3. Now here we are taking the returned Codable User and converting it to your new DomainUser class.
  4. We aren’t implementing the other functions in this example so just leaving them empty for now to remove errors.
  5. This struct is the second request we are making, and again here we are mapping our Users Codable type from the second request to our DomainUser.

Now that we have made our two repositories, let’s show how we can quickly switch between them without breaking / changing code.

let repository: FirstRequestImp = FirstRequestImp()
repository.get(id: 1) { (user, error) in
    if let error = error {
        print(error)
    }
    
    if let user = user {
        print(user.name)
        print(user.street)
        print(user.city)
        print(user.postcode)
        print(user.latitude)
        print(user.longitude)
    }
}

Here is our example from earlier in the article but updated to use our new repositories. Here we go and fetch the user and print their details, the same as before. Now below we can switch to our second request and see how that will work.

let repository: SecondRequestImp = SecondRequestImp()
repository.get(id: 1) { (user, error) in
    if let error = error {
        print(error)
    }
    
    if let user = user {
        print(user.name)
        print(user.street)
        print(user.city)
        print(user.postcode)
        print(user.latitude)
        print(user.longitude)
    }
}

Now notice how the only part we changed was the implementation class? The rest of the code remained the same even though where the data was coming from has changed and is coming back in a completely different structure. Now imagine we are using this repo in many places to fetch user details. We can quickly switch between different data sources without changing the code that uses it. The only changes we have to make are to the repo and to the data mapping code. So only one change rather than a change in every single class that uses these objects.

Conclusion

So let’s recap what we have discussed here:

  • First of all we discussed the problem of using data storage classes throughout your codebase. Especially on large projects if you need to switch data source / structure.
  • We then discussed how using the repository pattern and mapping to domain objects rather than using data storage classes can make your code easier to change in the future.
  • We worked through some examples of how changing API structures can impact your code.
  • We then implemented a basic repository pattern with mapping to domain objects to show how doing this can make updating your project easier.

Finally let’s discuss the pros and cons of the approach:

Advantages

  • Code is easier to change if you need to switch data source or structure
  • Separates concerns of where / how data is stored away from the rest of your app

Disadvantages

  • Adds more code and complexity
  • Need to write mappers for each object to domain objects
  • Not really needed on smaller solo projects

Feel free to download the playground and play around with the examples yourself

Read More

Simple offline caching in Swift and Combine

Background

Following on from the previous post where we explored simple JSON decoding. In this post we are going to extend that simple networking example to include some offline caching so that if our network requests fail we can still provide content.

I hear of a lot of people put off by providing a caching layer in their apps for data. Popular solutions include putting an actual relational database inside your app to cache the data such as using Core Data or Realm. Now these solutions are fine if you are intending to levarage the power of a relational database to perform some kind of task. However they add a lot more complexity if you are simply using them as a caching layer. A few draw backs below:

  • If you are consuming in an house API you may be trying to replicate a back end database structure driven by a much more capable server side DBMS.
  • Whether you are mapping against a back end database or just the returned JSON. What happens when the structure changes? Do you need to update your parsing and data structure. Do you need to migrate data?
  • Not only do you need to make sure you can parse and store the data correctly, you then must make sure you query the data in the same way so that you get the same results as returned from the API.
  • What happens if multiple requests need to update the data? Handling concurrent data updates carries it’s own complexity and head aches.

This is just a sample of the challenges faced when trying to use a relational database as a caching layer for your app. Now you could build some custom caching layer that writes things to disk or a library such as PINCache. However what if I told you there is something simpler that is already built in to iOS as standard?

Caching Headers

To help explain this we need to explore how HTTP caching headers are intended to work. Now, most request to an API will return a bunch of HTTP headers. These provide information and advice to the receiver about the response to the request. We won’t cover them all but the one we are most interested in for this example is the Cache-Control header.

Cache-control is an HTTP header used to specify browser caching policies in both client requests and server responses. Policies include how a resource is cached, where it’s cached and its maximum age before expiring (i.e., time to live)

The part of this statement that talks about maximum age before expiring is what we will explore here. Most APIs will specify something called a max-age in the response headers. This is the length of time in seconds that the receiver should consider this information valid for. After that period of time the response should be considered stale and new data be fetched from the source.

By default URLSession and URLRequest have a cache policy of useProtocolCachePolicy. This means they will honour the HTTP caching headers when making requests. In the case of the above it will cache request responses for the time specified in the header. It is possible to override this behaviour if you wish using one of the other options.

Postman

To demonstrate this behaviour in action we are going to use a tool called Postman. You may be using this already, it’s a fantastic tool for developing and testing APIs. One of the services that are provided by Postman is something called Postman Echo. This is a service that allows you to send various URL parameters to it and have postman reply those items back to you in a certain response format. To test our example we are going to use the response headers service that is provided, this allows us to specify headers and values in the url query string and have them played back to us in the actual response headers.

If we hit the URL below, you will get a response with the specified headers that you send in the URL query params.

https://postman-echo.com/response-headers?Cache-Control=max-age=30

We get back a header in the response of Cache-Control: max-age=30. This means that anyone processing the response should cache the response for 30 seconds at the most before requesting fresh data, as discussed previously.

We can use this to prove how the caching works in URLSession.

Caching in URLSession

Let’s setup an example below on how to test out these cache headers:

// 1
let url = URL(string: "https://postman-echo.com/response-headers?Content-Type=text/html&Cache-Control=max-age=30")!
let request = URLRequest(url: url)

let task = URLSession.shared.dataTask(with: url) { (data, response, error) in
	// 2
    if let httpResponse = response as? HTTPURLResponse,
        let date = httpResponse.value(forHTTPHeaderField: "Date"),
        let cacheControl = httpResponse.value(forHTTPHeaderField: "Cache-Control") {

        // 3
        print("Request1 date: \(date)")
        print("Request1 Cache Header: \(cacheControl)")
    }
}
task.resume()

// 4
sleep(5)

// 5
let task2 = URLSession.shared.dataTask(with: url) { (data , response, error) in
    if let httpResponse = response as? HTTPURLResponse,
        let date = httpResponse.value(forHTTPHeaderField: "Date"),
        let cacheControl = httpResponse.value(forHTTPHeaderField: "Cache-Control") {

        print("Request2 date: \(date)")
        print("Request2 Cache Header: \(cacheControl)")
    }
}
task2.resume()

Let’s step through this example step by step to demonstrate what is happening:

  1. First of all we setup our postman echo request, we will set this up to return cache headers of 30 seconds
  2. We make a request using the standard dataTask method. When we get the response we cast it to an HTTPURLResponse. An HTTPURLResponse contains a dictionary called allHeaders which is a dictionary containing all of the headers returned in the response. However this is error prone as dictionary keys are case sensitive. To combat this Apple have added a new function called value that takes a key string but does a case-insensitive match against the header so you don’t have to.
  3. With the code in point 2 we are grabbing the date of the response and the cache control header and printing them to the console so we can see what they are.
  4. We sleep for 5 seconds then perform another request.
  5. Here are performing the same request as above and fetching the values of the response headers again. This will help us to see how the caching works.

If we run the above code in our playground we should see the following in the console:

Request1 date: Tue, 23 Jun 2020 09:21:36 GMT
Request1 Cache Header: max-age=30
Request2 date: Tue, 23 Jun 2020 09:21:36 GMT
Request2 Cache Header: max-age=30

So what does this tell us about our requests?

  • The first 2 lines show that our request executed at a certain date and time, the second line displays the cache header we configured in our postman echo request.
  • The last 2 lines show the same thing?

This is because we set a cache time of 30 seconds in the request header. As you know from step 4 above, we slept for 5 seconds inbetween each request. The fact the date headers are the same shows that the second request response is in fact the same response as the first request, it has just been fetched from the cache.

To prove this we can modify the request so that we only cache the response for 3 seconds, this way when we sleep for 5 seconds, the response from the first request should be considered stale and the second request should end up with a new response.

Let’s modify the URL in our request to set the cache control to 3:

https://postman-echo.com/response-headers?Cache-Control=max-age=3

Now if we run the example above the console messages should look something like this:

Request1 date: Tue, 23 Jun 2020 11:34:58 GMT
Request1 Cache Header: max-age=3
Request2 date: Tue, 23 Jun 2020 11:35:03 GMT
Request2 Cache Header: max-age=3

How is this different from above. The main difference you will notice is that the request times are now different. The second request timestamp is 5 seconds after the first. This is because our cache time is 3 seconds now, so the second request is no longer pulling from the cache and is in fact a new request with a new response.

Offline and the Network Conditioner

Now you are probably asking yourself what this has to do with offline caching? To understand how we can leverage this caching behaviour we need to throttle our requests so that they fail. One of the tools at our disposal is something called the Network Conditioner. This is provided by Apple in the additional tools download.

If you download the tools and install the network conditioner preference pane, you should be able to launch it from your Mac preferences. Once open you should see something like the below:

Network Conditioner

This tool allows you to create various network conditions on your mac, such as 100% packet loss, 3G, dial up etc. We are going to use this to replicate a connection failure in our example to see how we can begin to use some of URLSession’s properties to access cached request data.

If we add the below into our second request callback so we can see if the request errors:

if let error = error {
    print(error.localizedDescription)
}

If we run the sample again, however this time once we receive the first 2 console messages. We activate the network conditioner using 100% loss. This will cause the second request to fail (it may take a few seconds for the request to timeout).

If done correctly we should see something like below in the console:

Request1 date: Tue, 23 Jun 2020 12:36:09 GMT
Request1 Cache Header: max-age=3
The request timed out.

Now we aren’t getting a response from the second request. Instead we are receiving an error. This is expected behaviour as the second request is indeed failing. What we can do in this scenario is grab the response from the cache if we so wish. To do so add the code below to the second completion handler:

if let cachedResponse = URLSession.shared.configuration.urlCache?.cachedResponse(for: request),
    let httpResponse = cachedResponse.response as? HTTPURLResponse,
    let date = httpResponse.value(forHTTPHeaderField: "Date") {

    print("cached: \(date)")
}

Part of the URLSession is the URLSessionConfiguration. This is an object which provides all of the configuration for the URLSession. One of the attributes here is the URLCache. This is where the magic happens. It is an in-memory and on-disk cache of the responses from URLRequests. It is responsible for storing and deleting the data, in our example that is controlled via the response headers.

One of the methods on the URLCache is cachedResponse. This will return the cached response for any URL request still in the cache.

In the example above we are pulling the cached response and outputting the header of the attached HTTPURLResponse. If we take another look at our example with the additional 2 snippets above we should have something like below:

let url = URL(string: "https://postman-echo.com/response-headers?Content-Type=text/html&Cache-Control=max-age=3")!
let request = URLRequest(url: url)
let task = URLSession.shared.dataTask(with: url) { (data, response, error) in
    if let httpResponse = response as? HTTPURLResponse,
        let date = httpResponse.value(forHTTPHeaderField: "Date"),
        let cacheControl = httpResponse.value(forHTTPHeaderField: "Cache-Control") {

        print("Request1 date: \(date)")
        print("Request1 Cache Header: \(cacheControl)")
    }
}
task.resume()

sleep(5)

let task2 = URLSession.shared.dataTask(with: url) { (data , response, error) in
    if let httpResponse = response as? HTTPURLResponse,
        let date = httpResponse.value(forHTTPHeaderField: "Date"),
        let cacheControl = httpResponse.value(forHTTPHeaderField: "Cache-Control") {

        print("Request2 date: \(date)")
        print("Request2 Cache Header: \(cacheControl)")
    }

    if let error = error {
        print(error.localizedDescription)

        if let cachedResponse = URLSession.shared.configuration.urlCache?.cachedResponse(for: request),
            let httpResponse = cachedResponse.response as? HTTPURLResponse,
            let date = httpResponse.value(forHTTPHeaderField: "Date") {

            print("cached: \(date)")
        }
    }
}
task2.resume()

Now if we follow the same test as before:

  • Run the playground
  • Wait for first request to finish
  • Activate network conditioner with 100% packet loss

What we should see in the console is this:

Request1 date: Sun, 28 Jun 2020 07:03:48 GMT
Request1 Cache Header: max-age=3
The request timed out.
cached: Sun, 28 Jun 2020 07:03:48 GMT

So what is happening here?

  • The first request is completing successfully so we can see the date and cache header info. The same as before.
  • The seconds request is failing, hence the request timeout error
  • However this time, as the request has failed we are fetching the previously made request response from the cache and outputting the header from that.

Now that we have shown how to grab cached requests from the cache, let’s wrap this up in a nice way so we can reuse it if we wish

Wrapping it up

First of all lets create a standard swift example, then we will have a look at how we can do this in Combine and some of the challenges in doing so.

extension URLSession {
    // 1
    func dataTask(with url: URL,
                  cachedResponseOnError: Bool,
                  completionHandler: @escaping (Data?, URLResponse?, Error?) -> Void) -> URLSessionDataTask {

        return self.dataTask(with: url) { (data, response, error) in
            // 2
            if cachedResponseOnError,
                let error = error,
                let cachedResponse = self.configuration.urlCache?.cachedResponse(for: URLRequest(url: url)) {

                completionHandler(cachedResponse.data, cachedResponse.response, error)
                return
            }

            // 3
            completionHandler(data, response, error)
        }
    }
}

So let’s walk through what we are doing here:

  1. We have created a method the same as the standard dataTask method on URLSession. However we have added a bool to control whether we would like to return the cached response on receiving a network error.
  2. Here we take the example we used earlier in our example and applied it to this method. First we check whether we should return the cached response based on our cachedResponseOnError parameter. Then check to see if we do have an error, if we do then attempt to grab the cached response from the URLCache and return it’s data and response objects along with the error.
  3. In the case where any of the above fails we simply return everything exactly as it was in returned by the normal dataTask method.

As the completion handler returns Data, URLResponse and Error we are able to return the data and response even if there is an error. That is a bit of a disadvantage in this case as the function caller needs to be aware that they may receive an error but also the cached response as well so need to cater for those scenario themselves.

Combine

Hopefully you have at least heard of Combine even if you haven’t had chance to use it yet in a production app. It is Apple’s own version of a reactive framework. Those of you who have already been using RxSwift will be right at home. We aren’t going to go into too much detail about what Combine is but here is a definition of what reactive programming is:

In computing, reactive programming is a declarative programming paradigm concerned with data streams and the propagation of change

In more simplistic terms, reactive programming uses a observer pattern to allow classes to monitor different streams of data or state. When this state changes it emits an event with the new value which can trigger other streams to perform work or update such as UI code. If you are familier with KVO you will understand the basic concept. However reactive programming is far less painful and a lot more powerful than KVO.

Now the approach described in the previous section works fine in the case of the completionHandler as it allows us to return all 3 items to the caller regardless of what happens. However in combine streams are designed to either return a value OR an error.

First of all let’s look at a simple example:

// 1
typealias ShortOutput = URLSession.DataTaskPublisher.Output

extension URLSession {
    // 2
    func dataTaskPublisher(for url: URL,
                           cachedResponseOnError: Bool) -> AnyPublisher<ShortOutput, Error> {

        return self.dataTaskPublisher(for: url)
            // 3
            .tryCatch { [weak self] (error) -> AnyPublisher<ShortOutput, Never> in
                // 4
                guard cachedResponseOnError,
                    let urlCache = self?.configuration.urlCache,
                    let cachedResponse = urlCache.cachedResponse(for: URLRequest(url: url)) 
                else {
                    throw error
                }

                // 5
                return Just(ShortOutput(
                    data: cachedResponse.data,
                    response: cachedResponse.response
                )).eraseToAnyPublisher()
        // 6
        }.eraseToAnyPublisher()
    }
}

So let’s step through what is happening here:

  1. First I am creating a typealias of the dataTaskPublisher.Output. This is mostly for code formatting reasons as the string is very long. This is simply a Data object and a URLResponse object in a tuple.
  2. Here we have setup our function with the cachedResponseOnError flag the same as before. We are returning a publisher with our type aliased output.
  3. First we call the standard dataTaskPublisher method to setup our request. We immediately chain that publisher using the new tryCatch. So what does this do? “Handles errors from an upstream publisher by either replacing it with another publisher or throwing a new error.” So here we catch any connection errors from the dataTaskPublisher and we can either throw another error or send another publisher down the chain.
  4. So the same as our pure Swift example we attempt to fetch our response from the cache, except here if we fail to find anything in the cache we just rethrow the same error we received in the try catch block so it can be handled further down the stream.
  5. If we were able to find a response in the cache then we use the Just publisher to send the new value down the stream wrapping our cached response.
  6. We erase the types to AnyPublisher using type erasure so items further down the stream don’t need to know the types. For more info on type erasure see my previous post.

Now let’s take our previous test and adapt it so we can see this in action:

// 1
let url = URL(string: "https://postman-echo.com/response-headers?Content-Type=text/html&Cache-Control=max-age=3")!
let publisher = URLSession.shared.dataTaskPublisher(for: url, cachedResponseOnError: true)

// 2
let token = publisher
    .sink(receiveCompletion: { (completion) in
        switch completion {
        case .finished:
            break
        case .failure(let error):
            print(error.localizedDescription)
        }
    }) { (responseHandler: URLSession.DataTaskPublisher.Output) in
        if let httpResponse = responseHandler.response as? HTTPURLResponse,
            let date = httpResponse.value(forHTTPHeaderField: "Date"),
            let cacheControl = httpResponse.value(forHTTPHeaderField: "Cache-Control") {

            print("Request1 date: \(date)")
            print("Request1 Cache Header: \(cacheControl)")
        }
    }

// 3
sleep(5)

// 4
let token2 = publisher
    .sink(receiveCompletion: { (completion) in
        switch completion {
        case .finished:
            break
        case .failure(let error):
            print(error.localizedDescription)
        }
    }) { (responseHandler: URLSession.DataTaskPublisher.Output) in
        if let httpResponse = responseHandler.response as? HTTPURLResponse,
            let date = httpResponse.value(forHTTPHeaderField: "Date"),
            let cacheControl = httpResponse.value(forHTTPHeaderField: "Cache-Control") {

            print("Request2 date: \(date)")
            print("Request2 Cache Header: \(cacheControl)")
        }
    }

As we have done with our other examples let’s step through and see what happens.

  1. First we create our request as we did in the pure Swift example, and then create our new publisher using our newly created function.
  2. Now in Combine, publisher’s only execute once there is an unsatisfied subscription. This happens whenever the sink function is called. The first closure is called when either the stream completes or an error throws (which also terminates the stream). The second closure is called whenever a new value is published from the stream. In this first case we can a tuple containing Data and a URLResponse. As before we inspect the date header of the request.
  3. As before we sleep for 5 seconds (we have set a timeout of 3 on using the cache control headers)
  4. This matches the same as step 2 however we changed the output.

If we follow the same steps as before and turn on packet loss using the network conditioner when we hit step 3 we should see a console log like below:

Request1 date: Tue, 30 Jun 2020 07:53:26 GMT
Request1 Cache Header: max-age=3
Request2 date: Tue, 30 Jun 2020 07:53:26 GMT
Request2 Cache Header: max-age=3

Now, this proves that we are returning our cached response in the second request as we have no connection and we are still receiving a response. However what is the problem here?

There is no error

The above implementation works fine if we just want to display cached data. However you may wish to inform the user that there was a connection failure and they are viewing old / stale information. So how can we get around this? In order to send the cached value, then the error we would need to create a custom Combine publisher. We won’t cover that here as that is a post in itself.

Conclusion

We have shown how we can make use of built in functionality of URLSession and URLCache along with the HTTP standard headers to provide simple and basic offline caching.

Advantages

  • Simple implementation, doesn’t require 3rd party frameworks or complex relational databases
  • Makes use of 1st party frameworks and relies on currently available standards (HTTP)
  • Concurrency handled automatically

Disadvantages

  • Relies on cache-control headers being correctly used in the API being consumed
  • URLSession cache policies need to be configured correctly
  • Doesn’t support more complex caching requirements / rules if needed
  • URLCache will delete the cache if device memory becomes full, something to bear in mind using this approach

In summary, this approach is simple and provides basic offline functionality for your app. If you have more complex needs / requirements for caching your data then other approaches may be more suitable.

Feel free to download the playground and play around with the examples yourself

Read More

Simple JSON decoder in Swift and Combine

Intro

Pretty much every app nowadays requires you to connect to the internet to access some content. The majority of those apps use JSON to communicate that data from the backend systems.

There is high chance you will have some code in your app to download, parse and return objects for your app to use from an endpoint (unless you are using a network library such as Alamofire)

In this post we are going to demonstrate how we can use Generics and Codable to help us build a simple reusable JSON decoder to download and parse responses from our endpoints.

Building our codable objects

The first thing we need to do is build our codable objects. Objects that implement the Codable protocol allow Encoders and Decoders to encode or decode them to and from an external representation such as JSON.

Let’s take the response from the sample endpoint below as an example:

https://jsonplaceholder.typicode.com/users

{
    "id": 1,
    "name": "Leanne Graham",
    "username": "Bret",
    "email": "Sincere@april.biz",
    "address": {
      "street": "Kulas Light",
      "suite": "Apt. 556",
      "city": "Gwenborough",
      "zipcode": "92998-3874",
      "geo": {
        "lat": "-37.3159",
        "lng": "81.1496"
      }
    },
    "phone": "1-770-736-8031 x56442",
    "website": "hildegard.org",
    "company": {
      "name": "Romaguera-Crona",
      "catchPhrase": "Multi-layered client-server neural-net",
      "bs": "harness real-time e-markets"
    }
  }

You can create codable classes yourself by hand. In simple examples this can be fairly straight forward, however if you have a response that has a more complex structure, doing so can be time consuming and error prone.

To create our codable objects we can use a generator, my weapon of choice is QuickType. We just paste in the JSON that is returned from the posts endpoint and it automatically generates the Codable structs for us. Easy!

If we paste in our post response, we should end up with some code looking like this:

// MARK: - User
struct User: Codable {
    let id: Int
    let name, username, email: String
    let address: Address
    let phone, website: String
    let company: Company
}

// MARK: - Address
struct Address: Codable {
    let street, suite, city, zipcode: String
    let geo: Geo
}

// MARK: - Geo
struct Geo: Codable {
    let lat, lng: String
}

// MARK: - Company
struct Company: Codable {
    let name, catchPhrase, bs: String
}

typealias Users = [User]

How easy was that?! Obviously we will still need to check the structs, in the example above none of the fields are optional which means data must be passed in otherwise our decoding will fail. We don’t need to worry about that here, but worth remembering when checking the generated code in your examples.

URLSession extension and Generics

To solve our problem we are going to wrap the existing URLSession dataTask method. I’m sure if you have done any kind of request work in pure swift you will have used this method in some form so we aren’t going to go into the details of how it works.

extension URLSession {

	// 1
    enum SessionError: Error {
        case noData
        case statusCode
    }

    /// Wraps the standard dataTask method with a JSON decode attempt using the passed generic type.
    /// Throws an error if decoding fails
    /// - Parameters:
    ///   - url: The URL to be retrieved.
    ///   - completionHandler: The completion handler to be called once decoding is complete / fails
    /// - Returns: The new session data task

    // 2 
    func dataTask<T: Decodable>(with url: URL,
                                completionHandler: @escaping (T?, URLResponse?, Error?) -> Void) -> URLSessionDataTask {

        // 3
        return self.dataTask(with: url) { (data, response, error) in
        	// 4
            guard error == nil else {
                completionHandler(nil, response, error)
                return
            }

            // 5
            if let response = response as? HTTPURLResponse,
                (200..<300).contains(response.statusCode) == false {
                completionHandler(nil, response, SessionError.statusCode)
            }

            // 6
            guard let data = data else {
                completionHandler(nil, response, SessionError.noData)
                return
            }

            // 7
            do {
                let decoded = try JSONDecoder().decode(T.self, from: data)
                completionHandler(decoded, response, nil)
            } catch(let error) {
                completionHandler(nil, response, error)
            }
        }
    }
}

So let’s step through this code sample step by step:

  1. First of we have defined a custom error for this extension, this is returned when no data has been returned from the request, covered in point 6. We also have an error case if we get an HTTPURLResponse with an incorrect status code, covered in point 5.
  2. Here we are making use of Generics to allow any type T being returned from this function as long as type T implements the Decodable protocol (which we need it to inorder to use the JSONDecoder)
  3. As discussed, here we are calling the existing dataTask method to run our request.
  4. First thing we do once the request has returned is check to see if there was a request error, if so we call the completion handler with the response and the error.
  5. The second check we perform is to check the status code if we have received an HTTPURLResponse. Note we aren’t stopping the code here if we don’t get a HTTPURLResponse as you could use this function to load a local JSON file for example, not just a remote URL. Any status code in the 200-299 range is considered a successful request, if we receive a status code outside this range we return an error along with the response for further processing by whoever passed the completion handler.
  6. The third check we perform is to unwrap data ready for decoding. If this fails (as in it’s nil) then we call the completionHandler with the response and our custom error defined in step 1.
  7. The final piece of the puzzle is to attempt to decode the data into type T we defined in the method signature as part of step 2. If this succeeds we can call our completion handler with our decoded type and response. If it throws an error we capture the error and return it using the catch block below.

See it in action

Now that we have put our function together, let’s take it for a test drive.

let url = URL(string: "https://jsonplaceholder.typicode.com/users")!
let task = URLSession.shared.dataTask(with: url, completionHandler: { (users: Users?, response, error) in
    if let error = error {
        print(error.localizedDescription)
        return
    }

    users?.forEach({ print("\($0.name)\n") })
})
task.resume()

This shouldn’t look too scarey, infact if you have used the standard dataTask functions in your code previously this should look very familiar. The only different here being that our completion handler now returns our Codable User objects rather than just a blob of Data like before.

Hopefully that example makes sense and gives you a nice simple way to perform a request and have it decode some JSON into a struct / class. Now let’s have a look at some reactive programming using Combine.

Combine

Hopefully you have at least heard of Combine even if you haven’t had chance to use it yet in a production app. It is Apple’s own version of a reactive framework. Those of you who have already been using RxSwift will be right at home. We aren’t going to go into too much detail about what Combine is but here is a definition of what reactive programming is:

In computing, reactive programming is a declarative programming paradigm concerned with data streams and the propagation of change

In more simplistic terms, reactive programming uses a observer pattern to allow classes to monitor different streams of data or state. When this state changes it emits an event with the new value which can trigger other streams to perform work or update such as UI code. If you are familier with KVO you will understand the basic concept. However reactive programming is far less painful and a lot more powerful than KVO.

Now let’s take the previous pure Swift example and see how we can use it in Combine. The Combine framework adds new reactive functionality to the URLSession in the form of the dataTaskPublisher function.

extension URLSession {

	// 1
    enum SessionError: Error {
        case statusCode(HTTPURLResponse)
    }

    /// Function that wraps the existing dataTaskPublisher method and attempts to decode the result and publish it
    /// - Parameter url: The URL to be retrieved.
    /// - Returns: Publisher that sends a DecodedResult if the response can be decoded correctly.

    // 2
    func dataTaskPublisher<T: Decodable>(for url: URL) -> AnyPublisher<T, Error> {
    	// 3
        return self.dataTaskPublisher(for: url)
        	// 4
            .tryMap({ (data, response) -> Data in
                if let response = response as? HTTPURLResponse,
                    (200..<300).contains(response.statusCode) == false {
                    throw SessionError.statusCode(response)
                }

                return data
            })
            // 5
            .decode(type: T.self, decoder: JSONDecoder())
            // 6
            .eraseToAnyPublisher()
    }
}

Similar to our previous example we have extended URLSession to provide this functionality. Let’s step through it:

  1. As with the pure Swift example we are defining a custom error here to handle when we receive a status code that is not a success. The difference being here we are attaching the response to the error as we don’t have a completionHandler in Combine. That way whoever is handling the error can inspect the response and see why it failed.
  2. Here we are defining the method, again using generics to only accept a type T that has implemented the Decodable protocol. The function returns a publisher who returns our decoded object.
  3. As discussed previously, we are simply wrapping the existing dataTaskPublisher method.
  4. Now here is where things start to become reactive. The tryMap function is similar to the standard map function in that it attempts to convert / transfrom elements from one type to another. However the difference here being that it is almost wrapped in a try. In this case you can include code in the closure which throws errors and they will be pushed downstream and handled later instead of needing a do block. Similar to our pure Swift example, we are checking we have a valid status code, if not we throw our custom error. If not we map our data ready to be decoded.
  5. Here we are using the built in decode method to attempt to decode our custom type using the JSONDecoder. Similar to the tryMap function above, any errors are pushed downstream to be handler later.
  6. The final piece of the puzzle is to use type erasure. This removes the publisher class type and makes it AnyPublisher. For more info on type erasure see my previous post

Combine in action

Now that we have built our wrapper class let’s take a look at this in action:

let url = URL(string: "https://jsonplaceholder.typicode.com/users")!

let token = URLSession.shared.dataTaskPublisher(for: url)
	// 1
    .sink(receiveCompletion: { (completion) in
        switch completion {
        // 2
        case .finished:
            break
        case .failure(let error):
            print(error.localizedDescription)
        }
    }) { (users: Users) in
    	// 3
        users.forEach({ print("\($0.name)\n") })
    }
  1. Here we have called our newly created dataTaskPublisher method which has returned our publisher. This is where reactive programming comes in. All of the code inside the dataTaskPublisher has not executed yet. We have simply returned a publisher who is waiting for a subscriber to come along and listen. A publisher will not execute unless a subscription has not been fulfilled. To subscribe to a stream we use the sink method. If you think of the chain of reactive methods flowing into a sink at the bottom, that is the best analogy here.
  2. The sink method has 2 parts. The first closure defines what happens once the stream is completed. Now this can come in the form of a finished state, which means the stream has completed what is doing and will no longer emit any more events. Or failure, which means some item further up the stream has raised an error which flows down into this sink where it can be handled.
  3. The second closure defines what we would like to do each time the event stream emits a change. In this case the publisher will send a users array once it has finished loading, here we are just printing out the user names.

Finally

What have we learnt:

  • We have used QuickType to convert our JSON into codable structs for decoding.
  • Wrapped the existing URLSession dataTask method with our own using Generics so we can using any Codable type to decode the response.
  • Similarly, using reactive programming and Apple’s new Combine framework have created our own Generic wrapper for the existing dataTaskPublisher function.

Feel free to download the playground and play around with the examples yourself

Read More

What is type erasure in Swift

Intro

  • Wtf is type erasure?
  • Why do I need it?
  • This seems complicated?
  • Isn’t there a simpler way?

These are are just some of the questions I found myself asking once I first starting exploring type erasure. Like many other developers, I have been making use of protocols in my code to remove dependencies and make my classes easy to unit test. It wasn’t until I then started to add generics to my protocols that I discovered the need to apply type erasure.

Having read many blog posts and guides about type erasure I still came away confused as to what it was, why it was needed and why it seemed to add so much complexity. By trying to add generics to protocols in a project I was working on I finally saw the light! I am going to try and walk you through the topic using an example which is similar to the one I was trying to solve in my project. Hopefully this will help those of you who are looking to understand the topic further in the same way it helped me.

Generics and Associated Types

I am assuming that as you are here you have a fairly advanced knowledge of Swift and have potentially begun or have been using protocols with generics in your code. Below is a simple protocol called Fetchable. The idea of the protocol is to go and fetch some objects of type FetchType from somewhere and call the completion handler with the result once it’s finished whatever it is doing.

protocol Fetchable {
    associatedtype FetchType

    func fetch(completion: ((Result<FetchType, Error>) -> Void)?)
}

Now that we have our protocols lets create a couple of structs to implement the protocol.

struct User {
    let id: Int
    let name: String
}

struct UserFetch: Fetchable {
    typealias FetchType = User

    func fetch(completion: ((Result<FetchType, Error>) -> Void)?) {
        let user = User(id: 1, name: "Phil")
        completion?(.success(user))
    }
}

So here we have created a dummy data class, User. Our fetch struct has implemented the generic protocol and has specified the type of object that will be returned in the protocol using a typealias. Everything here is great, we can implement this protocol as many times as we like and return whatever object types we want without the need to create a new protocol for each one.

The problem

Now, here in lies the problem. If we wish to hold a reference to an object that has implemented this protocol. How do we know what type it is going to return? See the below example:

struct SomeStruct {
    let userFetch: Fetchable
}

What you will also find here is that you will see an error, something like the below

Protocol ‘Fetchable’ can only be used as a generic constraint because it has Self or associated type requirements

So we can’t even use this type as a reference to the object, as it has an associated type which we cannot see at this point and have no way of specifying.

Now we could do something like below, however this creates a dependency between SomeStruct and the userFetch object. If we are following the SOLID principles we want to avoid having dependencies and hide implementation details.

struct SomeStruct {
    let userFetch: UserFetch
}

Ok, so let’s try adding a type like we do with other generic types such as arrays and dictionaries:

struct SomeStruct {
    let userFetch: Fetchable<User>
}

If you try the above you will probably end up with an error something like this:

Cannot specialize non-generic type ‘Fetchable’

See generic protocols, unlike generic types cannot have their type inferred in the type declaration. The type is only specified during implementation.

Type Erasure to the rescue

So this is where type erasure comes in. In order for us to know the type returned we need to implement a new class that can be used to infer the type of object returned so that we know what to expect when we call fetch.

// 1
struct AnyFetchable<T>: Fetchable {
    // 2
    typealias FetchType = T

    // 3
    private let _fetch: (((Result<T, Error>) -> Void)?) -> Void

    // 4
    init<U: Fetchable>(_ fetchable: U) where U.FetchType == T {
        _fetch = fetchable.fetch
    }

    // 5
    func fetch(completion: ((Result<T, Error>) -> Void)?) {
        _fetch(completion)
    }
}

Whoooa! There is a lot going on here so let us go through it piece by piece to explain what is happening.

  1. Here our AnyFetchable class is implementing the Fetchable protocol. But also we see that we now have a generic type specification. This means that we can specify what type is being used while storing a reference to this struct.
  2. Our generic type T being specified in the line above is then used in the typealias and mapped to the FetchType associated value of the protocol.
  3. Now this is where things get fiddly. In order for us to erase the type of the injected class we must first create an attribute which is a closure with a matching signature for each function in the protocol. In this scenario we only have 1 method which is the fetch method. Here you can see the fetch attribute has the same method signature as the one in the protocol.
  4. Lets break this down a bit. First of all we are saying that this init method is only available for an object that has implemented Fetchable, called U. The where clause at the end of the line is a generic type restriction which states that the FetchType of the Fetchable U must be the same as the one being used in this class. This might not make too much sense right now, but stay with me. When the fetchable type U is passed in, we store a reference to its fetch method in our own internal variable. This is what helps us erase the type, we store a reference to all of the objects methods without actually storing a reference to the object. That way we don’t need to know the type.
  5. Here is our implementation of the Fetchable protocols fetch method, however all we are doing is calling the reference to passed in objects fetch method and calling that instead.

Hopefully some of this makes sense, some of this may be new or confusing especially point 4. Let’s show how we can use our class in this example.

struct SomeStruct {
    let userFetch: AnyFetchable<User>
}

// 1
let userFetch = UserFetch()

// 2
let anyFetchable = AnyFetchable<User>(userFetch)

// 3
let someStruct = SomeStruct(userFetch: anyFetchable)

// 4
someStruct.userFetch.fetch { (result) in
    switch result {
    case .success(let user):
        print(user.name)
    case .failure(let error):
        print(error)
    }
}
  1. First we create an instance of our UserFetch object from earlier in the example that returns our example user.
  2. We pass this into our AnyFetchable object. Now remember we had a generic type constraint on our init in point 4 of the previous example. This is being satisfied because we have specified that the AnyFetchable should return a User type, and the UserFetch object we are passing in has the FetchType User.
  3. We can now pass in the AnyFetchable to our struct.

Why?

Now you are probably thinking, why do all of this? Well, let’s try another example:

// New Dave user struct
struct DaveFetch: Fetchable {
    typealias FetchType = User

    func fetch(completion: ((Result<FetchType, Error>) -> Void)?) {
        let user = User(id: 2, name: "Dave")
        completion?(.success(user))
    }
}

// Example implementation 2
let daveFetch = DaveFetch()
let anyDaveFetchable = AnyFetchable<User>(daveFetch)
let someDaveStruct = SomeStruct(userFetch: anyDaveFetchable)

someDaveStruct.userFetch.fetch { (result) in
    switch result {
    case .success(let user):
        print(user.name)
    case .failure(let error):
        print(error)
    }
}

So here we have created a new object that implements Fetchable and returns a user called Dave. We can then pass this into our SomeStruct using our type erasure class and it works exactly the same. The SomeStruct class doesn’t need to be changed in order to work with the new dave class as it’s type has been erased. In a production app we could inject any class we want as long as it fetches a User, whether that comes from the web, core data, the file system. It doesn’t matter we could switch it at any time without making changes to our SomeStruct class.

Finally

The last example here is that we can use our Any class for other types, not just User. See the example below:

// Product Type
struct Product {
    let id: Int
    let title: String
    let price: String
}

struct ProductFetch: Fetchable {
    typealias FetchType = Product

    func fetch(completion: ((Result<FetchType, Error>) -> Void)?) {
        let product = Product(id: 1, title: "My Product", price: "10.99")
        completion?(.success(product))
    }
}

let productFetch = ProductFetch()
let anyProductFetch = AnyFetchable<Product>(productFetch)
anyProductFetch.fetch { (result) in
    switch result {
    case .success(let product):
        print(product.title)
    case .failure(let error):
        print(error)
    }
}

Similar to our user example, we have created a new Product object and a fetcher that returns a product object. However we can re-use our AnyFetchable here but specifying the return type as Product.

There is a lot to cover and understand here and hopefully this helps make some sense of type erasure and what it is used for. More importantly how to implement your own Any type erasure class for your own protocols so that they can be referenced in your code.

Download the playground and play around with the examples yourself

Read More