Best Practices for Delegating Effectively in Engineering Management

Delegation is one of the most critical skills for any manager, especially in the field of engineering. With its inherently collaborative nature and often complex, multifaceted projects, effective delegation can be the difference between a project’s success and failure.

However, delegation is more than just offloading tasks. It involves entrusting your team with responsibilities, empowering them, and fostering their growth. Done right, it leads to improved efficiency, team development, and a healthier, more balanced workload for everyone.

This article will explore best practices for delegating effectively in engineering management.

Understanding Delegation

Delegation is the process of assigning tasks or responsibilities to others. In the context of management, it involves distributing tasks among team members based on their skills, interests, and the team’s overall workload.

The ability to delegate effectively is essential for many reasons. It allows managers to focus on strategic tasks and decision-making. It helps in developing team members’ skills and promoting their professional growth. It also enhances team productivity and efficiency by ensuring that tasks are done by the most competent individuals.

Best Practices for Effective Delegation

  • Know Your Team: To delegate effectively, you need a deep understanding of your team’s skills, interests, and capacities. This allows you to assign tasks to the most suitable individuals, leading to improved efficiency and job satisfaction. Regular one-on-one meetings, team-building activities, and performance reviews can provide valuable insights into your team’s capabilities and aspirations.

  • Define Tasks Clearly: Each delegated task should be defined clearly. This includes the task’s objectives, expected outcomes, deadlines, and any necessary resources or tools. Avoid vague instructions or assumptions. Ensure the person understands the task and its importance in the broader project context.

  • Match Tasks to Skills: Assign tasks based on team members’ skills and development goals. This not only increases the chances of the task being done well, but also motivates individuals by showing trust in their abilities and providing opportunities for growth.

  • Delegate Authority Along with Responsibility: Delegation is not just about assigning tasks; it’s also about entrusting authority. When you delegate a task, ensure the person has the authority to make decisions related to it. This empowers your team members, fosters their problem-solving skills, and reduces bottlenecks.

  • Set Clear Expectations: Ensure your team members know what is expected of them. This includes the quality of work, deadlines, and the degree of autonomy they have. Setting clear expectations upfront can prevent misunderstandings and ensure accountability.

  • Monitor Progress, Don’t Micromanage: While it’s important to monitor progress and provide support, avoid micromanaging. Give your team members the freedom to complete tasks in their own way. Regular check-ins or status updates can help keep you informed without being intrusive.

  • Provide Feedback and Recognize Efforts: Provide constructive feedback to help your team members improve. Recognize their efforts and celebrate successes. This not only boosts morale, but also promotes a culture of continuous learning and improvement.

  • Foster a Safe Environment for Mistakes: Mistakes are an inevitable part of learning. Foster an environment where mistakes are seen as learning opportunities, not failures. Encourage your team to take risks, experiment, and learn from their mistakes.

Delegation Scenarios and Strategies in Engineering Management

Let’s consider a few scenarios where delegation is particularly crucial in engineering management, along with strategies to handle them effectively.

Scenario 1: Large-Scale Projects

Large-scale engineering projects involve numerous tasks and responsibilities. Effective delegation is crucial for managing such projects successfully.

Strategy

Break down the project into smaller, manageable tasks. Delegate these tasks based on team members’ skills, interests, and capacities. Ensure each person understands their tasks, the deadlines, and how their work fits into the larger project. Regularly check in on progress and provide support as needed.

Scenario 2: High-Stakes Tasks

There may be high-stakes tasks that carry significant risks or consequences. These tasks require careful delegation to ensure they are handled competently and responsibly.

Strategy

Assign these tasks to individuals with the necessary skills, experience, and judgement. Provide clear guidelines and expectations, and ensure they have all the resources they need. Stay informed about the task’s progress, and be ready to step in if necessary.

Scenario 3: Tasks for Skill Development

Certain tasks can provide excellent opportunities for team members to develop new skills or gain experience in different areas.

Strategy

Identify the skills or experiences that the task can provide, and delegate it to someone who would benefit from this development. Make sure they understand the learning opportunity, and provide support and feedback to aid their learning.

Scenario 4: Routine Tasks

Routine tasks, such as maintenance work or periodic reporting, can take up a significant amount of time if not delegated effectively.

Strategy

Consider delegating routine tasks to less experienced team members as a way to build their skills and free up more experienced members for complex tasks. Alternatively, consider automating these tasks if possible.

Overcoming Common Challenges in Delegation

While delegation is crucial for effective management, it can also pose several challenges. Here are a few common challenges and tips to overcome them:

  • Reluctance to Delegate: Some managers may be reluctant to delegate due to a desire for control, lack of trust in the team, or fear of being seen as lazy. Overcome this by recognizing the value of delegation for the team and the project, building trust with your team, and changing your mindset about delegation.
  • Inadequate Skills or Resources: Sometimes, team members may not have the necessary skills or resources to complete the delegated tasks. Address this by providing training, mentorship, and the necessary tools and resources.
  • Over-delegation: This occurs when too many tasks are delegated to a person, leading to overwhelm and burnout. Avoid this by monitoring your team’s workload and ensuring tasks are distributed evenly.
  • Poor Communication: This can lead to confusion, mistakes, and frustration. Improve communication by clearly defining tasks, setting expectations, and maintaining open lines of communication.

Conclusion

Delegation is a powerful tool in engineering management. It not only improves efficiency and productivity but also empowers your team, fosters skill development, and creates a more balanced and satisfying work environment.

However, effective delegation requires a deep understanding of your team, clear communication, and trust. It’s about striking a balance between providing guidance and giving autonomy, between monitoring progress and avoiding micromanagement.

By understanding the principles of effective delegation and applying the strategies discussed in this article, you can harness the power of delegation to drive your team’s success and create a supportive, growth-oriented work environment. Remember, delegation is not just about getting things done; it’s about building a strong, capable, and motivated team.
Best Practices for Managing Conflict in Engineering Management

Conflict is an inevitable part of any organization, and engineering teams are no exception. As an engineering manager, dealing with conflict is one of the most challenging aspects of the role. However, if handled effectively, conflict can lead to innovation, improved team dynamics, and increased productivity. This article will explore best practices for managing conflict in engineering management.

Understanding the Nature of Conflict

Before we delve into conflict management strategies, it’s crucial to understand what conflict is and why it occurs. In the simplest terms, conflict arises from differences. These differences can be in perspectives, interests, or values.

In the context of an engineering team, conflicts can stem from disagreements over technical decisions, project priorities, or resource allocation. They can also arise from personal differences or communication breakdowns.

Regardless of the cause, conflicts can have significant negative impacts if not addressed. These can include decreased productivity, damaged relationships, increased stress, and a hostile work environment.

Adopting a Proactive Approach

The first best practice in managing conflict is to adopt a proactive approach. This involves creating an environment where conflicts are less likely to occur and, when they do, they are handled constructively.

  • Promote Open Communication: Encourage team members to share their ideas, concerns, and feedback openly. Regular team meetings, one-on-ones, and open-door policies can facilitate this.
  • Set Clear Expectations: Make sure your team understands their roles, responsibilities, and the standards expected of them.
  • Encourage Collaboration: Foster a collaborative culture where team members work together and support each other.
  • Provide Training: Provide your team with training in communication, negotiation, and conflict resolution skills.
  • Despite your best efforts, conflicts will inevitably arise. Here are some best practices for managing conflicts when they occur.

Listen Actively

When a conflict arises, the first step is to listen actively to all parties involved. This involves not just hearing the words, but understanding the underlying feelings, needs, and concerns.

  • Empathize: Try to understand the situation from each person’s perspective.
  • Ask Questions: Ask open-ended questions to get a deeper understanding of the issue.
  • Paraphrase: Paraphrase what you’ve heard to confirm your understanding.
  • Mediate Fairly

As a manager, your role is to mediate the conflict in a fair and neutral manner. Avoid taking sides or making judgments prematurely.

  • Facilitate Dialogue: Encourage the conflicting parties to communicate directly with each other, expressing their viewpoints respectfully.
  • Focus on Interests, Not Positions: Encourage team members to express their underlying needs and concerns, rather than sticking to their initial positions.
  • Generate Options: Help the parties involved generate multiple options for resolving the conflict.

Resolve and Learn

Once a resolution has been reached, it’s crucial to ensure that it’s implemented and the conflict doesn’t recur.

  • Follow Up: Monitor the situation to ensure that the agreed-upon resolution is implemented.
  • Reflect and Learn: Reflect on the conflict and its resolution. What can be learned? How can similar conflicts be prevented in the future?

Don’t Avoid Difficult Conversations

One of the biggest mistakes managers make is avoiding difficult conversations. However, ignoring conflicts doesn’t make them disappear; it often makes them worse. Address conflicts promptly and directly, while treating all parties with respect and fairness.

Leverage Diversity

Diverse teams bring different perspectives and ideas, which can lead to conflicts. However, this diversity can also be a strength. Encourage your team to see differences as opportunities for learning and innovation, rather than sources of conflict.

Seek Help When Needed

If a conflict is particularly challenging or if it’s causing significant disruption, don’t hesitate to seek help. This could be from a higher-level manager, a human resources professional, or an external mediator or coach.

Know When to Escalate

While most conflicts can be managed at the team level, there are situations when escalation is necessary. This could be when the conflict involves serious misconduct, such as harassment or discrimination, or when it’s causing significant harm to individuals or the team.

Foster a Culture of Respect

At the heart of effective conflict management is a culture of respect. This involves treating each other with kindness and understanding, even when disagreements occur. It also involves respecting diversity and different viewpoints.

The Role of Emotional Intelligence

Emotional Intelligence (EQ) plays a crucial role in conflict management. This includes self-awareness, self-regulation, empathy, and social skills.

  • Self-Awareness: Recognize your own emotions and how they can impact your reactions to conflict.
  • Self-Regulation: Manage your emotions effectively to remain calm and composed during conflicts.
  • Empathy: Understand and share the feelings of others, which can help de-escalate conflicts.
  • Social Skills: Use effective communication and interpersonal skills to manage and resolve conflicts.

Balancing Assertiveness and Cooperation

Managing conflict effectively requires a balance of assertiveness and cooperation. This involves standing up for your own or your team’s needs and interests, while also seeking to understand and accommodate the needs of others.

Promote Psychological Safety

Psychological safety is a sense of trust and respect among team members, where individuals feel safe to express their ideas, take risks, and make mistakes without fear of punishment or ridicule. Teams with high psychological safety are more likely to handle conflicts constructively, as team members feel safe to express their disagreements openly and respectfully.

Common Conflict Scenarios and Strategies for Resolution

Let’s examine a few common conflict scenarios within engineering teams, and strategies for resolving them effectively.

Scenario 1: Disagreement Over Technical Decisions

Imagine a situation where two senior engineers, Alice and Bob, have a disagreement over the choice of technology for a new project. Alice believes that adopting a new, cutting-edge technology is the best approach, as it offers advanced features and future-proofs the project. Bob, on the other hand, argues for using a tried-and-true technology that the team is familiar with, to minimize risk and deliver on time.

Resolution Strategy

In this situation, as a manager, your role is to facilitate a constructive dialogue between Alice and Bob. Encourage them to express their viewpoints, focusing on the underlying interests and concerns, rather than sticking to their initial positions.

For example, Alice’s interest might be in innovation and staying competitive, while Bob’s interest might be in risk management and efficient delivery. Recognizing these underlying interests can open up new options. Perhaps there’s a way to incorporate the new technology in a limited, controlled way that allows for innovation while managing risk. Or maybe the team could invest in training and support to mitigate the risks associated with the new technology.

Scenario 2: Personality Clashes

Consider another scenario where two team members, Carlos and David, have a personality clash. Carlos is extroverted, outspoken, and likes to brainstorm ideas in group settings. David is introverted, prefers quiet to concentrate, and likes to think through his ideas before sharing them. Their differing styles have led to tension and misunderstandings.

Resolution Strategy

In this scenario, it’s important to facilitate a conversation between Carlos and David, helping them understand each other’s work styles and needs. Encourage empathy and mutual respect.

For instance, Carlos could be encouraged to give David a heads-up before discussions and respect his need for quiet working time. David, on the other hand, could be encouraged to express his ideas even if they’re not fully formed, to contribute to the team’s brainstorming sessions.

By understanding and accommodating each other’s styles, Carlos and David can turn their differences into strengths, fostering a more diverse and inclusive team culture.

Scenario 3: Conflict Over Priorities

In another situation, Emma, a software engineer, feels frustrated because she’s constantly being pulled into urgent bug fixes, leaving her with no time to work on her main project. Frank, the support engineer, feels that resolving customer issues should always be the top priority.

Resolution Strategy

In this case, it’s crucial to clarify roles, responsibilities, and priorities. You may need to step in and make a decision, or facilitate a discussion with Emma and Frank about how to balance immediate customer needs with long-term project goals.

Perhaps there is a way to streamline the bug-fixing process, or allocate specific times for it, so it doesn’t interrupt Emma’s project work. Alternatively, there might be a need for additional resources or better coordination between the project and support teams.

Conclusion

Managing conflict in engineering management is a complex task that requires a diverse set of skills, from effective communication and active listening to empathy, patience, and fairness. It’s about creating a culture where conflicts are not feared or avoided, but embraced as opportunities for learning, growth, and innovation.

Remember that conflict is not inherently bad. When handled effectively, it can lead to better decisions, increased creativity, stronger relationships, and a more engaged and productive team. As an engineering manager, your role is not to eliminate conflict, but to manage it constructively, turning challenges into opportunities for team growth and success.

Transitioning from Engineer to Engineering Manager: The Uncharted Terrain

In the world of tech, transitioning from the role of an engineer to an engineering manager is often viewed as a natural progression. Many engineers, after having honed their technical skills, look forward to the opportunity of expanding their sphere of influence by stepping into a managerial role. However, this transition is not as straightforward as it may seem at first glance. It presents a new set of challenges that are fundamentally different from those encountered in a purely technical role.

Understanding the Role Shift: From Problem-Solver to Enabler

One of the most significant challenges in transitioning from engineer to engineering manager is accepting and understanding the fundamental shift in roles. As an engineer, your primary role is to solve technical problems - whether it’s writing code, debugging issues, or designing software architecture. Your success is often measured by the quality of the solutions you deliver and the technical challenges you overcome.

However, as an engineering manager, your role involves less hands-on problem-solving and more enabling your team to solve problems. You become a facilitator, mentor, and guide, helping to clear roadblocks and provide resources for your team. Your success is now measured less by your personal technical accomplishments and more by the achievements of your team.

This shift from individual contributor to team leader can be challenging and even discomforting for many new managers. It requires a change in mindset, where you need to redefine what productivity and success mean to you. You’ll need to find fulfillment in the success of others, which can be a difficult transition for someone used to personal technical achievements.

Mastering the Art of Time Management and Prioritization

As an engineer, you are often given well-defined tasks and deadlines. Your work is scoped, and you can focus your efforts on technical problem-solving. However, as a manager, your responsibilities become varied and often less defined. You’ll be juggling multiple tasks, from strategic planning and goal-setting to recruitment, team-building, and administrative duties.

Consequently, effective time management and prioritization become essential skills. You’ll need to learn to balance urgent issues with important long-term goals, delegate tasks, and sometimes, even say ‘no’ to avoid overcommitting yourself or your team.

Perhaps one of the biggest challenges for many new engineering managers is people management. While your previous role primarily involved interacting with code, your new role will involve interacting with people. Understanding and managing human dynamics is much more complex and unpredictable than solving technical problems.

You’ll need to cultivate a diverse set of skills, including effective communication, conflict resolution, and motivational abilities. You’ll have to navigate team dynamics, manage conflicting personalities, understand individual motivations, and foster a positive, productive work environment. You’ll also need to provide feedback, mentorship, and career development for your team members - tasks that require empathy, patience, and understanding.

The Challenge of Delayed Feedback

In engineering, feedback is often immediate and clear-cut. You write code, run it, and see the results. If something breaks, you fix it. Your impact is visible and quantifiable. However, as a manager, feedback is often delayed and less tangible.

The impact of decisions you make or initiatives you implement may not be evident for weeks or even months. Measuring success becomes trickier, as it’s often tied to team performance, employee satisfaction, and long-term project outcomes. This delay in feedback can be disconcerting and requires patience, long-term thinking, and an ability to see the big picture.

Growing into a Visionary Leader

As an engineer, you are typically tasked with implementing visions and plans created by others. However, as an engineering manager, you are expected to set the vision and chart the course. This involves strategic thinking, decision-making under uncertainty, and the ability to inspire and motivate your team to align with your vision. It requires you to shift from a detail-oriented focus to a broader perspective, which can be challenging for many who are used to the concrete world of coding.

The Isolated Landscape of Management

Being a manager can sometimes feel isolating. You’re often privy to sensitive information that you can’t share with your team. There may be company decisions you have to uphold even if you don’t personally agree with them. You may need to mediate conflicts, deliver difficult feedback, or make tough decisions that not everyone will like. This can create a sense of being ‘alone in the middle’ - between your team and upper management - which many new managers are unprepared for.

The Conquest of the Challenges: Strategies for Success

While these challenges might seem daunting, they can be successfully managed with the right strategies.

  • Embrace the Change: Recognize that your role has fundamentally changed. Embrace your new identity as a facilitator and leader, and take pride in the success of your team.
  • Develop New Skills: Invest time in developing essential managerial skills, such as effective communication, conflict resolution, strategic thinking, and time management. These are just as important as your technical skills in your new role.
  • Seek Mentorship: Find mentors who can guide you through this transition. They can provide invaluable advice, insights, and moral support.
  • Prioritize Self-Care: The role of a manager can be stressful. Make sure to take care of your mental health. Practice mindfulness, maintain a healthy work-life balance, and seek professional help if needed.
  • Embrace Continuous Learning: Accept that you’ll make mistakes, but view them as learning opportunities. Strive to learn and grow continuously.

Final Thoughts

Transitioning from engineer to engineering manager is a significant career shift, filled with challenges but also opportunities for personal and professional growth. It’s a journey that requires not just technical expertise but also a broad range of soft skills.

However, it’s important to remember that management is not the only path for career progression. Many companies now offer ‘individual contributor’ tracks, allowing engineers to take on more complex problems and responsibilities without moving into management.

Whether you decide to pursue management or remain an individual contributor, the key is to understand your strengths, passions, and career aspirations, and align them with your chosen path. Remember, a successful career is not just about titles or roles, but about continuous learning, growth, and making a positive impact in your organization.

In the end, whether you’re writing code or leading a team, the most important thing is to find joy and fulfillment in what you do. This will not only lead to personal satisfaction but also to a successful and rewarding career.

SOLID Principles in Swift - Dependency Inversion Principle

Background

In this series of posts we are going to be covering the SOLID principles of software development. These are a set of principles / guidelines, that when followed when developing a software system, make it more likely that the system will be easier to extend and maintain over time. Let’s take a look at the problems that they seek to solve:

  • Fragility: A change may break unexpected parts, it is very difficult to detect if you don’t have a good test coverage
  • Immobility: A component is difficult to reuse in another project or in multiple places of the same project because it has too many coupled dependencies
  • Rigidity: A change requires a lot of effort because it affects several parts of the project

So what are the SOLID principles?

  • Single Responsibility Principle - A class should have only a single responsibility / have only one reason to change
  • Open-Closed Principle - Software should be open for extension but closed for modification
  • Liskov Substitution Principle - Objects in a program should be replaceable with instances of their sub types without altering the correctness of the program
  • Interface Segregation Principle - Many client-specific interfaces are better than one general-purpose interface
  • Dependency Inversion Principle - High level modules should not depend on low level modules. Both should depend on abstractions

In this article we will focus on the Dependency Inversion Principle.

What does it mean?

This principle has 2 main components described below:

High-level modules should not import anything from low-level modules. Both should depend on abstractions (e.g., interfaces) Abstractions should not depend on details. Details (concrete implementations) should depend on abstractions

I’ve interviewed many iOS developers over the years and I struggle to recall a single person who has actually got this part of the SOLID principles 100% right. I think a large part of this comes from the fact many use simple architectures such as MVVM that don’t break applications down into smaller layers and components/modules. This isn’t a criticism, not every app needs a VIPER/Clean architecture approach with multiple layers.

Most iOS developers I speak to come to the conclusion that this principle just means using protocols instead of concrete classes and injecting dependencies to help with testing/mocking. While this principle does rely on this to work it is not the primary purpose of the principle and exposes an issue once you start to depend on abstractions used across multiple layers / modules.

Setup

Lets setup a simple example in Xcode where we have two separate modules that depend on each other in order to provide some functionality.

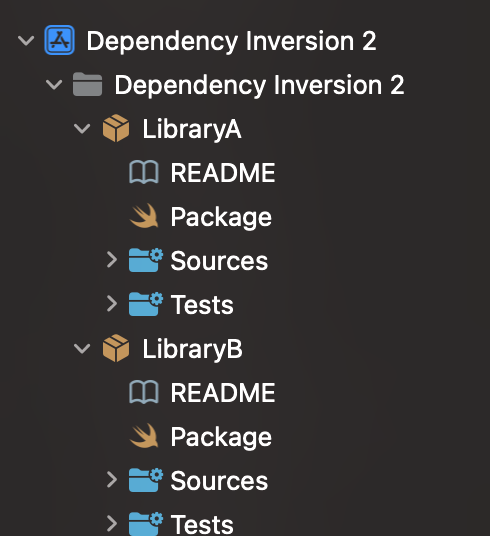
If we create a simple Swift UI project using Xcode, then using File -> New -> Package create 2 new swift packages and add them to the project. One called LibraryA and one called LibraryB. Be sure to select your project in the ‘Add to’ drop down when naming your libraries. You should have something that looks like below Xcode.

Swift Packages Setup

Let’s start by adding a protocol and some custom data structure that we are going to be using across the 2 libraries we are working. Add a file called Protocol.swift in LibraryA and add the following code below:

import Foundation

public protocol MyProtocol {
    func doSomething(data: MyData)
}

public struct MyData {
    public let title: String
    public let subTitle: String
}

We have a simple one function protocol and a small struct, this is what we will be using to separate dependencies between our 2 libraries.

Next, lets create an implementation in LibraryA that has these protocols as a dependency. Create a file in LibraryA with the name ImplementationA:

import Foundation

public class ImplementationA {
    private let something: MyProtocol
    
    public init(something: MyProtocol) {
        self.something = something
    }
}

This is just a simple class that has the MyProtocol protocol has a dependency. Simple enough so far!

Now let’s create a class in LibraryB that implements the protocol that is being used in our class in LibraryA. Create a class in LibraryB called ImplementationB:

import Foundation
import LibraryA

public class ImplementationB: MyProtocol {
    public init() {}
    
    public func doSomething(data: LibraryA.MyData) {
        print("Do something")
    }
}

We have our class in LibraryB that is implementing the protocol we previously created in LibraryA. For this reason you will notice that we have to import LibraryA in this class as well. There is one additional step we need to do before this will compile correctly, we need to define our dependency in our package file. Let’s open the LibraryB package file and edit it to add the dependency between the 2 packages:

import PackageDescription

let package = Package(
    name: "LibraryB",
    products: [
        .library(
            name: "LibraryB",
            targets: ["LibraryB"]),
    ],
    // Assign LibraryA as dependency
    dependencies: [
        .package(path: "../LibraryA")
    ],
    targets: [
        .target(
            name: "LibraryB",
            // Add dependency to target
            dependencies: ["LibraryA"]),
        .testTarget(
            name: "LibraryBTests",
            dependencies: ["LibraryB"]),
    ]
)

We won’t go into all the options you need in the swift package file but hopefully by reading this you can see we have defined a dependency and added it to our LibraryB target. If you attempt to build the project it should compile successfully.

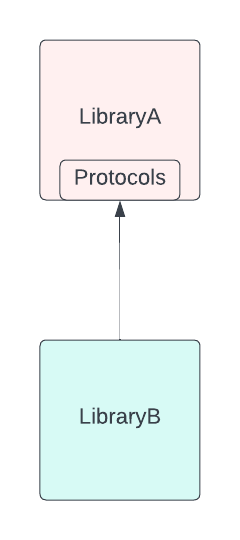
Now let’s look at the structure of these 2 libraries and their relationship to each other.

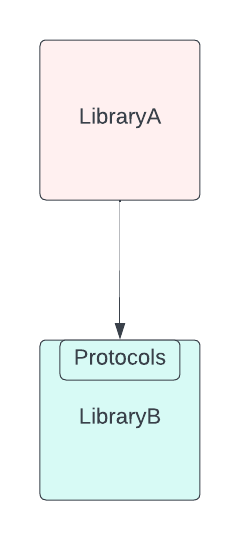
LibraryB to LibraryA Dependency

As you can see, we have LibraryA, this contains the protocols and LibraryB that implements the protocols. In order for LibraryB to implement the protocols it needs a dependency to LibraryA in order to work.

Problem 1

Now what happens if we want to use the protocols in another Library? Let’s call this LibraryC? At moment the protocols are contained in LibraryA where they are being used and implemented by Library B.

  • We can’t use the protocols in another library without adding LibraryA which may contain code and other assets we don’t want.
  • We could copy the protocols to LibraryC, however if you needed LibraryA and LibraryC in the same project you would get class clashes.
  • We would need to edit LibraryB to add another dependency in this case. What happens if we are not the owners of LibraryB? How would we even do this?

One solution we can try is moving the protocols from LibraryA to LibraryB. This reverses the dependencies and helps to solve the problems highlighted above. Let’s go ahead and do this now.

  • Copy the Protocols.swift file we created from LibraryA to LibraryB
  • Remove the import of LibraryA from the implementationB.swift
import Foundation

public class ImplementationB: MyProtocol {
    public init() {}
    
    public func doSomething(data: MyData) {
        print("Do something")
    }
}
  • Add an import of LibraryB to the top of implementationA.swift
import Foundation
import LibraryB

public class ImplementationA {
    private let something: MyProtocol
    
    public init(something: MyProtocol) {
        self.something = something
    }
}
  • Update the LibraryB package file to remove the LibraryA dependency
import PackageDescription

let package = Package(
    name: "LibraryB",
    products: [
        .library(
            name: "LibraryB",
            targets: ["LibraryB"]),
    ],
    // Assign LibraryA as dependency
    dependencies: [],
    targets: [
        .target(
            name: "LibraryB",
            // Add dependency to target
            dependencies: []),
        .testTarget(
            name: "LibraryBTests",
            dependencies: ["LibraryB"]),
    ]
)
  • Update the LibraryA package file to add the LibraryB dependency
import PackageDescription

let package = Package(
    name: "LibraryA",
    products: [
        // Products define the executables and libraries a package produces, and make them visible to other packages.
        .library(
            name: "LibraryA",
            targets: ["LibraryA"]),
    ],
    dependencies: [
        // Dependencies declare other packages that this package depends on.
        .package(path: "../LibraryB")
    ],
    targets: [
        // Targets are the basic building blocks of a package. A target can define a module or a test suite.
        // Targets can depend on other targets in this package, and on products in packages this package depends on.
        .target(
            name: "LibraryA",
            dependencies: ["LibraryB"]),
        .testTarget(
            name: "LibraryATests",
            dependencies: ["LibraryA"]),
    ]
)

Now let’s see a diagram of what we have done. Now if we look at our 2 libraries at a high level the dependencies look like this.

LibraryA to LibraryB Dependency

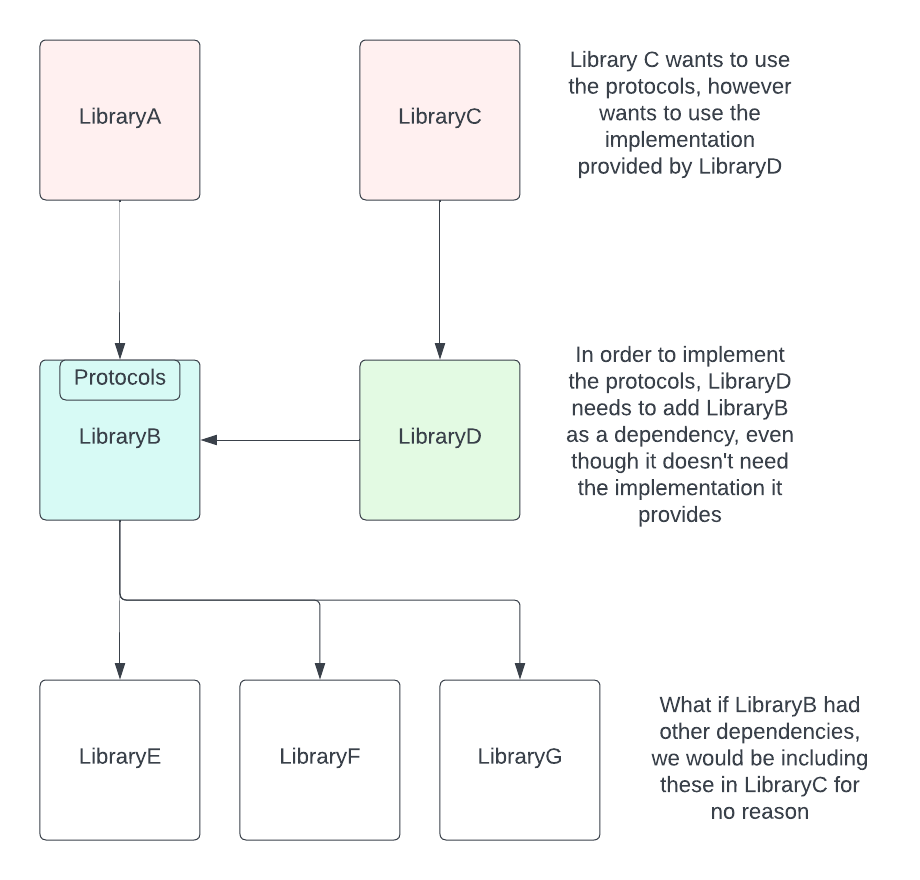
So now, our LibraryA has a dependency on LibraryB. LibraryA is using the protocols that are defined AND implemented in LibraryB! Problem solved… right… Not entirely.

If we review the problems we discussed earlier, if LibraryC wanted to make use of the protocols and implementation in LibraryB that is now possible as LibraryB has no knowledge of LibraryA or LibraryC. However this creates a new problem…

Problem 2

What if LibraryA and LibraryC want to use different implementations of the protocols from each other? What if we introduced LibraryD that wanted to implement the protocols and be used by another library such as LibraryC? In order to facilitate this we would need to create a dependency between LibraryD and LibraryB. What problems does this create?

We are introducing a dependency to a library we don’t need, in order to implement the protocols within it. In our example there isn’t much in LibraryB but imagine LibraryB had lots of other code and its own dependencies? Now we are including all of those in our project in order to have access to the protocols.

LibraryA to LibraryB Dependency Problems

Solution

This is where Dependency Inversion comes in. What we need to do is create a separate library for the protocols and any data that passes through them. Then, we make the dependencies between our different libraries to that one, thus removing the dependencies between our different layers. Let’s do that now.

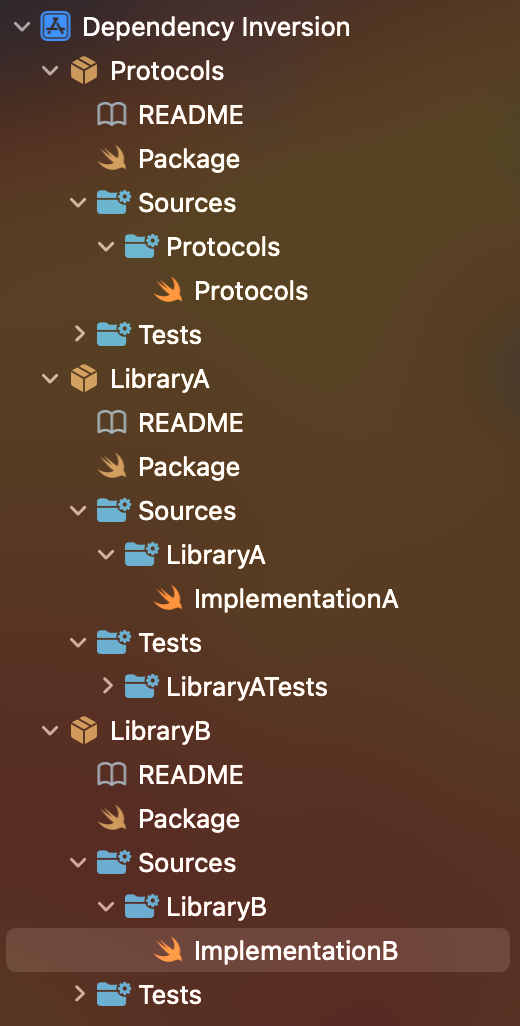
  • Create a new package and add it to your project, naming it Protocols. Now move the Protocols.swift file that we created earlier into the Protocols package. Your Xcode project file explorer should look like below:

Protocols in own package

  • Now lets edit the dependencies of our packages so that both LibraryA and LibraryB depend on protocols. Your package files for LibraryA and B should now look like the below:
import PackageDescription

let package = Package(
    name: "LibraryA",
    products: [
        // Products define the executables and libraries a package produces, and make them visible to other packages.
        .library(
            name: "LibraryA",
            targets: ["LibraryA"]),
    ],
    dependencies: [
        // Dependencies declare other packages that this package depends on.
        .package(path: "../Protocols")
    ],
    targets: [
        // Targets are the basic building blocks of a package. A target can define a module or a test suite.
        // Targets can depend on other targets in this package, and on products in packages this package depends on.
        .target(
            name: "LibraryA",
            dependencies: ["Protocols"]),
        .testTarget(
            name: "LibraryATests",
            dependencies: ["LibraryA"]),
    ]
)
import PackageDescription

let package = Package(
    name: "LibraryB",
    products: [
        // Products define the executables and libraries a package produces, and make them visible to other packages.
        .library(
            name: "LibraryB",
            targets: ["LibraryB"]),
    ],
    dependencies: [
        // Dependencies declare other packages that this package depends on.
        .package(path: "../Protocols")
    ],
    targets: [
        // Targets are the basic building blocks of a package. A target can define a module or a test suite.
        // Targets can depend on other targets in this package, and on products in packages this package depends on.
        .target(
            name: "LibraryB",
            dependencies: ["Protocols"]),
        .testTarget(
            name: "LibraryBTests",
            dependencies: ["LibraryB"]),
    ]
)
  • Now update the imports of your implementation files so that they import Protocols instead. Your implementation files should look like the below:
import Foundation
import Protocols

public class ImplementationA {
    private let something: MyProtocol
    
    public init(something: MyProtocol) {
        self.something = something
    }
}
import Foundation
import Protocols

public class ImplementationB: MyProtocol {
    public init() {}
    
    public func doSomething(data: MyData) {
        print("Do something")
    }
}

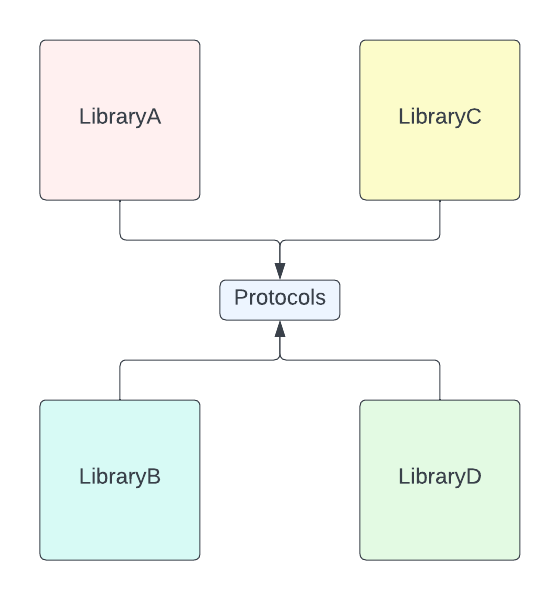
Let’s have a look at what we have done here. We have moved the dependencies between the layers into a separate package and are now pointing both sides at that rather than one way or the other. Let’s update our diagram to show how this helps us.

Dependency Inversion

Now if we want to use LibraryA, B, C, or D it does not matter in our dependency graph. They all point to the protocols and data and can be used interchangeably without the need to modify the libraries, so they depend on each other. We also avoid importing any unnecessary classes that we don’t need in order to satisfy the dependencies.

This is what dependency inversion is. It’s separating protocols and data dependencies from the dependencies themselves and putting them into their own package. This way you completely separate the layers from each other, and they can be used together without any knowledge of each other. Awesome!

SOLID Principles in Swift - Interface Segragation Principle

Background

In this series of posts we are going to be covering the SOLID principles of software development. These are a set of principles / guidelines, that when followed when developing a software system, make it more likely that the system will be easier to extend and maintain over time. Let’s take a look at the problems that they seek to solve:

  • Fragility: A change may break unexpected parts, it is very difficult to detect if you don’t have a good test coverage
  • Immobility: A component is difficult to reuse in another project or in multiple places of the same project because it has too many coupled dependencies
  • Rigidity: A change requires a lot of effort because it affects several parts of the project

So what are the SOLID principles?

  • Single Responsibility Principle - A class should have only a single responsibility / have only one reason to change
  • Open-Closed Principle - Software should be open for extension but closed for modification
  • Liskov Substitution Principle - Objects in a program should be replaceable with instances of their sub types without altering the correctness of the program
  • Interface Segregation Principle - Many client-specific interfaces are better than one general-purpose interface
  • Dependency Inversion Principle - High level modules should not depend on low level modules. Both should depend on abstractions

In this article we will focus on the Interface Segregation Principle.

What does it mean?

The summary of the principle is as follows:

Many client-specific interfaces are better than one general-purpose interface

In Swift, we use Protocols rather than interfaces in languages such as Java so from here on out we will refer to interfaces as Protocols.

Now the purpose of this rule is quite straight forward in comparison to some of the other rules in the SOLID principles. What it means is its better to create smaller Protocols than to create one large one with lots of methods defined.

What’s the problem

So why does having one large protocol cause a problem? Let’s examine one of the classic Cocoa Touch protocols to see why this is an issue.

public protocol UITableViewDataSource : NSObjectProtocol {

    // 1
    func tableView(_ tableView: UITableView, numberOfRowsInSection section: Int) -> Int
    func tableView(_ tableView: UITableView, cellForRowAt indexPath: IndexPath) -> UITableViewCell

    // 2
    optional func numberOfSections(in tableView: UITableView) -> Int
    optional func tableView(_ tableView: UITableView, titleForHeaderInSection section: Int) -> String? 
    optional func tableView(_ tableView: UITableView, titleForFooterInSection section: Int) -> String?
    optional func tableView(_ tableView: UITableView, canEditRowAt indexPath: IndexPath) -> Bool
    optional func tableView(_ tableView: UITableView, canMoveRowAt indexPath: IndexPath) -> Bool
    optional func sectionIndexTitles(for tableView: UITableView) -> [String]?
    optional func tableView(_ tableView: UITableView, sectionForSectionIndexTitle title: String, at index: Int) -> Int
    optional func tableView(_ tableView: UITableView, commit editingStyle: UITableViewCell.EditingStyle, forRowAt indexPath: IndexPath)
    optional func tableView(_ tableView: UITableView, moveRowAt sourceIndexPath: IndexPath, to destinationIndexPath: IndexPath)
}

I am sure many of you have implemented this protocol at some point in your past ;) I have modified the source slightly to make it easier to read and get the point across So why are we looking at this?

  1. Only 2 methods you have to implement on the first 2.
  2. The rest of the methods are optional and you can implement whichever ones you feel you want to use.

Now this protocol has its roots in Objective C helps it masks the problem somewhat. In Objective C as you can see in the code above its possible to mark certain functions as optional. This means you can implement them if you want to but don’t have to, this allows this protocol declaration to contain too many methods without causing problems for the implementing class.

In Swift, it is not possible to mark functions as optional, all functions need to be implemented. Let’s update the above protocol to be more Swifty and see what problems that might cause us.

protocol MyUITableViewDataSource {

    func tableView(_ tableView: UITableView, numberOfRowsInSection section: Int) -> Int
    func tableView(_ tableView: UITableView, cellForRowAt indexPath: IndexPath) -> UITableViewCell

    func numberOfSections(in tableView: UITableView) -> Int
    func tableView(_ tableView: UITableView, titleForHeaderInSection section: Int) -> String? 
    func tableView(_ tableView: UITableView, titleForFooterInSection section: Int) -> String?
    func tableView(_ tableView: UITableView, canEditRowAt indexPath: IndexPath) -> Bool
    func tableView(_ tableView: UITableView, canMoveRowAt indexPath: IndexPath) -> Bool
    func sectionIndexTitles(for tableView: UITableView) -> [String]?
    func tableView(_ tableView: UITableView, sectionForSectionIndexTitle title: String, at index: Int) -> Int
    func tableView(_ tableView: UITableView, commit editingStyle: UITableViewCell.EditingStyle, forRowAt indexPath: IndexPath)
    func tableView(_ tableView: UITableView, moveRowAt sourceIndexPath: IndexPath, to destinationIndexPath: IndexPath)
}

Now that we have converted our protocol to be more swifty, what problem will this cause when we attempt to make a class conform to this protocol? Let’s have a look at an example.

class MyTableViewDatasource: MyUITableViewDataSource {
    func tableView(_ tableView: UITableView, numberOfRowsInSection section: Int) -> Int {}
    func tableView(_ tableView: UITableView, cellForRowAt indexPath: IndexPath) -> UITableViewCell {}
    func numberOfSections(in tableView: UITableView) -> Int {}
    func tableView(_ tableView: UITableView, titleForHeaderInSection section: Int) -> String? {}
    func tableView(_ tableView: UITableView, titleForFooterInSection section: Int) -> String? {}
    func tableView(_ tableView: UITableView, canEditRowAt indexPath: IndexPath) -> Bool {}
    func tableView(_ tableView: UITableView, canMoveRowAt indexPath: IndexPath) -> Bool {}
    func sectionIndexTitles(for tableView: UITableView) -> [String]? {}
    func tableView(_ tableView: UITableView, sectionForSectionIndexTitle title: String, at index: Int) -> Int {}
    func tableView(_ tableView: UITableView, commit editingStyle: UITableViewCell.EditingStyle, forRowAt indexPath: IndexPath) {}
    func tableView(_ tableView: UITableView, moveRowAt sourceIndexPath: IndexPath, to destinationIndexPath: IndexPath) {}
}

Our class above now has to implement every single protocol method. Even if we don’t intend to use it. In the objective c implementation of the protocol we have the option of implementing only the ones we need whereas now we must implement every single method. Imagine all the view controllers in the world that would be full of empty methods in order to conform to this protocol!

This protocol breaks the interface segregation principle.

A better solution

To improve the solution we could break the one big interface down into smaller protocols. That way we could conform to only the protocols we were interested in implementing for our functionality. This may looks something like:

  1. UITableViewDataSource - For the 2 compulsory methods we are familier with
  2. UITableViewSectionsDatasource - For methods relating to multi section methods
  3. UITableViewSectionTitles - For methods relating to headers and footers in sections
  4. UITableViewEditable - For methods relating to editing and moving cells

This way we could conform to select methods we want, rather than one big interface where we may only want a small subset of the methods.

A good example

A good example of interface segregation in the iOS SDK is Codable. The definition of Codable is as below:

typealias Codable = Decodable & Encodable

Basically Codable is just the combination of 2 other protocols: Decodable and Encodable. This is a great example of how to do the interface segregation. If you are building say a JSON parse struct, you may wish to only conform to Decodable so you can decode the JSON. If in the future you wanted to serialize the struct for something like say data storage you can conform to Encoding later if needed.

Summary

The interface segregation principle is the easiest of the principles to understand in my opinion. In basic terms it means don’t create a big protocol with lots of methods that aren’t always required to be implemented depending on the implementation requirements.

Instead, separate the protocol into smaller protocols with only the methods required for a single piece of functionality to work. Not only does this avoids having lots of redundant methods it also helps to facilitate the single responsibility principle by allowing functionality to be broken down into different classes. For example, you could have different classes to handle different activities rather than one big class with all functionality in.

SOLID Principles in Swift - Liskov Substitution Principle

Background

In this series of posts we are going to be covering the SOLID principles of software development. These are a set of principles / guidelines, that when followed when developing a software system, make it more likely that the system will be easier to extend and maintain over time. Let’s take a look at the problems that they seek to solve:

  • Fragility: A change may break unexpected parts, it is very difficult to detect if you don’t have a good test coverage
  • Immobility: A component is difficult to reuse in another project or in multiple places of the same project because it has too many coupled dependencies
  • Rigidity: A change requires a lot of effort because it affects several parts of the project

So what are the SOLID principles?

  • Single Responsibility Principle - A class should have only a single responsibility / have only one reason to change
  • Open-Closed Principle - Software should be open for extension but closed for modification
  • Liskov Substitution Principle - Objects in a program should be replaceable with instances of their sub types without altering the correctness of the program
  • Interface Segregation Principle - Many client-specific interfaces are better than one general-purpose interface
  • Dependency Inversion Principle - High level modules should not depend on low level modules. Both should depend on abstractions

In this article we will focus on the Liskov Substitution Principle.

What does it mean?

So the Liskov Substitution Principle states:

Derived classes must be substitutable for their base classes

What exactly does this mean? In a basic sense it for example if you have a function that accepts a type of class which is a parent of other classes, any class that subclasses the parent class should be able to be passed in without it breaking the program.

See a summary of the main points of the principle below:

  1. Contra variance of method parameter types in the sub type.
  2. Covariance of method return types in the sub type.
  3. New exceptions cannot be thrown by the methods in the sub type, except if they are sub types of exceptions thrown by the methods of the super type.
  4. Don’t implement stricter validation rules on input parameters than those implemented by the parent class.
  5. Apply at the least the same rules to all output parameters as applied by the parent class.

Let’s take a look at what these different rules mean for subclasses.

The Parent Class

First of all, let’s define our parent class or base class that contains some functionality. Let’s use a vehicle class as an example, this vehicle has a throttle which can be set at any value between 0 and 100.

// 1
enum VehicleError: Error {
    case outOfBounds
}

// 2
class Vehicle {
    private var throttle: Int = 0
    
    // 3
    func setThrottle(throttle: Int) throws {
        guard (0...100).contains(throttle) else {
            throw VehicleError.outOfBounds
        }
        self.throttle = throttle
    }
}

Let’s step through it:

  1. First of all we define a custom error to throw if the throttle is not within bounds
  2. Here we define our vehicle class that has a throttle variable to store the value being set
  3. We have a function to set the throttle value, there is a guard statement to check whether the value being set is in the appropriate range. If it is not, we throw an error, if it is we set the value

Validation rules on input parameters

Now let’s create a subclass that breaks the principle. We will make a lorry class that inherits from the super class but adds its own restrictions to the throttle function, only allowing the throttle to be set between 0 and 60 for example.

class Lorry: Vehicle {
    override func setThrottle(throttle: Int) throws {
        guard (0...60).contains(throttle) else {
            throw VehicleError.outOfBounds
        }
        
        try super.setThrottle(throttle: throttle)
    }
}

So what is happening here? We have subclassed the Vehicle class and overriden the setThrottle method. Now what we have done here is we have added a guard statement to check if the throttle is between 0 and 60. We throw an error saying out of bounds if outside of that, if it is within bounds we call the super class method.

Why is this a problem? Well imagine we are building a system / class that interacts with the Vehicle class. Now based on the Vehicle class you would expect to be able to set the throttle to anything between 0 and a 100. However now, if someone chooses to pass a Lorry subclass to your system / class, you will not be able to set the throttle above 60. Depending on how this other class or system is built this may have unintended side effects as you can’t set the values that you are expecting without getting an error.

This example breaks the rule:

Don’t implement stricter validation rules on input parameters than those implemented by the parent class.

Errors in the liskov principle

Let’s modify our example to see how we could break the principle by throwing different errors. Let’s modify the Lorry subclass:

enum LorryError: Error {
	case outOfBounds
}

class Lorry: Vehicle {
    override func setThrottle(throttle: Int) throws {
        guard (0...60).contains(throttle) else {
            throw LorryError.outOfBounds
        }
        
        try super.setThrottle(throttle: throttle)
    }
}

So what is happening here:

  • We have added a new Error type called LorryError
  • When we have our bounds exception we are throwing this new error type instead of the one provided by the super class

Why does that cause a problem? To find out let’s take a look at the error handling code:

// 1
let vehicle: Vehicle = Vehicle()

do {
	// 2
    try vehicle.setThrottle(throttle: 110)
} catch VehicleError.outOfBounds {
	// 3
    print("System shutdown")
} catch {
	// 4
    print("Show generic error")
}

Let’s step through this code:

  1. We are creating a Vehicle super class object.
  2. We are calling our function with a value considered out of bounds
  3. We catch the outOfBounds exception and print a system shutdown message
  4. We have a generic catch for other errors where we show a generic error message

Now if we run this code we see the below message in the console as expected:

System shutdown

So what happens if we replace our Lorry subclass with its new error and put it in place of the Vehicle super class? If we change line one to read:

let vehicle: Vehicle = Lorry()

If we run the code above we will now see a different error:

Show generic error

The error handling code is not aware of subclass specific errors so is no longer able to handle them accordingly. Imagine a mission critical system that needs to shut down if an out of bounds happens, in this case the error would be missed as it would require the error handling class to have knowledge of all possible sub types in order to handle all the errors appropriate. Defeating the point of using the super class and thus breaking the principle:

New exceptions cannot be thrown by the methods in the sub type, except if they are sub types of exceptions thrown by the methods of the super type.

Contra variance and Covariance of parameters and return types

In the list of rules you may recall seeing two items talking about contra variance and covariance of parameters and return types. What does that mean exactly?

  1. Contra variance of method parameter types in the sub type.
  2. Covariance of method return types in the sub type.

Contra variance of method parameter types in the sub type

Contra variance means that we can use change the type of method parameter to a super class of the type but not a subclass. This rules works basically in combination with the rule below:

Don’t implement stricter validation rules on input parameters than those implemented by the parent class.

What it means is, we can use a super class of a parameter, thus ‘weakening’ the restrictions of the method, but not a subclass of that type which would tighten the restrictions of the method.

Covariance of method return types in the sub type

Covariance means that the type being used can be a sub type of the class provided by the super class function return type. Similarly, this works in the same way as the 5th rule:

Apply at the least the same rules to all output parameters as applied by the parent class.

Now both of these rules aren’t possible to be broken as part of Swift. It’s not possible to overload functions providing alternative type specifications, at least while still referring to the super class type. We can override methods and provide different parameter types and return types but this requires the calling class to know the type of the subclass. When referring to the super class, the super class implementation is always called regardless of subclass functions with different params.

SOLID Principles in Swift - Open / Closed Principle

Background

In this series of posts we are going to be covering the SOLID principles of software development. These are a set of principles / guidelines, that when followed when developing a software system, make it more likely that the system will be easier to extend and maintain over time. Let’s take a look at the problems that they seek to solve:

  • Fragility: A change may break unexpected parts, it is very difficult to detect if you don’t have a good test coverage
  • Immobility: A component is difficult to reuse in another project or in multiple places of the same project because it has too many coupled dependencies
  • Rigidity: A change requires a lot of effort because it affects several parts of the project

So what are the SOLID principles?

  • Single Responsibility Principle - A class should have only a single responsibility / have only one reason to change
  • Open-Closed Principle - Software should be open for extension but closed for modification
  • Liskov Substitution Principle - Objects in a program should be replaceable with instances of their sub types without altering the correctness of the program
  • Interface Segregation Principle - Many client-specific interfaces are better than one general-purpose interface
  • Dependency Inversion Principle - High level modules should not depend on low level modules. Both should depend on abstractions

In this article we will focus on the Open-Closed Principle.

What does it mean?

So the open-closed principle states:

Software should be open for extension but closed for modification

What exactly does this mean? I think out of all the principles this is the hardest to understand. Mostly due to the fact the explanation leaves far too much open to interpretation. A simple Google search will offer up several examples of how this principle works. In this article I will present my take on the principle and how to build software that will comply with it.

Let’s focus on a type that by design, violates the open closed principle.

Enums

Enums are a very powerful tool in Swift. They are first class types and such can have associated values and conform to protocols for example. However when used at the boundary of a particular system or module they can present a particular problem.

Let’s imagine an analytics system where we can log events. This is a design pattern I’ve seen in many places:

// 1
enum AnalyticsEvent {
    case newsList
    case newsDetail(id: Int)
}

// 2
class AnalyticsController {
    func sendEvent(_ event: AnalyticsEvent) {
        let title = event.title
        let params = event.params
        
        // Send data to analytics network
    }
}

// 3
extension AnalyticsEvent {
    var title: String {
        switch self {
        case .newsList:
            return "News List"
        case .newsDetail:
            return "News detail"
        }
    }
    
    var params: [String : String] {
        switch self {
        case .newsList:
            return [:]
        case .newsDetail(let id):
            return ["id": "\(id)"]
        }
    }
}

Let’s look at what we have here.

  1. The first thing that is defined is an enum that houses all the different analytics events that are available. Some with associated values.
  2. Next we have our analytics controller, this takes an event as a parameter, takes information from the event and would then send that on to our analytics system.
  3. Here we have extended the AnalyticsEvent enum to add 2 variables, one for title and one for params that contain a switch for each of our events.

On the surface or at first look this might appear an ok solution. We have hidden our implementation of the analytics network inside our AnalyticsController and setup a defined set of events that we can support.

The Problem

Now lets look at the problems that this approach causes.

  • What happens if we need to add new events to our analytics system?
  • What if our analytics system was part of a separate package or module?
  • What happens when we have a lot of events?

So first of all, every time we need to add / update or remove any of the events in our analytics system we need to modify the enum. We can’t just implement new events and have them be compatible with the system. Also if the number of events becomes very large then the code will grow large in size. Making it hard to read, maintain and a bit of a mess. Also the enum now has multiple responsibilities, as it covers many events breaking the single responsibility principle.

The second issue which is probably the more important one, is let’s say we are breaking our app down in to separate packages. This Analytics Controller and Event would be in a separate package, what if we wanted to re-use it across different projects? Both of these scenarios become very difficult because we are using an enum that would need to be updated to accommodate events for different apps. The package would need constantly updating as new events were added.

The Solution

So we have identified some issues with the above implementation, how can we change it to make solve these issues we have identified? Look at the new example:

// 1
struct NewsListEvent: AnalyticsEvent {
    var title: String {
        return "News List"
    }
    
    var params: [String : String] {
        return [:]
    }
}

struct NewsDetailEvent: AnalyticsEvent {
    let id: Int
    
    var title: String {
        return "News detail"
    }
    
    var params: [String : String] {
        return ["id": "\(id)"]
    }
}

// 2
protocol AnalyticsEvent {
    var title: String { get }
    var params: [String: String] { get }
}

class AnalyticsController {
    func sendEvent(_ event: AnalyticsEvent) {
        let title = event.title
        let params = event.params
        
        // Send data to analytics network
    }
}

Let’s look at how we have changed the example:

  1. First of all we have now removed the enum. Using an enum as a huge list of possible options is considered a code smell. Especially when it involves something that may change often. If you have a finite number of states that is unlikely to change, that is more suited to an enum than a list of analytics events. We have refactored those enum cases into 2 separate classes now.

  2. We have switched the enum for a protocol that exposes the necessary items required by our analytics controller (we could have potentially done this in the previous example however we would still have the enum).

So what advantages does this have over the previous implementation?

  • With the events now being in separate classes we are now following the single responsibility principle, each event has its own class that can be updated whenever they need to be.
  • Now that we are using a protocol and not an enum, we are now able to add new events to our app without ever having to touch the analytics system. Simply create a new class and make it conform to AnalyticsEvent, and we can use it with the analytics controller.
  • Further to that we could have our analytics system in a separate reusable package, then our client apps could define their own set of events to use with the system.

Our analytics code is now open for extension, but does not need to be modified to support new events. Unlike our enum example.

SOLID Principles in Swift - Single Responsibility Principle

Background

In this series of posts we are going to be covering the SOLID principles of software development. These are a set of principles / guidelines, that when followed when developing a software system, make it more likely that the system will be easier to extend and maintain over time. Let’s take a look at the problems that they seek to solve:

  • Fragility: A change may break unexpected parts, it is very difficult to detect if you don’t have a good test coverage
  • Immobility: A component is difficult to reuse in another project or in multiple places of the same project because it has too many coupled dependencies
  • Rigidity: A change requires a lot of effort because it affects several parts of the project

So what are the SOLID principles?

  • Single Responsibility Principle - A class should have only a single responsibility / have only one reason to change
  • Open-Closed Principle - Software should be open for extension but closed for modification
  • Liskov Substitution Principle - Objects in a program should be replaceable with instances of their sub types without altering the correctness of the program
  • Interface Segregation Principle - Many client-specific interfaces are better than one general-purpose interface
  • Dependency Inversion Principle - High level modules should not depend on low level modules. Both should depend on abstractions

In this article we will focus on the Single Responsibility Principle.

Problem

The first principle in the list is the Single Responsibility Principle. This principle is defined as follows:

A class should have only one reason to change

This means a class should be responsible for only one task, not multiple. Let’s take a look at an example and how we can refactor it using the principle.

struct SomeNews: Codable {
    let id: Int
    let title: String
}

class NewsDatasource {
    func getNews(completion: @escaping ([SomeNews]) -> Void) {
        // 1. Create request
        let url = URL(string: "SomeNews/URL")!
        let request = URLRequest(url: url)
        
        // 2. Fetching data
        let dataTask = URLSession.shared.dataTask(with: request) { (data, response, error) in
            
            // 3. Parsing data
            guard let data = data,
                  let news = try? JSONDecoder().decode([SomeNews].self, from: data) else {
                completion([])
                return
            }
            
            completion(news)
        }
        
        dataTask.resume()
    }
}

This looks like a fairly simple news datasource / service that is fetching some news items from the web. However if we take a closer look we will see it’s responsible for more than one task.

  1. Creating the URLRequest that is used to fetch the news articles
  2. Fetching the data using a URLSession
  3. Parsing the data

Already that is 3 different responsibilities this class has. They may seem fairly straight forward in this example but imagine how this could get out of hand quickly in a larger codebase. Let’s cover some of the scenarios.

  • Is this example the news request is simple. However what if the request was more complex, what if we needed to add headers etc to that request? All that code would be in this class.
  • What if we wanted to change the request used to fetch the news? We would have to make a code change here. Or what if we could fetch news from more than one API? How would we do that in the current structure?
  • Once the request has been made we are using a JSONDecoder to decode the response. What if the response comes back in a different format? What if we wanted to use a different decodable for the response?
  • What if the news request can be used in multiple places?

As we can see from the above list, there are several scenarios that would require a code change of this class. If we recall what the single responsibility stands for:

A class should have only one reason to change

There is also a side effect of this which isn’t as obvious, that is testability. Let’s look at some examples:

  • How would we test changes the URLRequest? If did indeed change the URLRequest or it was being generated differently, how would we test that?
  • How do we test how our class handles responses from the server? What happens if we get an error for example?
  • How do we test our decoding code? How can we be sure that it is going to handle incorrect data correctly? How does our news datasource handle decoding errors?

If we look at the code in the example we can see that in would be impossible to write unit tests covering any of the above scenarios. Let’s have a look at how we can break this class down into single components, allowing us to make changes only in one place and at the same time improving testability.

Breaking it down

URL Builder

Let’s start by breaking this class down into separate classes, each with one responsibility. First of all let’s take out the building of the URLRequest and put it in another class.

class NewsURLBuilder {
    private let hostName: String
    
    init(hostName: String) {
        self.hostName = hostName
    }
    
    func getNews() -> URLRequest {
        let url = URL(string: "\(hostName)SomeNews/URL")!
        let request = URLRequest(url: url)

        return request
    }
}

Great, now we have a class that’s only responsibility is to build and return a URLRequest. In a more complex system this class might need ids, user tokens etc in order to configure the request. In the scenario where we need to change how news is retrieved we only need to modify this one class in order to make that change. We can also change the hostname based on the environment such as dev, test and prod.

The other benefit of doing this is we can now write unit tests to make sure that the URLRequest is being built correctly. Let’s do a small example now:

class URLBuilderTests: XCTestCase {

    func testURLBuilder() throws {
        let builder = NewsURLBuilder(hostName: "http://mytest.com/")
        let request = builder.getNews()
        
        XCTAssertEqual(request.url?.absoluteString, "http://mytest.com/SomeNews/URL", "Request URL string is incorrect")
    }

}

Our URL builder isn’t particularly complex so doesn’t need many tests. But at least here with it being in a separate component we can test the construction and make sure it’s being created correctly. We could expand this test to test other elements of the request if needed, or if we needed different parameters to build the request.

Parser

Next lets take the parser and put that into it’s own class.

class NewsParser {
    private let decoder: JSONDecoder
    
    init(decoder: JSONDecoder) {
        self.decoder = decoder
    }
    
    func parse(data: Data) -> [SomeNews] {
        return (try? decoder.decode([SomeNews].self, from: data)) ?? []
    }
}

Here we can see we have taken our decoding code and put it into a separate class. This class has one reason to change, it only needs to be changed if the parsing needs to be changed! Also like our URL builder class we can now test the decoding to make sure we get the results we are expecting:

class NewsParserTests: XCTestCase {

    func testCorrectData() throws {
        let correctJSON = """
        [
          {
            "id": 1,
            "title": "Test Article 1"
          },
          {
            "id": 2,
            "title": "Test Article 2"
          }
        ]
        """
        
        let data = correctJSON.data(using: .utf8)!
        
        let parser = NewsParser(decoder: JSONDecoder())
        let news = parser.parse(data: data)
        XCTAssertFalse(news.isEmpty)
        XCTAssertEqual(news[0].id, 1)
        XCTAssertEqual(news[0].title, "Test Article 1")
    }

    
    func testInCorrectData() throws {
        let incorrectJSON = """
        [
          {
            "id": 1,
            "title": "Test Article 1"
          },
          {
            "id": 2,
        ]
        """
        
        let data = incorrectJSON.data(using: .utf8)!
        
        let parser = NewsParser(decoder: JSONDecoder())
        let news = parser.parse(data: data)
        XCTAssertTrue(news.isEmpty)
    }
}

So what have we done here. We have created a couple of unit tests for our parser.

  • The first one supplies the parser with some correct JSON data and checks that the news objects we receive are correct and have the right data.
  • The second test sends some incorrect data to the parser and tests that we receive an empty array as expected

I’m aware that we aren’t handling errors in this example, this has been done to try and keep things as simple as possible

Putting it all together

Now that we have separated out these components into separate pieces, lets see how our datasource looks now.

class NewsDatasource {
    private let requestBuilder: NewsURLBuilder
    private let parser: NewsParser
    
    init(requestBuilder: NewsURLBuilder, parser: NewsParser) {
        self.requestBuilder = requestBuilder
        self.parser = parser
    }
    
    func getNews(completion: @escaping ([SomeNews]) -> Void) {
        // 1. Create request
        let request = requestBuilder.getNews()
        
        // 2. Fetching data
        let dataTask = URLSession.shared.dataTask(with: request) { [weak self] (data, response, error) in
            
            // 3. Parsing data
            guard let self = self,
                let data = data else {
                completion([])
                return
            }
            
            completion(self.parser.parse(data: data))
        }
        
        dataTask.resume()
    }
}

Now if we look here we can see that we have swapped out the code for building the request and parsing the data for our separate classes. Now our example is following the single responsibility principle. We have 3 components now:

  1. A component to build our request
  2. A component to execute the request
  3. A component to parse the data we get back from the request

So what have we gained:

  • We now have test coverage of our components (we could update the NewsDatasource to have tests too but that is a bit more advanced and out of scope of this article)
  • We have the ability to re-use these components in other parts of the app or in other apps if we need to
  • If we need to make changes, each component is only responsibility for one thing, so we can update and test each change in turn. Rather than making multiple changes in one place and not be able to test them!

Feel free to download the sample and play around with the tests yourself!

Programmatic routing in SwiftUI

Background

As I’m sure any iOS developer now knows, the future of iOS app development is SwiftUI. Apple’s new UI development language is now on its 2nd major release. While my own personal feeling is that the framework is not quite ready for prime time (much like when Swift first arrived. It’s missing some fairly key features) and we are perhaps a version or 2 away from it realistically being an option for being used to build a complete app. There is no denying that it is the future and when it works well, it makes building UI a lot easier.

If you are using an advanced iOS architecture VIPER, MVVM etc it is probably the case that you have abstracted your routing or creating of your view controllers away into a separate part of your architecture. When you need to navigate or deal with a deeplink for example, you will hopefully have something like a dependency injection framework or factory to create your view controller. This is than pushed onto the navigation stack or presented by the view controller depending on what you are trying to do.

This is something that is fairly straight forward in UIKit and makes a lot of sense. In this article we are going to discuss the workings of SwiftUI and how that approach is no longer possible.

Example

// 1
struct ContentView: View {
    var body: some View {
        NavigationView(content: {
            NavigationLink(destination: DetailView()) {
                Text("Navigate")
            }
        })
        
    } 
}

// 2
struct DetailView: View {
    var body: some View {
        Text("Detail View")
    }
}

This is a fairly simple SwiftUI example but let’s talk through it.

  1. First we have a ContentView, this contains a NavigationView which is kind of similar to a UINavigationController in UIKit, however it is a lot more limited. We have a navigation link that allows the user to tap the text view and will ‘push’ the detail view on to the stack.
  2. Second we have our detail view that simply displays some text.

If we run the code and tap on the links we should get something like this:

SwiftUI Navigation

Seems to work as intended right? What problems are there with this approach?

  1. There is a tight coupling between the ContentView and the DetailView, what if we want to change the navigation destination?
  2. What if we want to use the ContentView in a different app that doesn’t contain a DetailView but something else?
  3. What if the DetailView has dependencies we need to inject when it’s created? How does the ContentView know what to do in order to create the DetailView?
  4. What if we wish to perform an event such as fire an analytics event before moving to the next view?
  5. What if we wish to present the view in a modal rather than pushing it to the navigation stack?

Many of the more advanced architectures and frameworks have already solved these problems using a router / co-ordinator pattern. These are responsible for handling any navigation logic and often talk to a dependency injection module in order to create the destination view and pushing it onto the navigation stack or presenting it.

Decoupling the Views

The first thing we can try to do is abstract away the creation of the detail view. This will at least give us the opportunity to change the destination without the knowledge of the ContentView.

// 1
final class ContentPresenter: ObservableObject {
    func getDetailView() -> AnyView {
        return AnyView(DetailView())
    }
}

// 2
struct ContentView: View {
    @ObservedObject private var presenter: ContentPresenter
    
    init(presenter: ContentPresenter) {
        self.presenter = presenter
    }
    
    var body: some View {
        NavigationView(content: {
            NavigationLink(destination: presenter.getDetailView()) {
                Text("Navigate")
            }
        })
        
    }
}

struct DetailView: View {
    var body: some View {
        Text("Detail View")
    }
}

So let’s have a look at what we are doing here:

  1. First of all we have tried to separate out the creation of the destination view into another object. Ideally we could put this into a protocol but for the purpose of simplicity we have just used an object.
  2. We are injecting the presenter into the ContentView now, you will also notice in the NavigationLink we are now calling a method on the presenter to get the destination.

What does this give us that the previous example doesn’t?

  1. There is no longer tight coupling between the ContentView and the DetailView. The destination is no longer hardcoded. If we make the presenter using a protocol for example. We can inject different presenters and have different destinations.
  2. If the detailview has its own dependencies that need injecting then the presenter can take care of that as well without having to code them in here.

However it’s not all tea and biscuits! There are still a number of issues highlighted earlier that this solution doesn’t solve:

  1. We are still not able to trigger any analytics events or any other app behaviours off the back of the navigation trigger. Block the user from navigating until they have logged in for example.
  2. We can’t change or configure how the navigation happens, for example presenting a login vs actually performing navigation.
  3. We are also exposing navigation to the view, a presenter typically would not need to expose navigation functionality to the view. It would handle a tap event and then hand off that navigation logic to the router. Here we have to expose that functionality to the view itself.

Keep with UIKit for navigation, for now

My personal feeling is that navigation in SwiftUI could do with some more work. Views themselves should not know or care about where they are navigating to and how. They should be a visual representation of state. Of course, the navigation could be a presentation of state too, however a quick peak at the NavigationView docs shows no access to any form of state at all. The navigation view polices its own state, nothing outside of the object has a way to modify that state.

Further to that, many of the methods we have come to expect from UINavigationController are simply not available here. Whether it’s lack of maturity or a slightly confused approach I don’t know. My recommendation for now would be to make use of UINavigationControllers and the UIHostingController to perform navigation for the time being, at least until a better way to manage and manipulate the navigation state is added to SwiftUI.

Let’s have a quick look at how that changes things. First we need to create a hosting controller and inject our SwiftUI view:

let presenter = ContentPresenter()
let vc = UIHostingController(rootView: ContentView(presenter: presenter))
let navigationController = UINavigationController(rootViewController: vc)
presenter.navigationController = navigationController

So here we are creating our presenter and our view as before but adding them into a UIHostingViewController and a navigation controller. The UIHostingViewController allows us to put SwiftUI views into what is essentially a UIViewController and use it within a UIKit app.

We have also passed a reference to the navigation controller to the presenter. Let’s have a look at our updated SwiftUI code now that we have refactored it into a UIHostingController.

// 1
final class ContentPresenter: ObservableObject {
    weak var navigationController: UINavigationController?
    
    func buttonTapped() {
        // Do whatever we like
        // ...
        // Navigate
        let vc = UIHostingController(rootView: DetailView())
        navigationController?.pushViewController(vc, animated: true)
    }
}

// 2
struct ContentView: View {
    @ObservedObject private var presenter: ContentPresenter
    
    init(presenter: ContentPresenter) {
        self.presenter = presenter
    }
    
    var body: some View {
        Button(action: { presenter.buttonTapped() }) {
            Text("Navigate")
        }
    }
}

What’s changed here:

  1. First of all our presenter has replaced our getDetailView with a more generic button tapped function. This function can do any number of things we need it to do, before finally navigating. Here you can see we are using our reference to the navigation controller to push the new view controller.
  2. In our SwiftUI view you will see we no longer have a NavigationView or a NavigationLink. Our view has become far more generic and doesn’t contain and navigation specific logic. You will also see that we have a button which has a tap action assigned by the presenter. This allows us to make the button do anything, not just trigger navigation.

Hopefully you found this helpful when exploring navigation options in SwiftUI. You can find the SwiftUI Sample and the UIHostingController samples on github.

Using protocols, ObservableObject and @Published property wrappers in SwiftUI

Background

As I’m sure any iOS developer now knows, the future of iOS app development is SwiftUI. Apple’s new UI development language is now on it’s 2nd major release. While my own personal feeling is that the framework is not quite ready for prime time (much like when Swift first arrived. It’s missing some fairly key features) and we are perhaps a version or 2 away from it realistically being an option for being used to build a complete app. There is no denying that it is the future and when it works well, it makes building UI a lot easier.

As SwiftUI is the future, I’ve been investigating how teams might migrate their existing architectures across to the new technology. There a number of challenges presented by migrating to SwiftUI we will discuss below. As the title suggests we will be exploring how to use a presenter to control a SwiftUI view. It doesn’t matter which architecture you are using as such, whether it’s VIPER, MVVVM, VIP, MVP etc. As long as the logic and state of the view has been abstracted away from the view itself so it can be properly unit tested.

Example

List Item View

Let’s start by creating an example in SwiftUI. We will create a simple list view to display some news for example. Let’s create a simple list view first of all:

// 1
struct ListItemViewModel: Identifiable {
    let id: Int
    let title: String
    let subTitle: String?
    let image: String
}

// 2
struct ListItemView: View {
    let viewModel: ListItemViewModel
    
    var body: some View {
        HStack() {
            Image(viewModel.image)
            VStack(alignment: .leading) {
                Text(viewModel.title)
                    .font(.headline)
                viewModel.subTitle.map({
                    Text($0)
                        .font(.subheadline)
                })
            }
        }
    }
}

// 3
struct ListItemView_Previews: PreviewProvider {
    static var previews: some View {
        ListItemView(
            viewModel: ListItemViewModel(
                id: 1,
                title: "Test Title",
                subTitle: "Test Subtitle",
                image: "first"
            )
        )
    }
}

This is quite a straight forward view, but let’s step through it.

  1. First of all we define our model for the view. We have an id so that we can conform to Identifiable. This allows SwiftUI to uniquely identify each model in the view and helps with performing things like animation and reordering. We also have a title, optional subTitle and an image string. Hopefully nothing here is too scary.
  2. Now we define the view inself. Views in SwiftUI are simple structs that conform to the View protocol, rather than subclasses of UIView like they used to be in UIKit. Its a simple Hstack with an image view then 2 labels stacked on top of each other. See the screen grab below.
  3. Finally we have the preview code to inject an example model to use in the preview.

SwiftUI ListItemView

List View

Now that we have the items in our list, lets create a simple list view that displays those items.

// 1
struct ContentView: View {
    let listItems: [ListItemViewModel]
 
    var body: some View {
        List(listItems) { item in
            ListItemView(viewModel: item)
        }
    }
}

// 2
struct ContentView_Previews: PreviewProvider {
    static var previews: some View {
        let items = [ListItemViewModel(id: 1, title: "test", subTitle: "test sub", image: "first"),
                    ListItemViewModel(id: 2, title: "test2", subTitle: "test sub1", image: "first"),
                    ListItemViewModel(id: 3, title: "test3", subTitle: "test sub2", image: "first"),
                    ListItemViewModel(id: 4, title: "test4", subTitle: "test sub3", image: "first"),
                    ListItemViewModel(id: 5, title: "test5", subTitle: "test sub4", image: "first")]
        
        ContentView(listItems: items)
    }
}

Ok so what do we have here:

  1. A simple ContentView who has an array of list item view models and a body. The body lists out the content of our list using the ListItemView we created earlier. Simple
  2. Here we have some test data to show that our list is working. If we preview this view we will see something like this:

SwiftUI ListView

That’s wonderful, however it is not particularly dynamic. This is where a presenter or view model would come in. If we look at the description of MVP or MVVM we will see they have a similar role:

The presenter acts upon the model and the view. It retrieves data from repositories (the model), and formats it for display in the view.

There are further abstractions layers (such as interactors and use cases). However we are less concerned with them in this discussion and more on the relationship between the view and the presenter who is holding the state and logic of the view.

Abstracting the state

So at the moment we have a pretty stateless SwiftUI view that simply displays a hardcoded list. Now let’s attempt to abstract the list items away into another object that is injected into the view. This object would be responsible for fetching our items and loading them for the view.

This is where an ObservableObject comes in.

When your type conforms to ObservableObject, you are creating a new source of truth and teaching SwiftUI how to react to changes. In other words, you are defining the data that a view needs to render its UI and perform its logic. SwiftUI uses this dependency to automatically keep your view consistent and show the correct representation of your data. We like to think of ObservableObject as your data dependency surface. This is the part of your model that exposes data to your view, but it’s not necessarily the full model.

So lets update our example to move our list of items into a separate class that conforms to this protocol.

final class ListPresenter: ObservableObject {
    @Published var listItems: [ListItemViewModel] = []
}


struct ContentView: View {
    @ObservedObject private var presenter: ListPresenter
    
    init(presenter: ListPresenter) {
        self.presenter = presenter
    }
 
    var body: some View {
        List(presenter.listItems) { item in
            ListItemView(viewModel: item)
        }
    }
}

The @Published property wrapper here works with the ObservableObject to notify SwiftUI whenever the value changes in order to trigger an update.

We also see the @ObservedObject property wrapper. This causes this view to subscribe to the ObservableObject that’s assigned to it, and invalidates the view any time the object updates.

This is great and allows us to inject an object from outside of the view who can manage the fetching and supplying to the view, whenever the listItems var updates, the view will automatically update!

De-coupling dependencies

Now there is one problem here, can you see it? This view has a dependency between the view itself and the presenter class. Now if you are following the SOLID principles for example, and like to separate dependencies between your classes and layers we will need to remove the dependency between the view and presenter.

To do this lets change the ListPresenter class to be a protocol instead:

final class ListPresenterImp: ListPresenter {
    @Published var listItems: [ListItemViewModel] = []
}

protocol ListPresenter: ObservableObject {
    @Published var listItems: [ListItemViewModel] { get }
}

struct ContentView: View {
    @ObservedObject private var presenter: ListPresenter
    
    init(presenter: ListPresenter) {
        self.presenter = presenter
    }
 
    var body: some View {
        List(presenter.listItems) { item in
            ListItemView(viewModel: item)
        }
    }
}

This looks like it should be a straight forward change… Wrong! You will now start seeing errors galore. The primary cause coming from the decleration of our new protocol:

Property ‘listItems’ declared inside a protocol cannot have a wrapper

The problem here being exactly as the error states. We cannot use property wrappers inside protocols! That is going to cause a bit of a problem as we now can’t make use of the nice integration with SwiftUI via @Published properties, or so it seems…

Let’s take a step back for a moment, what exactly does the @Published property wrapper actually do? The @Published property wrapper essentially provides a publisher that the SwiftUI system can subscribe to in order to listen to updates to the value. This is in fact an implementation detail. One of the key points of protocol oriented programming is to abstract the implementation of functions are variables away from the dependency so that it is unaware of the inner workings. By trying to apply a property wrapper to the protocol we are trying to enforce how that variable should implemented under the hood. When infact should the implementing class of our protocol wish to, they could create their own custom implementation of the wrapper.

Fixing the errors

Ok so let’s start by removing the @Published property wrapper from our protocol:

final class ListPresenterImp: ListPresenter {
    @Published var listItems: [ListItemViewModel] = []
}

protocol ListPresenter: ObservableObject {
    var listItems: [ListItemViewModel] { get }
}

struct ContentView: View {
    @ObservedObject private var presenter: ListPresenter
    
    init(presenter: ListPresenter) {
        self.presenter = presenter
    }
 
    var body: some View {
        List(presenter.listItems) { item in
            ListItemView(viewModel: item)
        }
    }
}

Great! However there are now a bunch of different errors occuring… The key one that we need to pay attention to is this one:

Protocol ‘ListPresenter’ can only be used as a generic constraint because it has Self or associated type requirements

Right, so we have solved the riddle of @Published but this has now surfaced another problem. In order for our ListPresenter protocol to be compatible with the ObervedObject property wrapper in the view, it must extend ObservableObject. Now the problem here is that the ObservableObject uses an associatedtype. Which means if we wish to use it or hold a reference to it we must do type erasure (for more info read my previous post on type erasure) or use a generic constraint.

The simplest solution is for us to use a generic constraint on the view. View the code below:

final class ListPresenterImp: ListPresenter {
    @Published var listItems: [ListItemViewModel] = []
}

protocol ListPresenter: ObservableObject {
    var listItems: [ListItemViewModel] { get }
}

struct ContentView<T>: View where T: ListPresenter {
    @ObservedObject private var presenter: T
    
    init(presenter: T) {
        self.presenter = presenter
    }
 
    var body: some View {
        List(presenter.listItems) { item in
            ListItemView(viewModel: item)
        }
    }
}

So what has changed here. You will now notice that we have added a generic type T to our view. We have also added a generic constraint when implementing the View protocol which signals that the init and body implementations here are only when type T is a ListPresenter. Now in this instance that works fine as we only intend to use this view with our ListPresenter class. This removes the errors and the code now compiles. Let’s update the code and run a little test to make sure we are still getting all the reactive goodness of SwiftUI.

final class ListPresenterImp: ListPresenter {
    @Published var listItems: [ListItemViewModel] = []
    
    init() {
        Timer.scheduledTimer(withTimeInterval: 5.0, repeats: false) { (timer) in
            let items = [ListItemViewModel(id: 1, title: "test", subTitle: "test sub", image: "first"),
                        ListItemViewModel(id: 2, title: "test2", subTitle: "test sub1", image: "first")]
            
            self.listItems = items
        }
    }
}

protocol ListPresenter: ObservableObject {
    var listItems: [ListItemViewModel] { get }
}

struct ContentView<T>: View where T: ListPresenter {
    @ObservedObject private var presenter: T
    
    init(presenter: T) {
        self.presenter = presenter
    }
 
    var body: some View {
        List(presenter.listItems) { item in
            ListItemView(viewModel: item)
        }
    }
}

We have updated our list presenter implementation class to update our list items after 5 seconds. Nice and easy. If we initialise our view with a presenter with 5 items as below, then after 5 seconds our list should reduce to the 2 items as set in the timer.

let items = [ListItemViewModel(id: 1, title: "test", subTitle: "test sub", image: "first"),
                    ListItemViewModel(id: 2, title: "test2", subTitle: "test sub1", image: "first"),
                    ListItemViewModel(id: 3, title: "test3", subTitle: "test sub2", image: "first"),
                    ListItemViewModel(id: 4, title: "test4", subTitle: "test sub3", image: "first"),
                    ListItemViewModel(id: 5, title: "test5", subTitle: "test sub4", image: "first")]
        
let presenter = ListPresenterImp()
presenter.listItems = items
let contentView = ContentView(presenter: presenter)

Now let’s run this as part of an app and see what happens:

Presenter Demo

So as you can see, after 5 seconds the list of items is reduced after 5 seconds to 2 items, proving that our implementation works and we are still able to hook into the nice secret sauce that combine and swiftUI expose to us to allow us to update our views. I’ve seen some rather crazy implementations and workarounds on Stack Overflow. Hopefully this implementation is a little nicer!

Download the sample project to run it for yourself (Xcode 12.4)